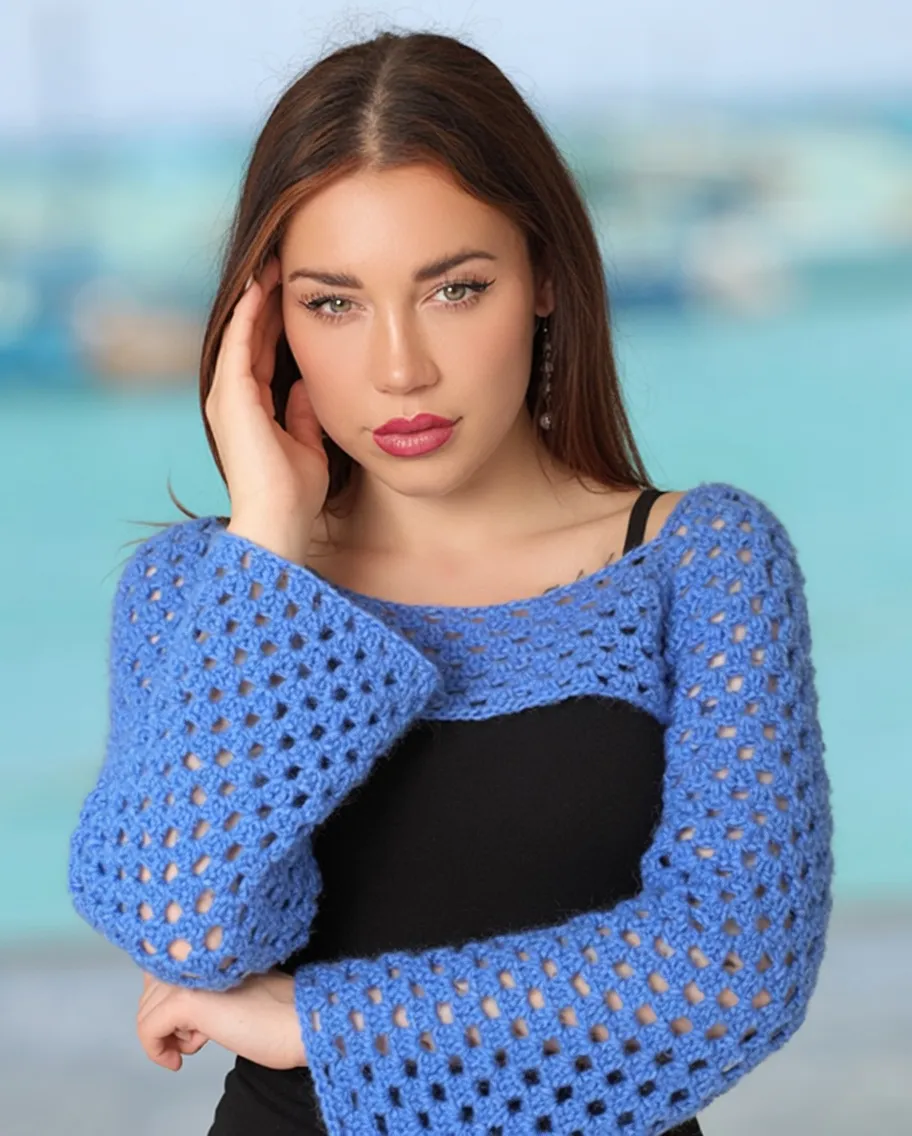
Looking for your next favorite layering piece? This Faerie Granny Shrug is the perfect blend of cozy comfort and whimsical style. Whether you are heading to a festival, lounging at home, or just need something light for a breezy evening, this bolero has you covered.
This pattern is fantastic for confident beginners who are comfortable working in the round and familiar with basic stitches. If you love easy wearable crochet projects, you might also enjoy this Easy Summer Scallop Crochet Tank Top or this Everyday Crochet Sweater Vest Pattern.
Materials Needed
- Worsted/Aran weight (4) Yarn – I used several different types of yarn that include Arcane Fibre Works (worsted weight), DROPS Air, Yarn Bee Ethereal Eyelash, Yarn Bee Chloe, Yarn Bee Fireside, (Just a heads up that most of the Yarn Bee yarn linked seems to be sold out, but you still may be able to find them instore at a Hobby Lobby near you)
- Yarn amount needed approximately*: 300grams for XS/S, 350grams for M, 400grams for L/XL, 450grams for 2XL, 500 grams for 3XL/4XL, 550grams for 5XL (*all of the types of yarn I used varied slightly between each other, but these amounts are based on a standard worsted weight yarn)
- 6.00mm Crochet Hook – Clover Hooks are the BEST
- Scissors – these are cute and sharp!
- Darning Needle – my FAVES 💕
- Stitch Markers – I don’t personally use these in this pattern, but if you have a hard time knowing where you started, these are my favorite!
Abbreviations Used
- Ch = Chain
- St(s) = Stitch(es)
- Sl St = Slip Stitch
- Dc = Double Crochet
- Sc = Single Crochet
- Sk 2 ch = Skip two chains
- Dc Cluster = Work 3 Double Crochet into the same chain/chain 1 space
- Dc Cluster Corner (Increase) = Work a double crochet cluster, chain 2 and another double crochet cluster into the same corner chain 2 space
- Ch space = Chain Space
- Rnd(s) = Round(s)
Gauge
4″x4″ square = 4 dc cluster stitches wide x 4 dc cluster rows tall Measurements taken while garment was laid flat.
Pattern Notes
*This pattern uses USA crochet terminology.
*Turning Ch 2 DOES count as a double crochet stitch in this pattern.
*When working double crochet cluster, you work in chain spaces and not in the stitches (unless otherwise directed to).
Pattern Instructions
Faerie Grannie Shrug
Ch 72 (the size of this chain is wide, though it might not look like it at first, it should fit most every size, as long as your gauge is correct).
Rnd 1: Sl st into the first ch of your chain (make sure it isn’t twisted). You will now be working in the rnd.
Ch 2 (this will count as your first stitch of the rnd), work 2 more dc into the same ch you sl stitched into (the ch 2 along with the 2 dc counts as your first dc cluster), ch 2 and work 1 dc cluster into the same ch space (this is your 1st dc cluster corner), *ch 1, sk 2 ch and work 1 dc cluster into the next ch, *repeat 3 more times,
ch 1, sk 2 ch and work 1 dc cluster, ch 2 and 1 more dc cluster into the same ch space (this is your 2nd dc cluster corner), *ch 1, sk 2 ch and work 1 dc cluster into the next ch, *repeat 5 more times,
ch 1, sk 2 ch and work 1 dc cluster, ch 2 and 1 more dc cluster into the same ch space (this is your 3rd dc cluster corner), *ch 1, sk 2 ch and work 1 dc cluster into the next ch, *repeat 3 more times,
ch 1, sk 2 ch and work 1 dc cluster, ch 2 and 1 more dc cluster into the same ch space (this is your 4th dc cluster corner), *ch 1, sk 2 ch and work 1 dc cluster into the next ch, *repeat 5 more times,
sl st into the first st (the ch 2 from the beginning) of the rnd.
Rnd 2: Turn your work and ch 2. work 2 more dc into the same ch space, work 1 dc cluster into every ch space until you come to a corner ch space, *work 1 dc cluster corner into the corner ch space, work 1 dc cluster into every ch space until you come to a corner ch space, *repeat until the end of the rnd.
Sl st into the first st of the rnd.
Rnd 3-as many rnds as you need for your size: Repeat round 2 by working 1 dc cluster into every ch 1 space and 1 dc cluster corner (increase) into every corner ch 2 space. Work as many rnds as you need for when you try on this top and the corners can reach and comfortably connect underneath your armpits
I worked a total of 6 rnds and I am typically a size XS-S.
Again, work as many rnds as you need for the corners to reach comfortably under your arms.
Once you have as many rnds as you need we will move onto the rnd where we connect the corners under the arms.
Rnd 7 (or whatever rnd you are currently on): Turn your work and ch 2. *Work 1 dc cluster into each ch space until you reach a corner ch space, work 2 dc into that ch space, work HALF of a dc (yarn over, insert your hook, pick up a loop, yarn over, pull through 2 loops, STOP), yarn over, insert your hook into the next corner ch space (skipping over all of the dc clusters in between), pick up a loop, yarn over pull through 2, yarn over and pull through the last 3 loops on your hook, work 2 more dc into that same ch space (you now have connected you corners together and should have your first armhole), *repeat this 1 more time, work 1 dc cluster into each ch space until the end of the rnd.
Sl st into the first st of the rnd.
Fasten off (or work more rnds if you are wanting your body piece to be longer).
Sleeves
Rnd 1: Attach your yarn on either armhole and in any ch 1 space of that armhole and ch 2, work 2 more dc into that same ch space, *ch 1 and work 1 dc cluster into the next ch space, *repeat until you reach the end of the rnd.
Sl st into the first st of the rnd
Rnd 2: Turn your work and ch 2, work 2 more dc into that same ch space, *ch 1 and work 1 dc cluster into the next ch space, *repeat until you reach the end of the rnd.
Sl st into the first st of the rnd.
Rnd 3-32 (or more/less, depending on how long/short you want your sleeves): Repeat rnd 2 until you have as many rnds as you would like for your sleeve. I worked a total of 32 rnds
Fasten off.
Repeat process for second sleeve.
Assembly
Weave in all your ends and…
YOU’RE DONE!

Tips
Because this shrug is designed to be custom-fitted, the most important tip is to try it on as you work! Once you reach the body section, keep crocheting until those granny square corners reach comfortably underneath your armpits before joining. For more great garment fitting tips, check out this Easy Off-the-Shoulder Crochet Crop Top pattern.
FAQ
Does this pattern require strict gauge checking? Yes! Because the starting chain is meant to fit almost every size, hitting the correct gauge is the key to making sure your shrug actually fits your frame properly.
Can I use a different yarn weight? You can, but it will completely change your gauge and the amount of yarn you need. If you choose to use a different weight, make a gauge swatch first and adjust your starting chain width accordingly.
Conclusion
Congratulations on creating your beautiful Faerie Granny Shrug! This custom-fit, boho-inspired layering piece is sure to become a staple in your wardrobe. Share your finished shrug in the comments below!