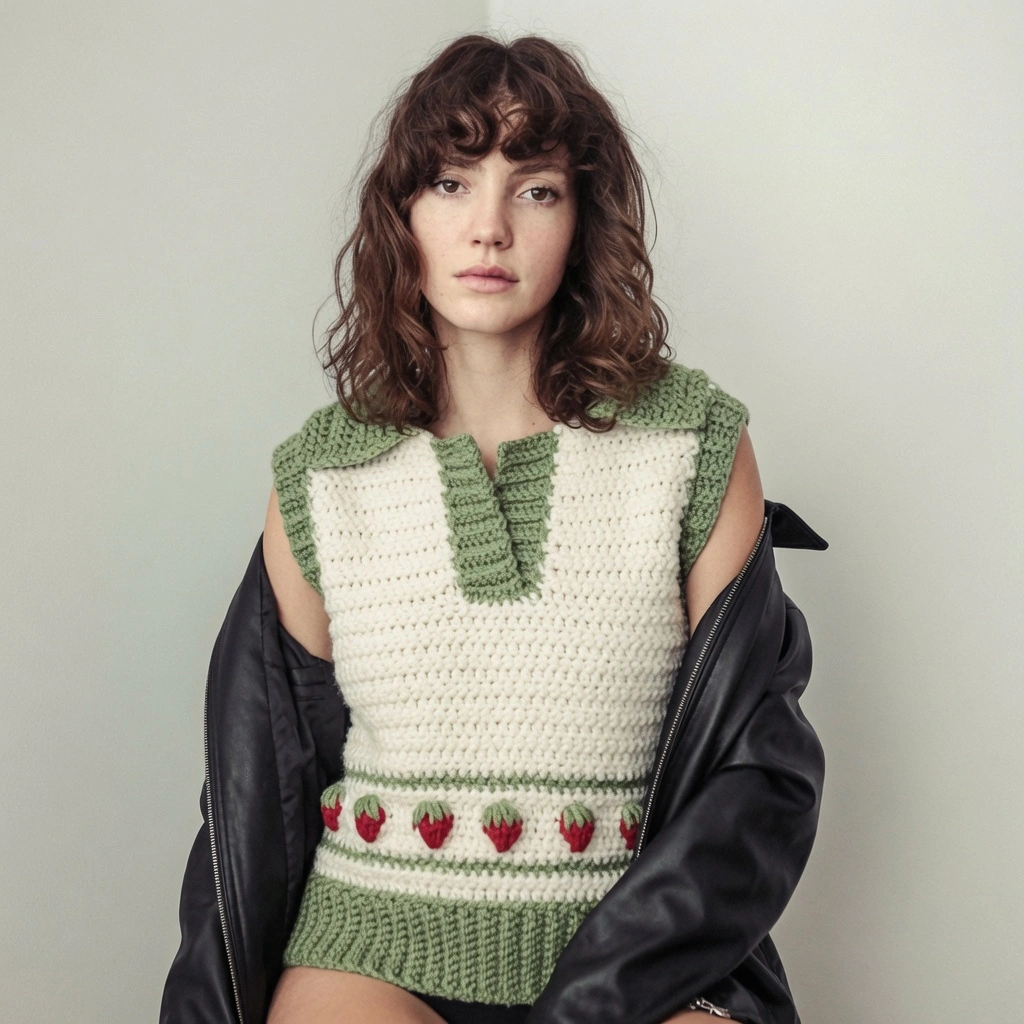
Layering season is officially here, and there is no better way to transition your wardrobe than with a handmade Everyday Crochet Sweater Vest! Featuring a charming strawberry stitch detail and a comfy ribbed fit, this sleeveless top is perfect for throwing over your favorite long-sleeve shirts. It is an approachable project for an adventurous beginner looking to expand their garment-making skills.
If you are looking to build a complete handmade outfit, why not pair this vest with some cozy bottoms? You can check out these Crochet Granny Square Shorts or these Stylish Crochet Granny Square Pants to match! Alternatively, if you want to brush up on your skills first, our Classic Granny Square Pattern Guide is a great place to start.
Materials Needed
- Worsted/Medium (4) Yarn
- 4.5mm Crochet Hook
- Scissors
- Darning Needle
- Stitch Markers (Optional, but helpful for beginners to track rows)
- Number of skeins:
- Color A: 1 light sage yarn (1 for sizes S, M, L, 2 for sizes XL and 2XL)
- Color B: 1 ivory yarn (1 for size S, 2 for sizes M and L, 3 for sizes XL and 2XL)
- Color C: 1 red yarn (for all sizes)
- Gauge: 4” square = 14 stitches wide x 14 rows tall (in half double crochet)
Abbreviations Used
- Ch = Chain
- St(s) = Stitch(es)
- Sc = Single Crochet
- Hdc = Half Double Crochet
- Dc = Double Crochet
- Sc blo = Single crochet in the BACK LOOP ONLY
- Hdc blo = Half double crochet in BACK LOOP ONLY
- Rep = Repeat
- Strawberry Stitch = See video for stitch located under rows 5-6
Pattern Instructions
This pattern uses USA crochet terminology.
This pattern follows size S, but has sizes S-2XL. Turning ch 1 does NOT count as a stitch in this pattern. Number of stitches indicated between <> (e.g. <59 for S, 63 for M, 67 for L, 71 for XL, 75 for 2XL>). This vest is worked from the bottom up.
Front Panel
Bottom Ribbing
Foundation: With color A, Ch 11
Row 1: Sc in the second ch from the hook, sc in each chain space until the end of the chain. Ch 1, turn your work. <10>
Row 2: Sc blo in each st until the end of the row. Ch 1, turn your work. <10>
Row 3-59 (63, 67, 71, 75): Sc blo in each st until the end of the row. Ch 1, turn your work. <10>
Now, turn your work so you will be working on the top of your ribbing horizontally.
Row 1: Hdc in each ribbed row (You should have as many sts as you do rows at the end). Ch 1, turn your work. <59, 63, 67, 71, 75>
Row 2-3: With color B, hdc in each st until the end of the row. Ch 1, turn your work. <59, 63, 67, 71, 75>
Row 4: With color A, hdc in each st until the end of the row. Ch 1, turn your work. <59, 63, 67, 71, 75>
Row 5-6: With color B, hdc in each st until the end of the row. Ch 1, turn your work. <59, 63, 67, 71, 75>
Row 7: Hdc in first 5 (7 M, 3 L, 5 XL, 7 2XL) sts, before finishing 5th hdc pull through color C, with color C work part of strawberry st, *pull through color B to finish last dc of strawberry st, hdc 5, before finishing 5th hdc pull through color C, with color C work part of strawberry st *rep until you have 5 (7 M, 3 L, 5 XL, 7 2XL) sts remaining, hdc in remaining 5 (7 M, 3 L, 5 XL, 7 2XL) sts. Ch 1, turn your work. <NOT counting the extra 4 sts in each strawberry st 59, 63, 67, 71, 75>
Row 8: Hdc in first 5 (7 M, 3 L, 5 XL, 7 2XL) sts,before finishing 5th hdc pull through color A, with color A hdc5tog to finish strawberry st, *pull through all the loops from the hdc5tog with color B, hdc 5, before finishing 5th hdc pull through color with color A, with color A hdc5tog to finish strawberry st, *rep until you have 5 (7 M, 3 L, 5 XL, 7 2XL) sts remaining, hdc in remaining 5 (7 M, 3 L, 5 XL, 7 2XL) sts. Push strawberry sts toward you to make them pop. Ch 1, turn your work. <59, 63, 67, 71, 75>
If you don’t like this strawberry stitch, these steps can be simply skipped and replaced with just 2 regular hdc rows!
Row 9: Hdc in each st until the end of the row. Ch 1, turn your work. <59, 63, 67, 71, 75>
Row 10: With color A, hdc in each st until the end of the row. Ch 1, turn your work. <59, 63, 67, 71, 75>
Row 11: With color B, hdc in each st until the end of the row. Ch 1, turn your work. <59, 63, 67, 71, 75>
Row 12-22 <24 M and L, 26 XL and 2XL>: Hdc in each st until the end of the row. Ch 1, turn your work. <59, 63, 67, 71, 75>
Fasten off at the end of row 22 (24 M and L, 26 XL and 2XL)
Row 23 <25 M and L, 27 XL and 2XL>: Count 12 (13 M, 14 L, 15 XL, 16 2XL) sts in and attach color B yarn to work, ch 1 and hdc in next 37 (39 M, 39 L, 43 XL, 45 2XL) sts. Ch 1, turn your work. <37, 39, 41, 43, 45>
Right side of panel
Row 24 <26 M and L, 28 XL and 2XL: Hdc in next 15 (16 M, 17 L, 18 XL, 19 2XL) sts. Ch 1, turn your work. <15, 16, 17, 18, 19>
Row 25-38 <27-40 M and L, 29-42 XL and 2XL>: Hdc in each st until the end of the row. Ch 1, turn your work. <15, 16, 17, 18, 19>
Fasten off at the end of row 38 (40 M and L, 42 XL and 2XL)
Right Strap
Row 39 <41 M and L, 43 XL and L>: Count 6 sts, attach color B yarn, ch 1, hdc in next 10 (11 M, 12 L, 13 XL, 14 2XL) sts. Ch 1, turn your work. <10, 11, 12, 13, 14>
Row 40 <42 M and L, 44 XL and 2XL>: Hdc in next 8 (9 M, 10 L, 11 XL, 12 2XL) sts, sk st, hdc in last st. Ch 1, turn your work. <9, 10, 11, 12, 13>
Row 41 <43 M and L, 44 XL and 2XL>: Sk first st, hdc in next 8 ( 9 M, 10 L, 11 XL, 12 2XL) sts. Ch 1, turn your work. <8, 9, 10, 11, 12>
Row 42 <44 M and L, 45 XL and 2XL>: Hdc in next 6 (7 M, 8 L, 9 XL, 10 2XL) sts, sk st, hdc in last st. Ch 1, turn your work. <7, 8, 9, 10, 11>
Row 43 <45 M and L, 47 XL and 2XL>: Sk st, hdc in next 6 (7 M, 8 L, 9 XL, 10 2XL) sts. Ch 1, turn your work. <6, 7, 8, 9, 10>
Row 44 <46 M and L, 48 XL and 2XL>: Hdc in next 4 (5 M, 6 L, 7 XL, 8 2XL) sts, sk st, hdc in last st. <5, 6, 7, 8, 9>
Fasten off.
Left side of panel
Row 23 <25 M and L, 27 XL and 2XL>: Count 8 sts over from right side of panel (8 sts for ALL sizes) attach color B yarn, ch 1, hdc in remaining 15 (16 M, 17 L, 18 XL, 19 2XL) sts. Ch 1, turn your work. <15, 16, 17, 18, 19>
Row 24 <26 M and L, 28 XL and 2XL>: Hdc in each st until the end of the row. Ch 1, turn your work. <15, 16, 17, 18, 19>
Row 25-38 <27-40 M and L, 29-42 XL and 2XL>: Hdc in each st until the end of the row. Ch 1, turn your work. <15, 16, 17, 18, 19>
Left Strap
Row 39 <41 M and L, 43 XL and 2XL>: Hdc in next 10 (11 M, 12 L, 13 XL, 14 2XL) sts. Ch 1, turn your work. <10 , 11 , 12, 13, 14>
Row 40 <42 M and L, 44 XL and 2XL>: Sk st, hdc in next 9 (10 M, 11 L, 12 XL, 13 2XL) sts. Ch 1, turn your work. <9, 10, 11, 12, 13>
Row 41 <43 M and L, 45 XL and 2XL>: Hdc in next 7 (8 M, 9 L, 10 XL, 11 2XL) sk st, hdc in last st. Ch 1, turn your work. <8, 9, 10, 11, 12>
Row 42 <44 M and L, 46 XL and 2XL>: Sk st, hdc in next 7 (8 M, 9 L, 10 XL, 11 2XL) sts. Ch 1, turn your work. <7, 8, 9, 10, 11>
Row 43 <45 M and L, 47 XL and 2XL>: Hdc in next 5 (6 M, 7 L, 8 XL, 9 2XL) sts, sk st, hdc in last st. Ch 1, turn your work. <6, 7, 8, 9, 10>
Row 44 <46 M and L, 48 XL and 2XL>: Sk st, hdc in next 5 (6 M, 7 L, 8 XL, 9 2XL> sts. <5, 6, 7, 8, 9>
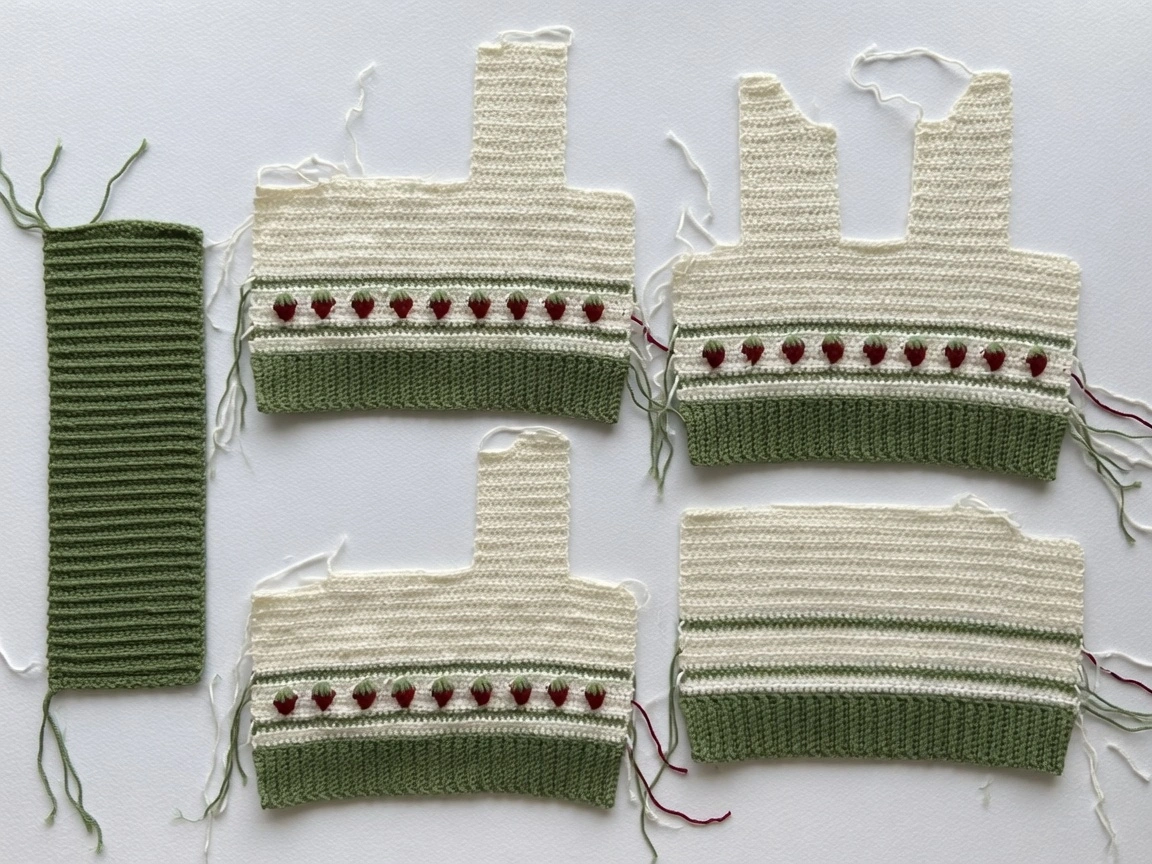
Fasten off.
Back Panel
Repeat front panel pattern up to row 23 (25 M and L, 27 XL and 2XL)
Row 24 <26 M and L, 28 XL and 2XL>: Hdc in each st until the end of the row. Ch 1, turn your work. <37, 39, 41, 43, 45>
Row 25-43 <27-45 M and L, 29-47 XL and 2XL>: Hdc in each st until the end of the row. Ch 1, turn your work. <37, 38, 41, 43, 45>
Row 44 <45 M and L, 47 XL and 2XL>: Hdc in first 5 (6 M, 7 L, 8 XL, 9 2XL) sts, fasten off, count over to the last 5 (6 M, 7 L, 8 XL, 9 2XL) sts, attach yarn, ch 1, hdc in last 5 sts.
Fasten off.
Assembly
Sew both panels together INSIDE OUT. After you’re done sewing the panels together, turn your vest OUTSIDE IN to continue with pattern.
This part is optional, but I like to do a single crochet border/edging around the neck hole and armholes because I feel like it gives it a slightly cleaner look, but it is not necessary. There is no exact number to single crochet around, just do it for your personal size, just make sure that both arm holes have the same number of single crochet so neither arm will be tighter or looser than the other.
BUT if you want to, simply..
- Sc around v-neck/neck opening and around arm holes
V-Neck Ribbing
In my Youtube video for this pattern, I show you how to crochet your ribbing straight to your top but you don’t have to do it that way, you can just crochet 7 sts wide x however many long you need for your length for the v-neck size. Ribbing widths apply to all sizes.
Row 1: With color A, ch 8, sc in the second ch from the hook, sc in remaining 6 ch. Ch 1, turn your work. <7>
Row 2-the length you need for your size: sc blo in each st until the end of the row. Ch 1, turn your work. <7>
Fasten off.
Repeat for other side of the v-neck.
Sew ribbed piece to v-neck.
Collar
The collar is the only ribbing in this pattern that will be done in hdc instead of sc, like the rest of the ribbing used in this pattern. Similar as for the v-neck ribbing, it will be 15 sts wide x however long you need/want your collar to be.
Row 1: With color A, ch 16, hdc in the second ch from the hook, hdc in the remaining 14 ch. Ch 1 and turn your work. <15>
Row 2-length you need for your size: Hdc blo in each st until the end of the row. Ch 1 and turn your work. <15>
Fasten off.
Sew ribbed piece to collar area.
Armholes
Again, similar to the v-neck ribbing and collar ribbing, it will be 4 sts wide x the length you need for your armholes. Make sure both armhole ribbing is the same length!
Row 1: With color A, ch 5, sc in the second ch from the hook, sc in remaining 3 ch. Ch 1 and turn your work. <4>
Row 2-length you need for your size: Sc blo in each st until the end of the row. Ch 1 and turn your work. <4>
Fasten off.
Repeat for other armhole.
Sew the very bottom of your v-neck ribbing to the vest.
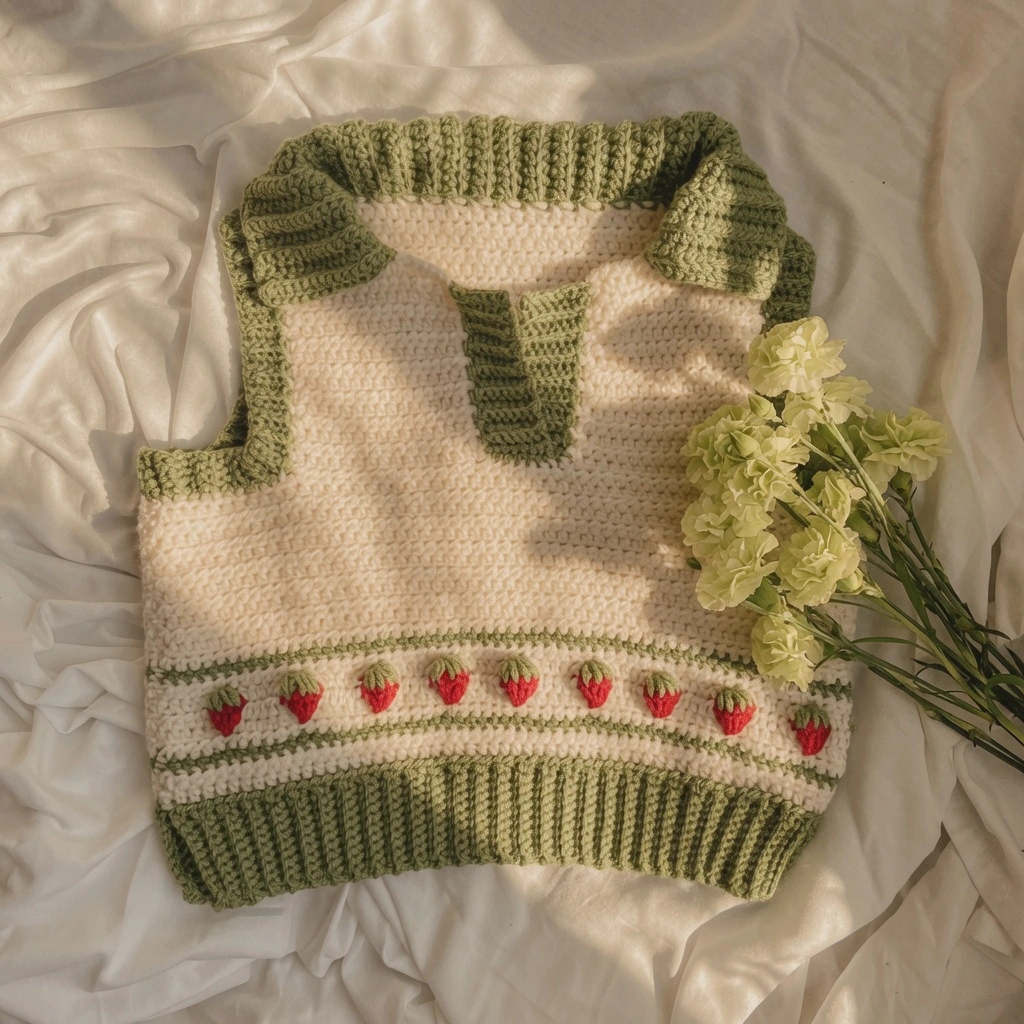
Weave in your ends and you’re done!
Tips for Success
- Perfecting the Strawberry Stitch: When working the strawberry stitch, make sure to push the stitches toward you so they “pop” out nicely on the right side of the fabric. If you find the color changes too tricky, you can easily substitute Rows 7 and 8 with standard half double crochet rows!
- Consistent Armholes: When adding your single crochet edging around the armholes, take the time to count your stitches. Ensuring both sides have the exact same number of single crochets will prevent one armhole from being tighter than the other.
- Custom Ribbing Lengths: Because bodies are unique, the ribbing lengths for the V-neck, collar, and armholes are left up to you. Pin your ribbing in place and try the vest on before sewing it down to guarantee a comfortable fit.
FAQ
Can I skip the strawberry stitch detail? Yes! The pattern notes explicitly state that if you don’t care for the strawberry stitch, you can simply skip those steps and replace them with two regular half double crochet rows.
Is this pattern hard for a beginner? It is an excellent project for an adventurous beginner. As long as you are comfortable with single crochet, half double crochet, and working in the back loop only, you will be able to create this vest. Using stitch markers to track your rows can make the process much easier!
Conclusion
Congratulations on creating your Everyday Crochet Sweater Vest! This charming, strawberry-detailed piece makes a perfect layering garment for transitioning between seasons. Share your gorgeous handmade vest in the comments below!