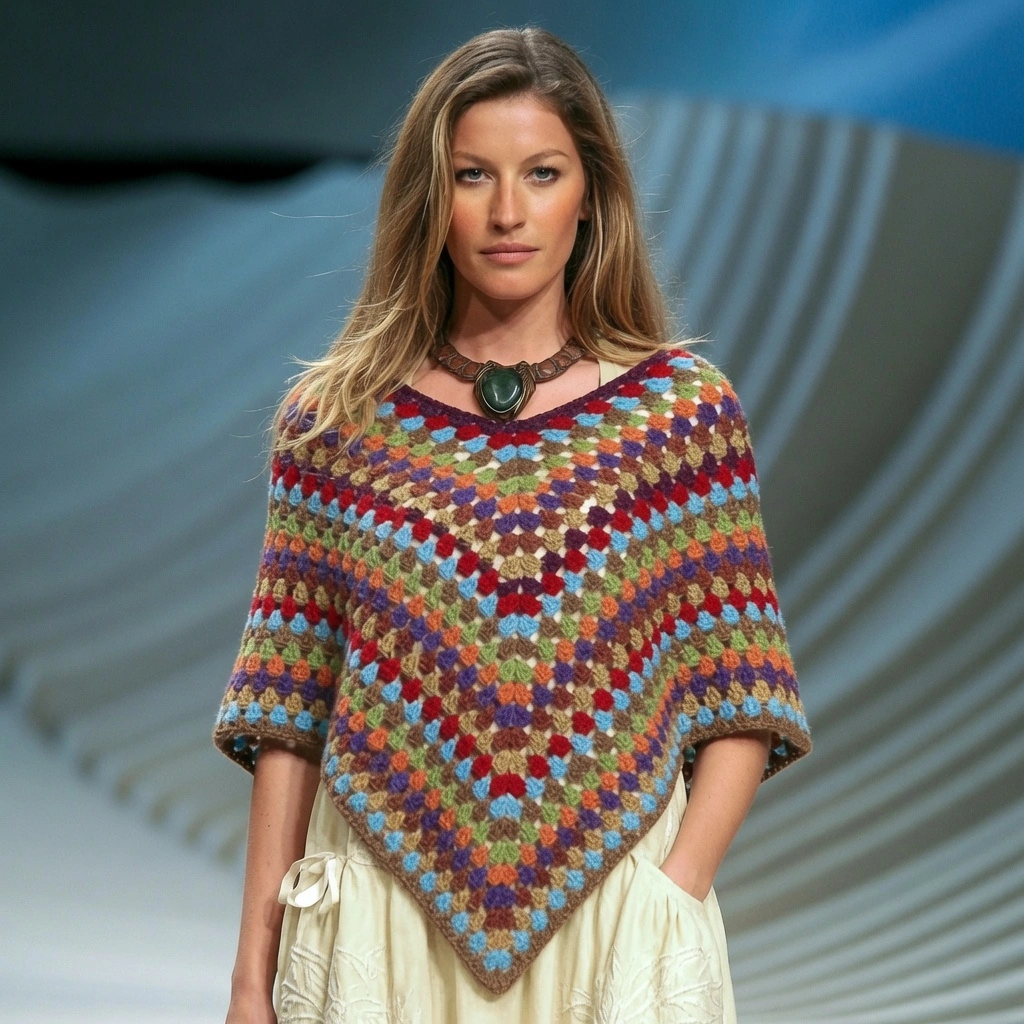
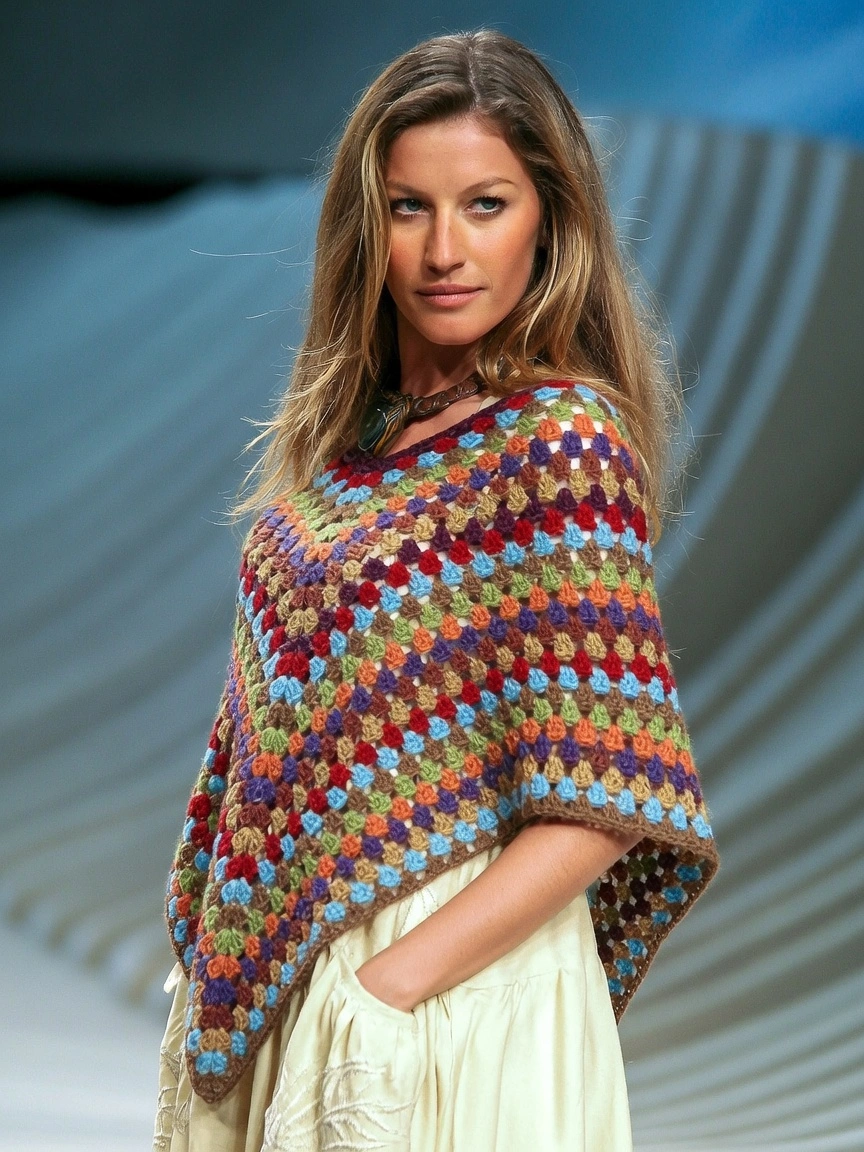
When the weather starts to cool down, there is nothing quite like throwing on a cozy, handmade poncho. The Winifred Poncho is a beautiful, easy-to-make crochet granny stripe poncho that brings both comfort and style to your everyday wardrobe. Using a classic granny stripe technique, this pattern works up beautifully in one solid color or a stunning array of scrap yarns.
This is a fantastic, approachable project for an adventurous beginner looking to step into garment-making. Since it is a one-size-fits-most design, you don’t have to stress about complicated shaping. If you are looking to build a full handmade wardrobe, this poncho looks fabulous layered over our Easy Summer Scallop Crochet Tank Top or paired with an Everyday Crochet Sweater Vest. You can even throw it on over an Easy Off-The-Shoulder Crochet Crop Top for a chic, boho look!
Materials Needed
- Medium Weight (4) yarn (See original pattern notes for multi-color vs. solid color yardage)
- 6.00mm Crochet Hook
- Scissors (nice and SHARP)
- Darning Needle (bent tip makes seaming and weaving in ends so much easier)
- Stitch markers (they stay in place so you don’t have to worry about them falling out)
Abbreviations Used
- St(s) = Stitch(es)
- Ch = Chain
- Sl st = Slip Stitch
- Dc = Double Crochet
- Dc Cluster = Double Crochet Cluster (3 dc worked into the same ch/ch space)
- Dc Cluster Corner/Inc = Double Crochet Corner/Increase (dc cluster, ch 3, dc cluster ALL worked into the same ch/ch space)
- Rnd = Round
- Rep = Repeat
Pattern Instructions
This pattern uses USA crochet terminology.
Ch 3 ALWAYS counts as a stitch in this pattern.
ALWAYS Ch 1 before moving onto the next dc cluster/ch space.
Through the remainder of this pattern, you will be work in ch spaces and not in sts. (exception for the slip stitch worked to join your round together).
Gauge and Measurements
- Gauge: 4” x 4” square = 4 dc clusters wide by 6 dc cluster rows tall. Gauge made with using the granny stripe stitch.
- Measurements: The poncho measures approx. 25 inches long from the neckline to the bottom point of the garment. But you can work as many rows as you’d like!
- Sizing: This is a OSFM (one size fits most) pattern. (I think it would most realistically best fit sizes XS-2XL. I’m a size S/M)
The Winifred Poncho Pattern
Ch 64 (it might not look like it at first, it should fit most every size, as long as your gauge is correct).
Rnd 1: Sl st into the first ch of your chain (make sure it isn’t twisted). You will now be working in the round.
Ch 3 (the ch 3 at the beginning of every round will ALWAYS count as the first st of the rnd throughout this pattern. And is always the first “dc” of your first dc cluster of the round).
work a dc cluster corner/inc into the first ch, *ch 1 (ALWAYS ch 1 before moving onto the next cluster), *sk 3 ch, work a dc cluster in the next ch, *rep 2 more times. Ch 1, Sk 3 ch,
*work a dc cluster corner into the next ch, ch 1, sk 3 ch, work a dc cluster in the next, ch 1, sk 3 ch, work a dc cluster in the next, ch 1, sk 3 ch, work a dc cluster in the next ch 1, sk 3 ch, *rep until the end of your ch and you have 4 dc cluster corners/increases and 12 standalone dc clusters. Sl st into the first st of the round.
(ROUND 2 IF YOU’RE NOT CHANGING COLORS)
Rnd 2: Turn your work. Ch 3, dc 2, ch 1 (this is your first dc cluster of the round.)
Make sure after every complete dc cluster/dc cluster corner, you ALWAYS ch 1 before moving onto the next ch space.
You will now be working in ch spaces and not in the chain itself. There are “edge” ch spaces (“edge” ch spaces are ch 1 spaces) and “corner” ch spaces (“corner ch spaces are ch 3 spaces).
You will only work 1 dc cluster into every “edge” ch space you come across and will be working a dc cluster corner/inc into every “corner” ch space you come across (ALWAYS ch 1 before moving onto the next ch space)
Continue working in every ch space until the end of the round. Sl st into the first st of the round.
(ROUND 2 IF YOU ARE CHANGING COLORS)
Fasten off your yarn and grab your next color. Rnd 2: Turn your work. Insert your hook into the closest corner where you previously sl st into to join the rnd and pull through your new yarn color.
Ch 3, work 2 dc in ch space, ch 3 and work 1 dc cluster into same ch space, ch 1 (this is your first dc cluster corner/inc of the rnd).
You will now be working in ch spaces and not in the chain itself. There are “edge” ch spaces (“edge” ch spaces are ch 1 spaces) and “corner” ch spaces (“corner ch spaces are ch 3 spaces).
You will only work 1 dc cluster into every “edge” ch space you come across and will be working a dc cluster corner/inc into every “corner” ch space you come across (ALWAYS ch 1 before moving onto the next ch space)
Continue working in every ch space until the end of the round. Sl st into the first st of the round.
(ROUND 3-6 IF YOU ARE NOT CHANGING COLORS)
Rnds 3-6: Turn your work. Ch 3, dc 2, ch 1 (this is your first dc cluster of the round.)
Work 1 dc cluster into every “edge”/ch 1 space and work a dc cluster corner/inc into every “corner”/ch 3 space
Continue working in every ch space until the end of the round. Sl st into the first st of the round.
(ROUND 3-6 IF YOU ARE CHANGING COLORS)
Fasten off your yarn and grab your next color.
Rnds 3-6: Turn your work. Insert your hook into the closest corner where you previously sl st into to join the rnd and pull through your new yarn color.
Ch 3, work 2 dc in ch space, ch 3 and work 1 dc cluster into same ch space, ch 1 (this is your first dc cluster corner/inc of the rnd).
Work 1 dc cluster into every “edge”/ch 1 space and work a dc cluster corner/inc into every “corner”/ch 3 space
Continue working in every ch space until the end of the round. Sl st into the first st of the round.
Fasten off your yarn and grab your next color.
(this part and the start of round 7 is irrelevant to you if you are not changing colors, you will be starting on a norm dc cluster and not a dc corner/inc)
Rnd 7: Turn your work. Insert your hook into the closest corner where you previously sl st into to join the rnd and pull through your new yarn color.
Ch 3, work 2 dc in ch space, ch 3 and work 1 dc cluster into same ch space, ch 1 (this is your first dc cluster corner/inc of the rnd).
You will only be keeping/increasing 2 of the 4 corners you have. If you look at the picture shown above, there are “top” and “bottom” corners and “side” corners.
You will ONLY be continuing to increase in the top & bottom corners and WILL NOT be increasing in the side corners, instead you will be only work 1 dc cluster into those side corners when you come across them instead of the dc cluster corner/inc
So, you’re going to continue the pattern as follows…
Work 1 dc cluster into every “edge”/ch 1 space AND into the next corner you come across, DO NOT INCREASE (only adding 1 dc cluster), continue working only 1 dc cluster into every ch space until you come to the next corner (the corner directly across from/under the “top” corner) work a dc cluster corner/inc into that “corner”/ch 3 space,
Continue working in every ch space until the end of the round. Sl st into the first st of the round.
Now there are no more “side corners” and only the top & bottom corner/points remain and will be the only ch spaces we will be increasing from here on out.
Fasten off your yarn and grab your next color.
Rnds 8-28: Turn your work. Insert your hook into the closest corner where you previously sl st into to join the rnd and pull through your new yarn color.
Ch 3, work 2 dc in ch space, ch 3 and work 1 dc cluster into same ch space, ch 1 (this is your first dc cluster corner/inc of the rnd).
Work 1 dc cluster into every “edge”/ch 1 space and work a dc cluster corner/inc into every “corner”/ch 3 space
Continue working in every ch space until the end of the round. Sl st into the first st of the round.
You are more than welcome to work more or less rounds for the desired length for your poncho, this is just how many I personally worked 😊.
After that, weave in all your ends and then…
…YOU’RE DONE!
Tips for Success
- Mind Your Corners: Round 7 is the magic round that transforms your piece from a square into a poncho shape! Pay close attention to the “side” corners versus the “top & bottom” corners to ensure your garment drapes correctly over your shoulders.
- Color Play: This pattern is an absolute stash-buster’s dream. Because you are working in granny stripes, you can easily change colors at the start of any round without affecting the structural integrity of the poncho.
- Weaving as You Go: If you are doing a multi-color poncho, weave in your ends as you finish each color section. There is nothing more daunting than finishing a beautiful garment and realizing you have 28 ends left to weave in!
FAQ
Is this pattern beginner-friendly? Yes! If you know how to double crochet, chain, and slip stitch, you can make this poncho. The repetition of the granny stripe stitch makes it a highly relaxing, mindful project.
How do I make the poncho longer? The pattern creates a garment that is approximately 25 inches long. If you want a longer drape, simply continue repeating the instructions for Rounds 8-28 until you reach your desired length before fastening off.
What if my chain twists on Round 1? This is the most crucial step to check. Before you slip stitch to join your chain into a round, double-check that there are no twists in your foundation chain. Using a stitch marker to hold the first and last chains together can help!
Conclusion
Congratulations on creating your cozy Winifred Poncho! This versatile, granny-stripe layering piece makes a perfect addition to your handmade wardrobe for those chilly transitional days. Share your beautiful poncho creation in the comments below!