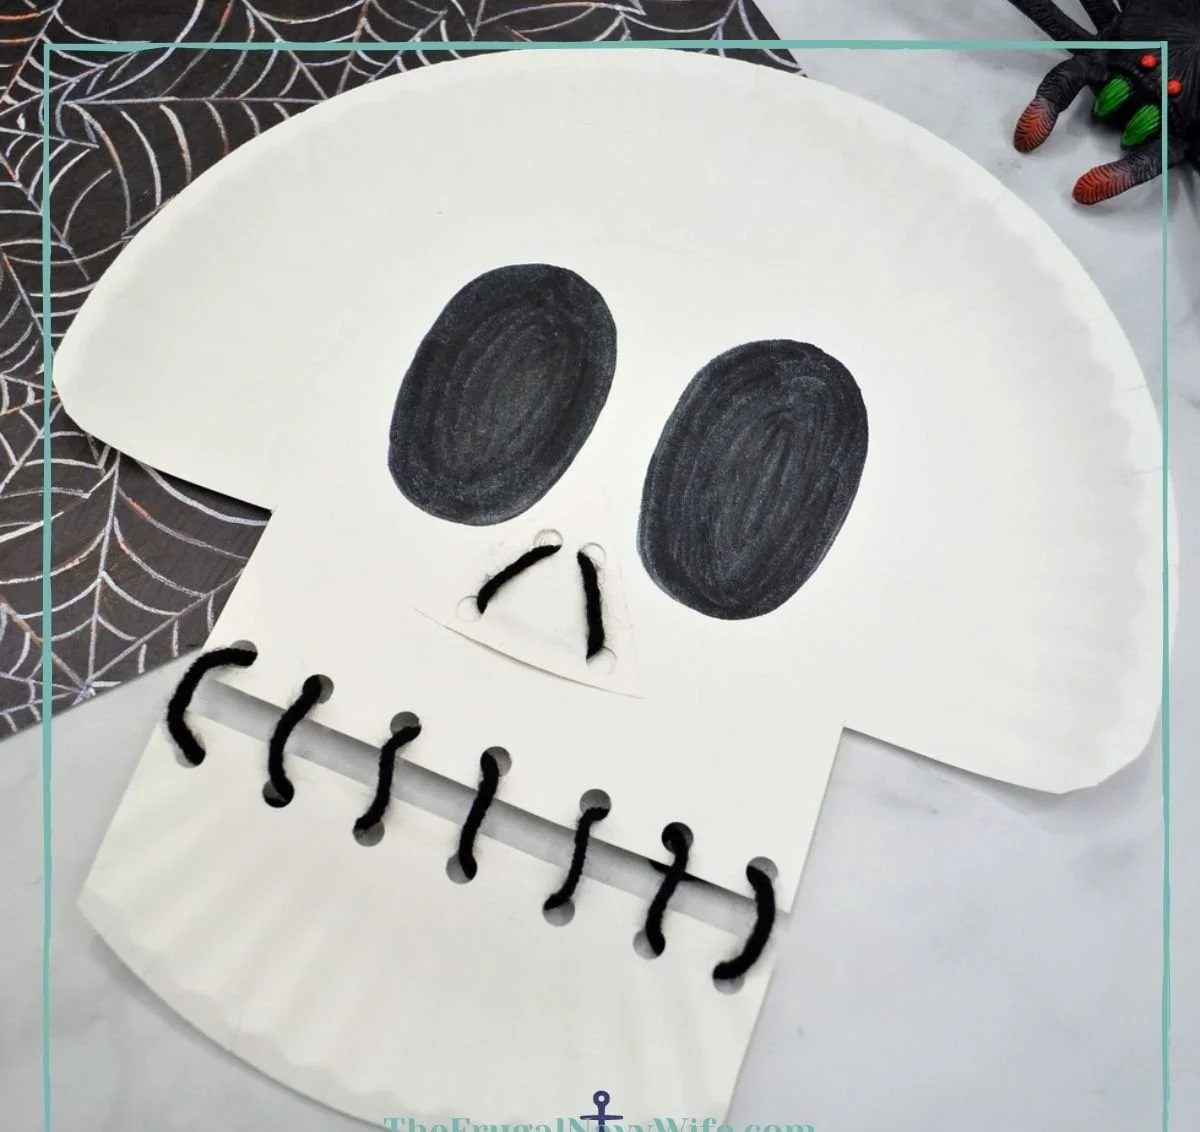
Skeleton Paper Plate Lacing Craft is an easy DIY project that is perfect for both kids and adults who want to unleash their creativity. This craft combines crafting and lacing techniques to create fun and spooky decorations for Halloween or any festive occasion. With simple materials and straightforward instructions, even beginners can create a charming skeleton design that will add flair to your home decor or make for unique handmade gifts.
WHY YOU WILL LOVE THIS Skeleton Paper Plate Lacing Craft
Making the Skeleton Paper Plate Lacing Craft is not only enjoyable but also rewarding. Here are a few reasons why you will love this easy, beginner-friendly craft:
- Easy for Beginners: This project requires no complicated techniques, making it perfect for those just starting with crafts.
- Uses Simple Materials: You only need paper plates, a marker, googly eyes, black yarn, and glue—common items that are budget-friendly and often found at home.
- Great for Home Decor: The finished craft can be displayed as part of your Halloween decor, making your home more festive.
- Quick to Make: You can complete this project in less than an hour, providing instant satisfaction.
- Easy to Customize: With a little creativity, you can personalize your skeleton with different colors or sizes.
This craft is perfect for various occasions, including Halloween parties, seasonal decorations, or even as a fun activity for children.
PROJECT DETAILS
Skill Level
Beginner-friendly. This craft is great for anyone, especially those with little to no crafting experience.
Estimated Time
Approximately 30–45 minutes. This makes it a quick project that doesn’t require too much setup or cleanup time.
Approximate Cost
Cost is minimal, likely under $10, especially if you already have many materials at home.
Best For
Perfect for children, adults, or families looking for an engaging DIY project that brings creativity to life.
Project Type
This is a simple craft that falls under the category of seasonal crafts, ideal for decorating your home during Halloween or any festive season.
TOOLS AND EQUIPMENT NEEDED
Scissors
Essential for cutting the paper plates into the skeleton shape. Make sure to use a pair that is comfortable to hold.
Hole Punch
Used to punch holes in the paper plates for lacing the yarn through, adding to the skeleton’s features.
MATERIALS
Paper Plates
These serve as the base for your skeleton craft. Their sturdy structure makes them perfect for crafting.
Black Marker
Utilized for coloring the skeleton’s eyes and nose, giving it a spooky look. A permanent marker is preferred for bold visibility.
Googly Eyes
These add a playful touch and mimic the look of a cute skeleton. They are widely available and easy to use.
Black Yarn
This is the lacing material used to create details like the nostrils and smile on the skeleton’s face. It adds depth and texture to the design.
Glue
Used to secure the googly eyes and nose onto the skeleton, ensuring everything stays in place. A glue stick or white craft glue works well.
HOW TO MAKE Skeleton Paper Plate Lacing Craft
Step 1: Cut the Plate to Resemble a Skeleton Shape
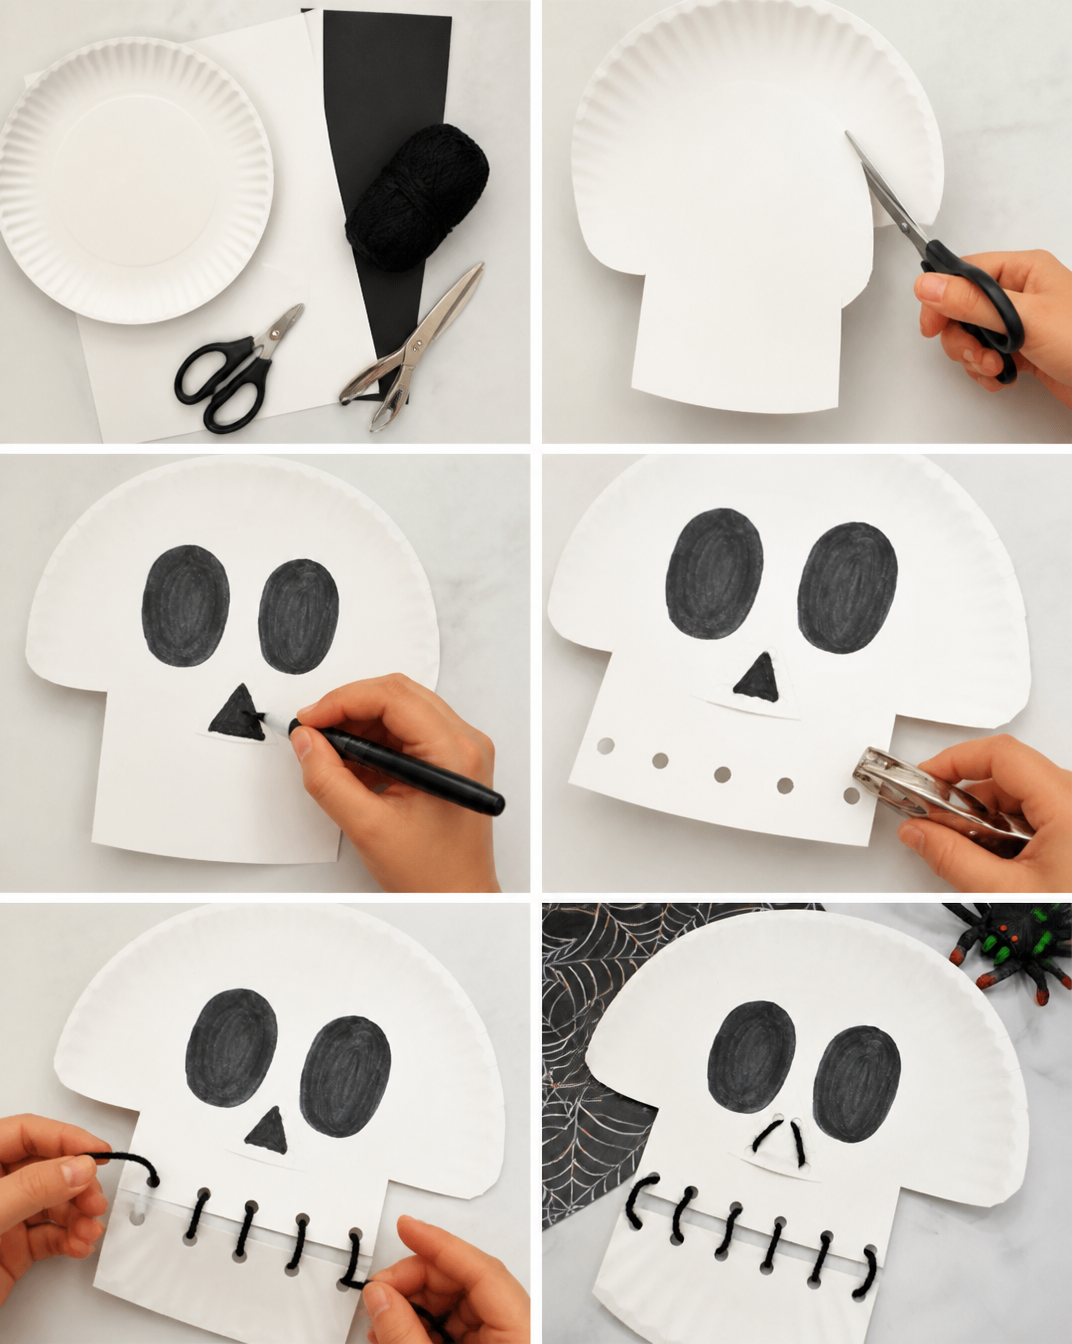
Start by taking a paper plate and cutting notches along the sides to create the outline of a skull. Then, cut a larger notch on the bottom part to create a jawline.
Step 2: Color the Eyes and Nose
With the black marker, color in two big oval shapes on the top side of the skeleton’s head to create eyes. Use a small cut-off piece of the plate to form the nose, coloring it black as well.
Step 3: Punch Holes
Using a hole punch, make holes along the bottom of the skull and the upper jaw. Also, punch holes in the nose piece where the yarn will be threaded for nostrils.
Step 4: Weave Yarn Through the Nose Piece
Take a length of black yarn and weave it through the holes in the nose piece, creating the shape of nostrils. Tie it securely at the back and glue the nose in place to hold it.
Step 5: Weave Yarn Through the Jaw Holes
Finally, take more black yarn and weave it through each hole along the lower jaw to create a big smile. Secure the ends by tying knots and trimming any excess yarn.
TIPS AND TRICKS
- Choosing Materials: Use sturdy paper plates that can withstand being cut and manipulated without tearing.
- Cutting Tips: Ensure your scissors are sharp for a clean cut. If working with children, supervise during cutting.
- Gluing: Allow sufficient drying time for the glue; a quick-drying glue can help speed things up.
- Avoiding Mistakes: Plan your holes in advance so they are even and aligned. This will help your project look neat.
- Making the Craft Last: If you want a more durable version, consider using heavier cardstock instead of paper plates or laminate your finished project.
- Working Safely: If using scissors or hole punches, always ensure they are away from faces and other bodies to prevent accidents.
VARIATIONS AND CUSTOMIZATION IDEAS
- Different Colors: Try using colored paper plates or paint the plates in various hues for a more vibrant skeleton.
- Seasonal Versions: Customize your skeleton for other holidays such as Thanksgiving by adding festive elements, like a harvest hat.
- Individual Personalities: Let each family member create a unique skeleton by changing facial expressions or adding accessories like hats or bows.
- Craft Size: Create larger skeletons using dinner plates or smaller ones using dessert plates for a varied display.
Skeleton Paper Plate Lacing Craft FAQ
Q1: Is this craft difficult for beginners?
No, this Skeleton Paper Plate Lacing Craft is designed to be beginner-friendly with simple steps that anyone can follow.
Q2: What materials do I need to make this craft?
You will need paper plates, a black marker, googly eyes, black yarn, and glue. These materials are often found at home or are inexpensive to purchase.
Q3: How long will this project take to complete?
The estimated time to complete this craft is around 30–45 minutes, making it a quick and enjoyable activity.
Q4: Can I store my finished skeleton craft?
Yes, you can store your finished skeleton in a dry area. Be careful not to crush it and avoid exposing it to moisture which could damage the materials.
Q5: How can I customize my skeleton?
You can customize your skeleton with different colors, sizes, or accessories. Let your creativity shine by adding personal touches like names or themed decorations.
CONCLUSION
The Skeleton Paper Plate Lacing Craft is a fantastic, easy DIY project perfect for beginners. With limited materials and simple steps, anyone can create this fun and spooky decoration. It’s budget-friendly, making it ideal for families looking for inexpensive craft ideas. Whether you’re preparing for Halloween, a party, or simply want to add a creative touch to your home, this craft is sure to please.
So, gather your materials and give this craft a try! Don’t forget to share your experience and finished projects with friends and family, or mention your customization ideas. Enjoy crafting!