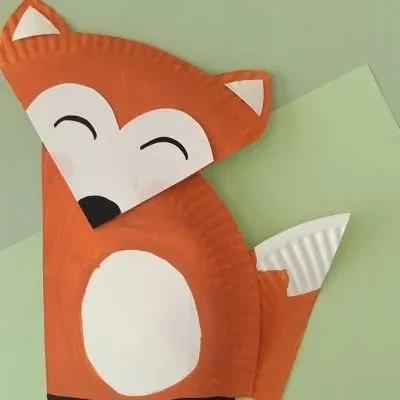
Creating a Red Fox Paper Plate Craft for the fall is an enjoyable and engaging DIY project that brings warmth and character to your home. This easy craft is perfect for beginners, as it uses simple materials and straightforward steps. As a representation of the vibrant colors of autumn, this creative DIY idea can serve as a decorative piece for your living space or a delightful handmade gift for friends and family. Let your imagination run wild with various customization options and enjoy a productive crafting time that’s budget-friendly and full of fun!
WHY YOU WILL LOVE THIS Red Fox Paper Plate Craft
If you’re looking for a straightforward and fun way to celebrate the fall season, making a Red Fox Paper Plate Craft is an excellent choice. Here are several reasons why you’re going to enjoy this DIY project:
- Easy for Beginners: No prior crafting experience is necessary; the steps are simple and easy to follow.
- Uses Simple Materials: You probably already have most of the supplies at home, making it convenient.
- Budget-friendly: Crafting doesn’t have to be expensive, and this project can be made for very little money.
- Quick to Make: Most of the time spent will be waiting for glue and paint to dry, making it suitable for busy schedules.
- Great for Home Decor: This colorful craft is ideal for seasonal decorating, adding a lovely touch to your space.
- Perfect for Gifts: The final product can be a sweet homemade gift for loved ones.
- Easy to Customize: You can easily add your touch to make it genuinely yours.
PROJECT DETAILS
Here’s a quick overview of what you can expect with this Red Fox Paper Plate Craft.
Skill Level
Beginner-Friendly: This craft is very accessible, making it perfect for those new to DIY projects.
Estimated Time
30-60 Minutes: Depending on your pace, including drying time for paint and glue.
Approximate Cost
Low Cost: This project can typically be completed for around $10, depending on the materials you might need to purchase.
Best For
Home Decor & Gifts: Ideal for fall-themed decorations or thoughtful handmade gifts.
Project Type
Seasonal Craft: This easy craft is perfect for the autumn season, perfect to display in your home or share with someone special.
TOOLS AND EQUIPMENT NEEDED
Gather the following tools to complete your Red Fox Paper Plate Craft.
Scissors
Used for cutting out shapes and details needed for your fox craft.
Glue (White Craft Glue)
Essential for adhering the colored paper pieces to the paper plate.
Paintbrush
You will use this to apply paint to your plate, providing an even coat for the color.
Paint (Orange and White)
These colors will be used to create the base of your fox, offering vibrant and realistic hues.
MATERIALS
Here’s what you’ll need to gather for your Red Fox Paper Plate Craft.
Paper Plates
They serve as the foundation for your craft, providing a sturdy and lightweight base.
Colored Paper (Orange, White, Black)
These colors will be used to create the fox’s face, ears, and tail, adding character and depth.
Googly Eyes
These bring a playful touch, adding life to your crafty fox.
Marker (Black)
Useful for adding details, such as the nose and whiskers, to your fox face.
String or Ribbon (Optional)
If you want to hang your craft, this will make it easy to display anywhere.
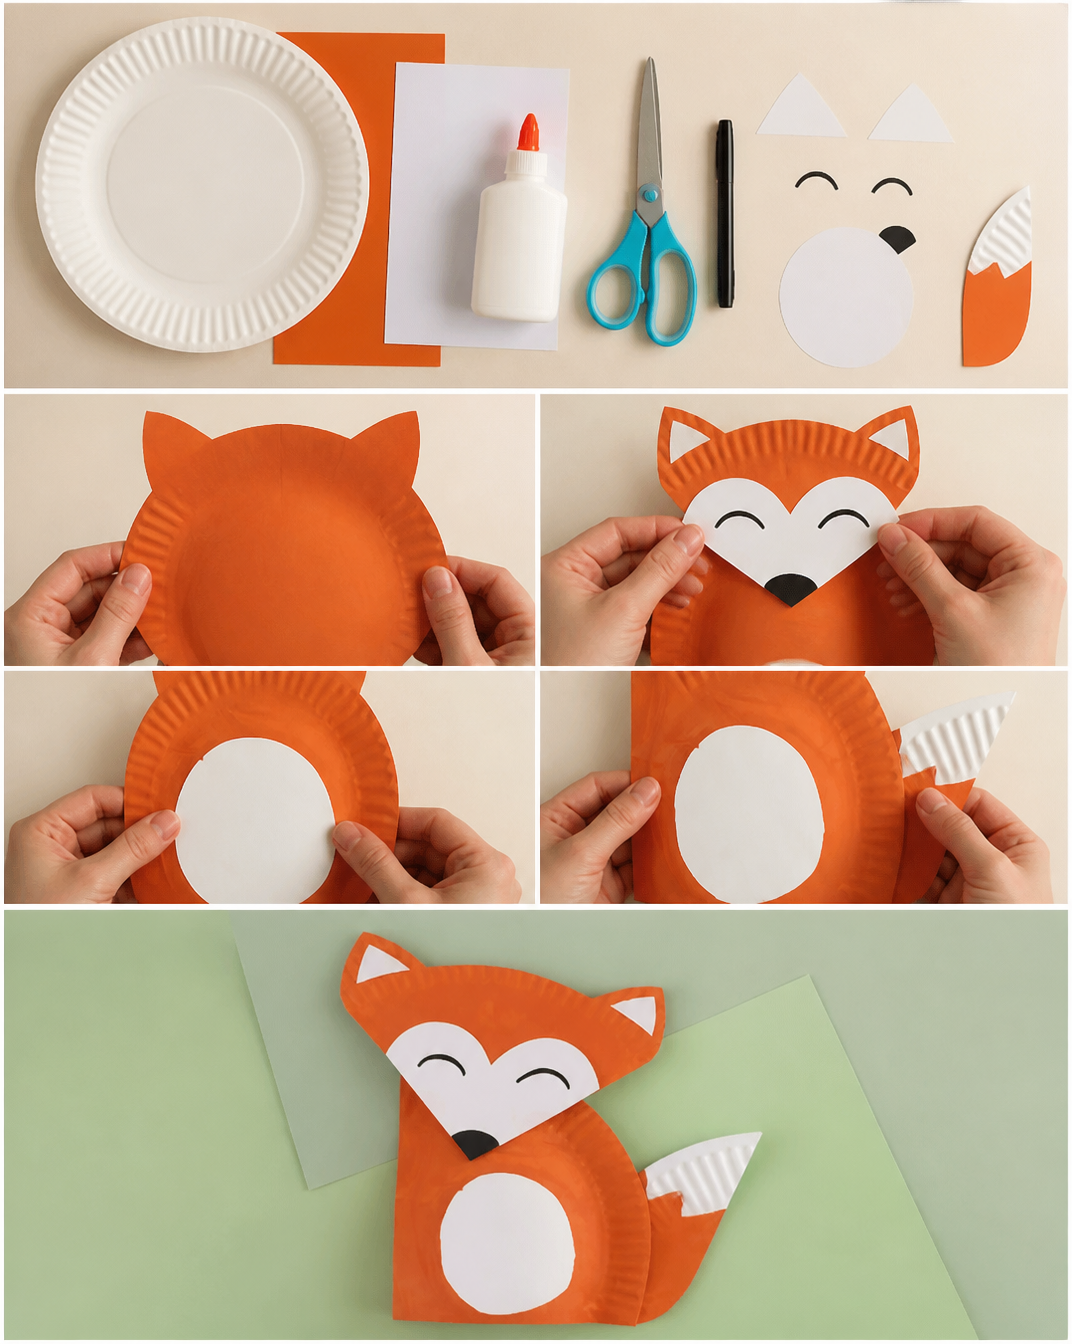
HOW TO MAKE Red Fox Paper Plate Craft
Follow these detailed steps to create your Red Fox Paper Plate Craft effortlessly.
Step 1: Prepare Your Plate
Start by painting your paper plate orange. Use your paintbrush to cover the entire surface evenly. Allow it to dry completely. This will serve as the fox’s face.
Step 2: Cut Out Ears
Using your black and white colored paper, cut out two triangles for the fox’s ears. The base of each triangle should be about 4 inches wide and 5 inches tall. Then, cut out smaller triangles from the white paper to create the insides of the ears.
Step 3: Assemble Ears
Glue the white triangles onto the black ones to form the ears. Once dry, attach them to the top of the paper plate using glue.
Step 4: Add Googly Eyes
Take your googly eyes and glue them onto the front of the paper plate, positioning them below the ears. This will give your fox character and charm.
Step 5: Create a Nose and Whiskers
Using the black marker, draw a nose just below the eyes and add three whiskers on each side. You can also cut out a small triangle from black paper to glue as the nose for a more 3D effect.
Step 6: Optional Tail
If you want, cut a long strip of orange paper for the tail. You can bend it into the desired shape and glue it to the side of the paper plate for added flair.
Step 7: Final Touches
Allow everything to dry completely before handling your craft.
TIPS AND TRICKS
Here are some helpful tips to ensure your Red Fox Paper Plate Craft turns out great:
- Choosing Materials: Opt for sturdy paper plates and quality glue for a long-lasting finish.
- Cutting Paper: Use sharp scissors to make clean cuts, particularly for the ears.
- Avoiding Common Mistakes: Plan where to place your features before gluing to avoid repositioning later.
- Getting a Better Finish: Make sure the paint layer is even by applying multiple thin coats instead of one thick coat.
- Making the Craft Last Longer: Ensure all parts are securely glued before display to prevent pieces from coming off over time.
- Safety Tips: If you are crafting with children, supervise them during cutting and gluing to ensure safety.
VARIATIONS AND CUSTOMIZATION IDEAS
Feel free to play around with your craft by trying these variations:
- Different Colors: Use shades of red or brown to create different fox variations.
- Add Accessories: Create hats or scarves for your fox using fabric scraps.
- Different Sizes: Experiment with larger or smaller paper plates for different-sized foxes.
- Seasonal Versions: Incorporate elements like leaves or pumpkins for a more autumnal feel.
- Personalized Versions: Add names or fun phrases using a marker for a unique touch.
Red Fox Paper Plate Craft FAQ
How difficult is this project?
This project is beginner-friendly and very easy to follow. Anyone can successfully create a cute fox face with little to no experience.
What materials do I need?
You will need paper plates, colored paper (orange, white, black), googly eyes, and a black marker.
Can I store this craft?
Yes! Once completed, store it in a cool, dry place. Avoid damp areas to prevent the craft from degrading.
How long does it take to complete?
This DIY project takes around 30 to 60 minutes, depending on drying times for paint and glue.
Can I customize this craft?
Absolutely! Feel free to experiment with colors, sizes, and additional features to make it your own.
CONCLUSION
Creating a Red Fox Paper Plate Craft is a wonderful way to celebrate the fall season with a fun, budget-friendly, and beginner-friendly craft. Not only is this easy DIY project suitable for home decor, but it also makes a great personalized gift or seasonal decoration. Sharing your finished craft or customization ideas makes this experience even more rewarding! We encourage you to gather your materials and try this creative project, and don’t hesitate to share your experiences with others. Happy crafting!