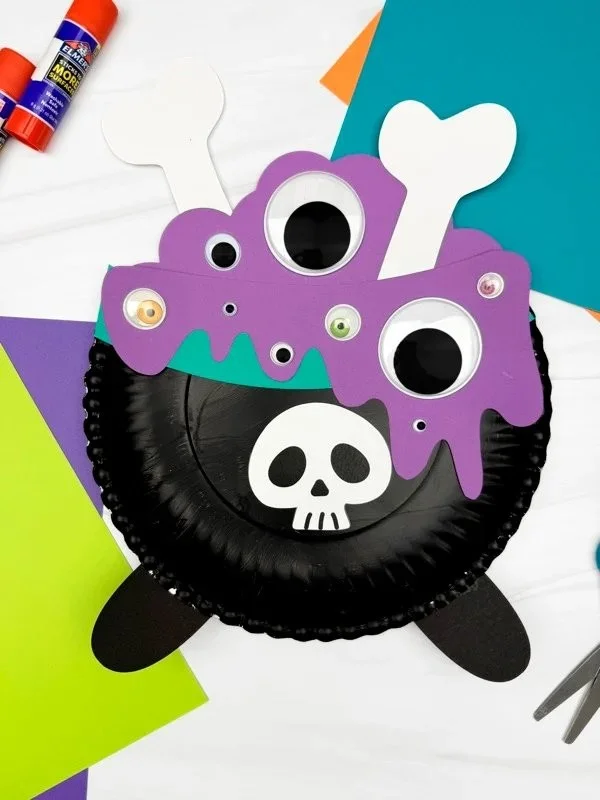
Get ready for a whirlwind of creativity with our Paper Plate Witches Brew Craft for Kids! This easy DIY project is perfect for anyone looking to whip up some Halloween magic using simple materials and a dash of imagination. With the help of our free PDF template, children can create a fantastical brew that is not only fun to make but also enhances their creativity. The Paper Plate Witches Brew Craft is a fantastic way to engage kids during Halloween, making it an ideal choice for weekend crafting sessions or school activities.
WHY YOU WILL LOVE THIS Paper Plate Witches Brew Craft
This Paper Plate Witches Brew Craft is a delightful activity that everyone will enjoy. Here are some reasons this craft deserves a spot on your to-do list:
- Easy for beginners: This project is perfect for kids and beginners. It requires no prior crafting experience, making it accessible to all.
- Uses simple materials: With readily available materials, you won’t need to make special trips to the store.
- Budget-friendly: It’s an inexpensive craft that won’t break the bank, making it a great budget-friendly DIY project.
- Quick to make: You can complete this craft in about an hour, which is ideal for short crafting sessions.
- Great for home decor: Once finished, display your witches’ brew as a fun Halloween decoration!
- Great for gifts: This craft can also be transformed into a handmade gift for Halloween parties.
- Easy to customize: Each child can add their personal touch, ensuring that no two potions will look the same.
PROJECT DETAILS
Skill Level
Beginner
This craft is easy and perfect for kids, making it suitable for beginners of any age.
Estimated Time
30-60 minutes
The time needed to complete this project ranges depending on the speed and patience of the child.
Approximate Cost
$5-$10
The cost mainly depends on materials you already have at home, making it a budget-friendly craft.
Best For
Kids’ Halloween celebrations
This craft is ideal for Halloween parties, school events, or just for fun at home.
Project Type
Simple craft
As a simple craft, this project provides a fun and creative outlet for kids.
TOOLS AND EQUIPMENT NEEDED
Scissors
Use scissors to cut the paper plates and any additional decorations you plan to use.
Glue
Regular school glue or craft glue will hold your materials together.
Paintbrush
A paintbrush helps apply paint smoothly for the best results.
Cup or Bowl (for mixing)
A plastic cup or bowl will be used for mixing colors or creating the “brew.”
MATERIALS
Paper Plates
These will serve as the base for your witches’ brew potions.
Green Paint
Green paint will be used to represent the witches’ brew and bring your creation to life.
Glitter
Add some magical shimmer to your potions with colorful glitter.
Construction Paper
Use construction paper for crafting potion labels, witch hats, or other decorative elements.
Markers
Markers can help add fun faces or designs to your paper plate.
Optional Add-Ons
Small plastic spiders, googly eyes, and other embellishments can add an extra element of fun!
![Paper Plate Witches Brew Craft For Kids [Free PDF Template]](https://cdn.contai.io/public/fal-ai-generated/1787011135_6a83a03fd306c.png)
HOW TO MAKE Paper Plate Witches Brew Craft
Step 1: Prepare the Base
Start by laying out the paper plates on a flat surface. These will become the base of your witches’ brew. Choose how many potions you’d like to create.
Step 2: Mix Your Brew
Using a cup or bowl, mix green paint with a bit of water to create a thinner consistency. This will make it easier to apply smoothly on the plate.
Step 3: Paint the Plates
Using a paintbrush, carefully paint the center of each paper plate green to represent your witches’ brew. Make sure to cover any areas for a vibrant color. Allow the paint to dry.
Step 4: Add the Glitter
Once the green paint has dried, sprinkle glitter over the painted area while the paint is still tacky. This will help the glitter adhere better.
Step 5: Create Labels
Cut out small labels from construction paper to name your potions. Names like “Witches’ Elixir” or “Zombie Juice” are fun options! Use markers to write the names on the labels.
Step 6: Final Touches
Use additional construction paper to create decorative elements like witch hats or potion ingredients to add around your brew. Glue these decorations around the edge of the paper plate.
Step 7: Display Your Craft
Once everything is dry, find a spot to display your wonderful Paper Plate Witches Brew Craft!
TIPS AND TRICKS
- Choosing materials: Use materials you already have at home where possible.
- Cutting: For safety, kids should use scissors designed for them. Keep cuts simple and manageable.
- Gluing: A little glue is often enough. Too much can make a mess!
- Common mistakes: Make sure paint is dry before adding glitter; otherwise, it might clump or make a mess.
- Finishing touches: Use metallic markers for a more eye-catching label.
- Money-saving: Gather supplies from recycling or leftover craft materials before buying new ones.
- Durability: If you want the potions to last, consider using a clear spray sealant.
- Safety: Always supervise kids during cutting and gluing.
VARIATIONS AND CUSTOMIZATION IDEAS
- Different Colors: Experiment with various colors for your brew to create spooky or whimsical potions.
- Different Sizes: Create smaller or larger plates based on your design preferences.
- Different Materials: Incorporate natural items like leaves or twigs for a rustic potion look.
- Seasonal Versions: Change the colors and accessories to suit other holidays like Thanksgiving or Christmas.
- Personalized Versions: Encourage kids to use their names or favorite characters in their potion labels.
- Different Patterns: Use patterned craft paper for unique designs.
![Paper Plate Witches Brew Craft For Kids [Free PDF Template]](https://cdn.contai.io/public/original_images/1787010949_6a839f850d8e3.jpg)
Paper Plate Witches Brew Craft FAQ
How difficult is this craft for kids?
This Paper Plate Witches Brew Craft is beginner-friendly and perfect for kids of all ages. Supervision is Suggested for the use of scissors and glue, but the overall crafting process is simple.
What materials do I need for this project?
You will need paper plates, green paint, glitter, construction paper, markers, glue, scissors, and optional embellishments. Most of these materials are budget-friendly and easy to find.
How should I store my finished craft?
Store your finished projects in a cool, dry place. If using a spray sealant, be careful when handling as the materials might become more fragile.
How long does it take to complete this craft?
The entire project takes about 30 to 60 minutes, depending on the drying time of the paint and how many potions you create.
Can this craft be customized further?
Absolutely! You can change colors, add different embellishments, or create different themed labels to make them unique!
CONCLUSION
Crafting the Paper Plate Witches Brew Craft is not only easy but also provides a wonderful opportunity for creativity and fun during the Halloween season. With simple materials and a few steps, children can create delightful decorations or gifts. This budget-friendly DIY offers endless possibilities for customization, ensuring every potion is a unique masterpiece. So gather your materials and start creating! Don’t forget to share your final creations or any great customization ideas with us. Happy crafting!