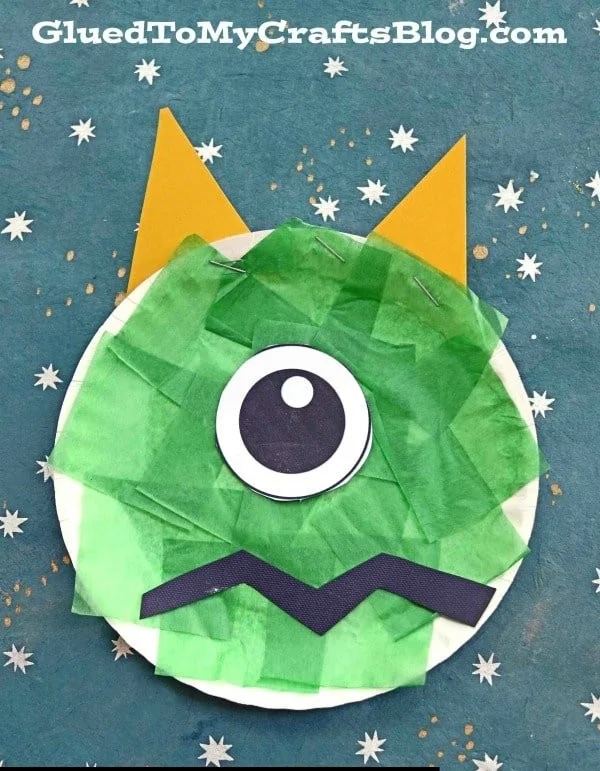
Crafting is a delightful way to express creativity, and one of the simplest and most fun options is the Paper Plate Monster Craft. This easy DIY project is perfect for all ages, making it an excellent choice for beginners or seasoned crafters looking for a quick and budget-friendly craft idea. Throughout this article, you will see why this fun and colorful project can be a wonderful addition to your DIY home decor or a fantastic gift for a child’s party.
WHY YOU WILL LOVE THIS Paper Plate Monster Craft
Creating your very own Paper Plate Monster is a joy for many reasons:
- Easy for beginners: This craft uses simple steps and requires no advanced skills, making it accessible for everyone, including kids and those new to crafting.
- Uses simple materials: You only need a few common supplies, which means you can get started right away without a trip to the store.
- Budget-friendly: Most of the materials are inexpensive or even free if you reuse items, making this craft a great option for those looking for budget-friendly DIY projects.
- Quick to make: With just a little time, you can create a adorable monster and even do several in one go.
- Great for home decor: Bring some whimsy to your space by hanging your colorful monsters on walls or in a child’s room.
- Easy to customize: You can give your monster a personality by altering colors, patterns, and features, creating a truly one-of-a-kind masterpiece.
PROJECT DETAILS
Skill Level
Beginner-friendly. This craft is simple and straightforward, requiring only basic skills.
Estimated Time
About 30-60 minutes. You can set aside enough time to create one or several monsters.
Approximate Cost
Around $10 or less. Most materials can be found around the house or purchased cheaply.
Best For
Kids, families, or anyone looking for a quick and creative DIY project, suitable for parties or holiday decorating.
Project Type
An easy, fun craft that’s perfect for creating unique DIY home decor or decorations for seasonal celebrations.
TOOLS AND EQUIPMENT NEEDED
Scissors
Used for cutting out shapes, features, and tissue paper for your monster.
Stapler
This tool helps attach cardstock features and decorative eyes to your monster.
Printable Eyeball Template
An optional but handy tool to help create fun eyeball shapes for your monsters.
MATERIALS
Paper Plates
These are the base of your project, providing a sturdy foundation for creating your monster.
Tissue Paper
Used to cover the paper plates, tissue paper adds color and texture to your monsters.
Eyeball Printable
This optional template makes it simple to create fun and quirky monster eyes.
White Cardstock Paper
Perfect for printing eyes or other features, as it’s sturdy and provides a clean look.
Colored Cardstock Paper
In various colors, this paper is used to cut out additional features like teeth, ears, and antennas.
School Glue
A simple adhesive that works well for attaching tissue paper and other features to the plate.
Scissors
Essential for cutting tissue paper and cardstock into various shapes needed for your monster.
Stapler
Used for attaching additional features securely to your monster.
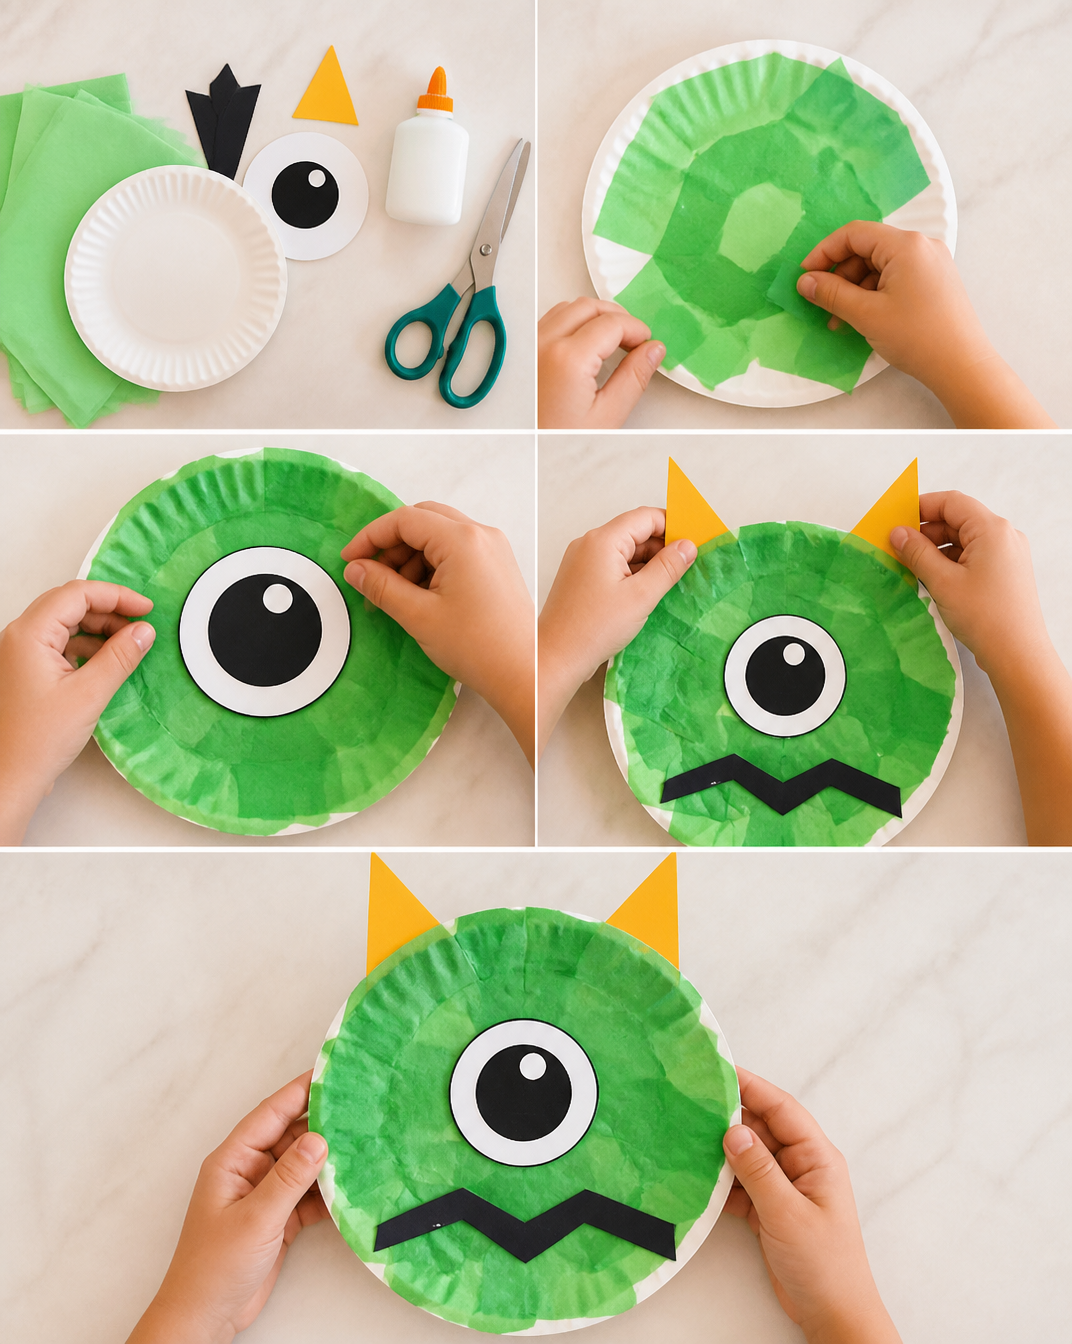
HOW TO MAKE Paper Plate Monster Craft
Creating your Paper Plate Monster is easy and fun. Follow these straightforward steps to bring your monster to life!
Step 1: Print and Cut Out the Eyeballs
Start by printing off the eyeball printable on a sheet of white cardstock. After printing, cut out the eyeball shapes, which will be the eyes of your monster. If you prefer, you can draw your own eyeballs instead of using a printable.
Step 2: Cut Squares of Tissue Paper
Next, take your colorful tissue paper and cut it into small squares. The size of the squares can vary, but they should be around 2×2 inches. These squares will make up the monster’s colorful fur.
Step 3: Glue Tissue Paper onto the Paper Plate
Apply a generous layer of glue on the surface of a paper plate. Then, start placing your tissue paper squares on the glue, covering the plate completely. Overlap the tissue pieces for a fuller look. This step creates the monster’s unique fur texture.
Step 4: Set Your Tissue-Covered Plate Aside
Once you have covered the plate with tissue paper, set it aside and let the glue dry completely. This might take a few minutes, so be patient while your monster begins to take form.
Step 5: Cut Out Features from Colored Cardstock
While your glue is drying, take your colored cardstock and cut out shapes for your monster’s features. Think about adding creative touches like teeth, ears, antennas, and funky hairstyles. Let your imagination run wild at this stage!
Step 6: Attach Features and Eyes to the Plate
After the glue on your plate has dried, use your stapler or glue to attach the cardstock features you created earlier onto the tissue-covered plate. Make sure to add the cut-out eyeballs as the final touch. If you used a stapler, be cautious while handling it to prevent any accidents.
Step 7: Display Your Paper Plate Monster
Finally, find a place to showcase your finished Paper Plate Monster! These can be displayed on walls, hung from ceilings, or even used as playful décor for a party or holiday event.
TIPS AND TRICKS
- Choosing Materials: Opt for bright-colored tissue papers to make your monster stand out. If you have leftover scraps of paper, consider using them for extra texture.
- Cutting: Keep your scissors steady and use a cutting mat if necessary to ensure clean cuts on cardstock and tissue paper.
- Gluing: Be generous with glue but avoid overdoing it, which could lead to soggy paper.
- Avoiding Mistakes: If the tissue paper doesn’t stick well, you can add more glue to areas where it lifts.
- Making the Craft Easier: If cutting shapes is difficult, templates can be printed to trace around before cutting.
- Saving Money: This craft can utilize recycled materials, such as leftover wrapping paper or magazine photos instead of new paper.
- Making It Last: Keep your finished crafts in a dry, cool place to prevent degradation. If you want your monster to last longer, consider using thicker cardstock for the base.
- Working Safely: Always supervise children when using scissors and hot glue guns.
VARIATIONS AND CUSTOMIZATION IDEAS
- Different Colors: Use various shades of tissue paper for a multi-colored monster.
- Seasonal Versions: Create holiday-themed monsters—think green for Halloween or red and green for Christmas!
- Larger Creations: Use bigger plates to make larger monsters, which can be a fun addition to yard decorations.
- Personalized Versions: Let kids create monsters that represent their personalities or favorite animals.
- Patterned Paper: Use patterned cardstock instead of solid colors for unique features, like polka dots or stripes.
- No Sew Variation: This project is perfect for no-sew crafting, but feel free to add fabric scraps for a mixed media effect.
Paper Plate Monster Craft FAQ
1. Is this Paper Plate Monster Craft difficult to make?
No, it is quite easy and perfect for beginners. The steps are simple, and children can participate with adult supervision.
2. What materials do I need for this craft?
You need paper plates, tissue paper, a printable eyeball template, cardstock paper in various colors, glue, scissors, and a stapler.
3. How long does this project take to complete?
On average, this craft takes about 30-60 minutes, depending on how elaborate you want to get with your monster features.
4. How should I store the finished Paper Plate Monster?
Store your completed craft in a cool, dry place. If you made it with light materials, consider hanging it up so it doesn’t get squished.
5. Can I customize my Paper Plate Monster?
Absolutely! You can change colors, sizes, and features to create a unique monster that fits your style or the season.
CONCLUSION
The Paper Plate Monster Craft is an enjoyable, easy DIY project that anyone can do at home. With its simple materials and straightforward steps, it serves as a fantastic introduction to crafting for beginners. Plus, it can be a fun activity for kids and adults alike, perfect for various occasions—whether for gifts, home decor, or seasonal decorations.
We encourage you to try this fun craft and share your experiences, finished projects, or your own unique customization ideas with friends and family! Happy crafting!