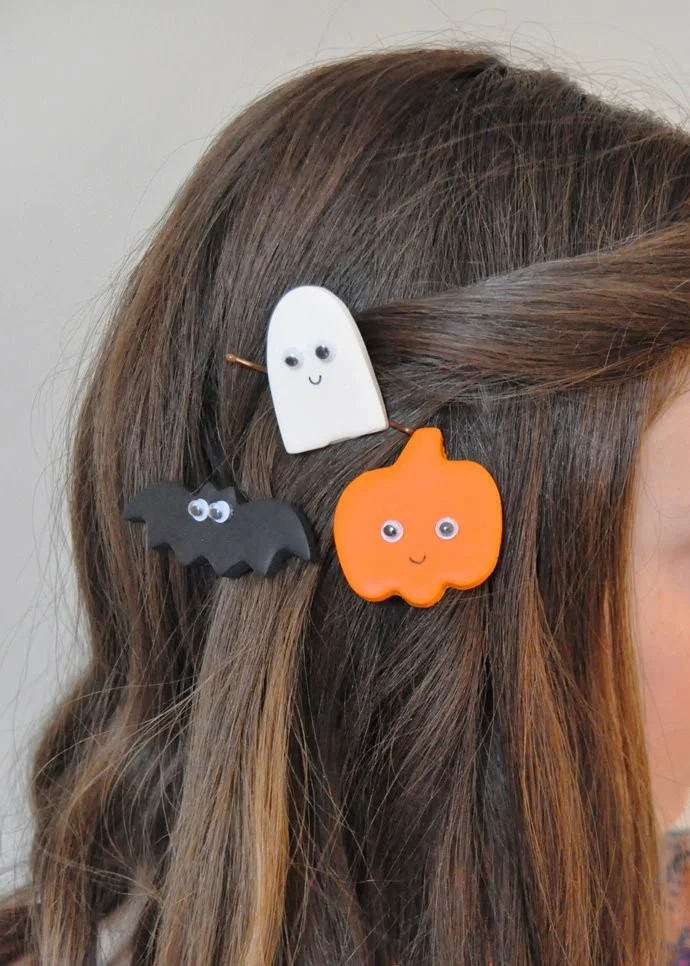
Halloween is an exciting time of year, filled with spooky decorations, creative costumes, and festive gatherings. One delightful way to celebrate the season is by making Halloween clay shapes. This easy DIY project allows you to create fun and whimsical decorations for your home, gifts for friends, or even party favors. With simple materials and beginner-friendly instructions, you can craft your way to a festive atmosphere. Let’s dive into this creative DIY idea that will bring your Halloween spirit to life.
WHY YOU WILL LOVE THIS Halloween Clay Shapes
Making Halloween clay shapes is an excellent choice for several reasons. First and foremost, it’s an easy craft tailored for beginners. You don’t need any prior experience to create charming decorations; the instructions are straightforward and simple to follow. Additionally, the materials required are budget-friendly and easy to find, making it a go-to project without breaking the bank.
This craft is perfect for adding a personal touch to your home decor during the Halloween season. The finished pieces can be used as decorations around your house, included in homemade gifts, or even as part of party supplies for Halloween gatherings. Furthermore, you can customize your clay shapes with various colors, patterns, and sizes, allowing your creativity to shine through.
PROJECT DETAILS
Skill Level
Beginner – This project is easy to follow and perfect for those who are new to crafting.
Estimated Time
Approximately 1 to 2 hours, depending on your pace and any additional customization you choose to add.
Approximate Cost
Around $15 to $25, based on the materials you select. Most materials are affordable and can be used for multiple projects.
Best For
This craft is great for home decor, gifts, and holiday decorating, making it versatile for various occasions.
Project Type
Seasonal craft – It’s specifically designed for Halloween but can be adapted for other holidays.
TOOLS AND EQUIPMENT NEEDED
Smooth Glass Jar or Rolling Pin
A smooth glass jar or rolling pin is helpful for rolling out the clay to your desired thickness. It ensures an even surface for cutting shapes.
Baking Sheet
You will need a baking sheet to place your clay shapes before putting them into the oven. This allows for easy transport and baking.
Hot Glue Gun
A hot glue gun is necessary for attaching the googly eyes and any clips or pins you might want to incorporate into your designs.
Scissors
A pair of scissors may come in handy for trimming any excess clay or cutting other materials you wish to use.
MATERIALS
Oven Bake Clay
Oven bake clay is the star of this project. It can be easily molded into various shapes and hardens when baked in the oven, making it durable for decorating.
Small Halloween Cookie Cutters
These fun cookie cutters will help create various spooky shapes, perfect for the Halloween theme. You can find shapes like ghosts, pumpkins, bats, and more.
Mini Googly Eyes
These tiny, wiggly eyes will add an adorable and whimsical touch to your clay shapes. They bring your creations to life!
Plain Hair Clips or Brooch Pins
These items will serve as a base for your clay shapes if you wish to turn them into wearable accessories or brooches.
Smooth Glass Jar or Rolling Pin
As mentioned, this tool is used for rolling out the clay. It’s essential for ensuring that your clay is evenly flattened.
Hot Glue Gun
A hot glue gun is perfect for securing any additional features like googly eyes. It provides a strong bond that will hold up over time.
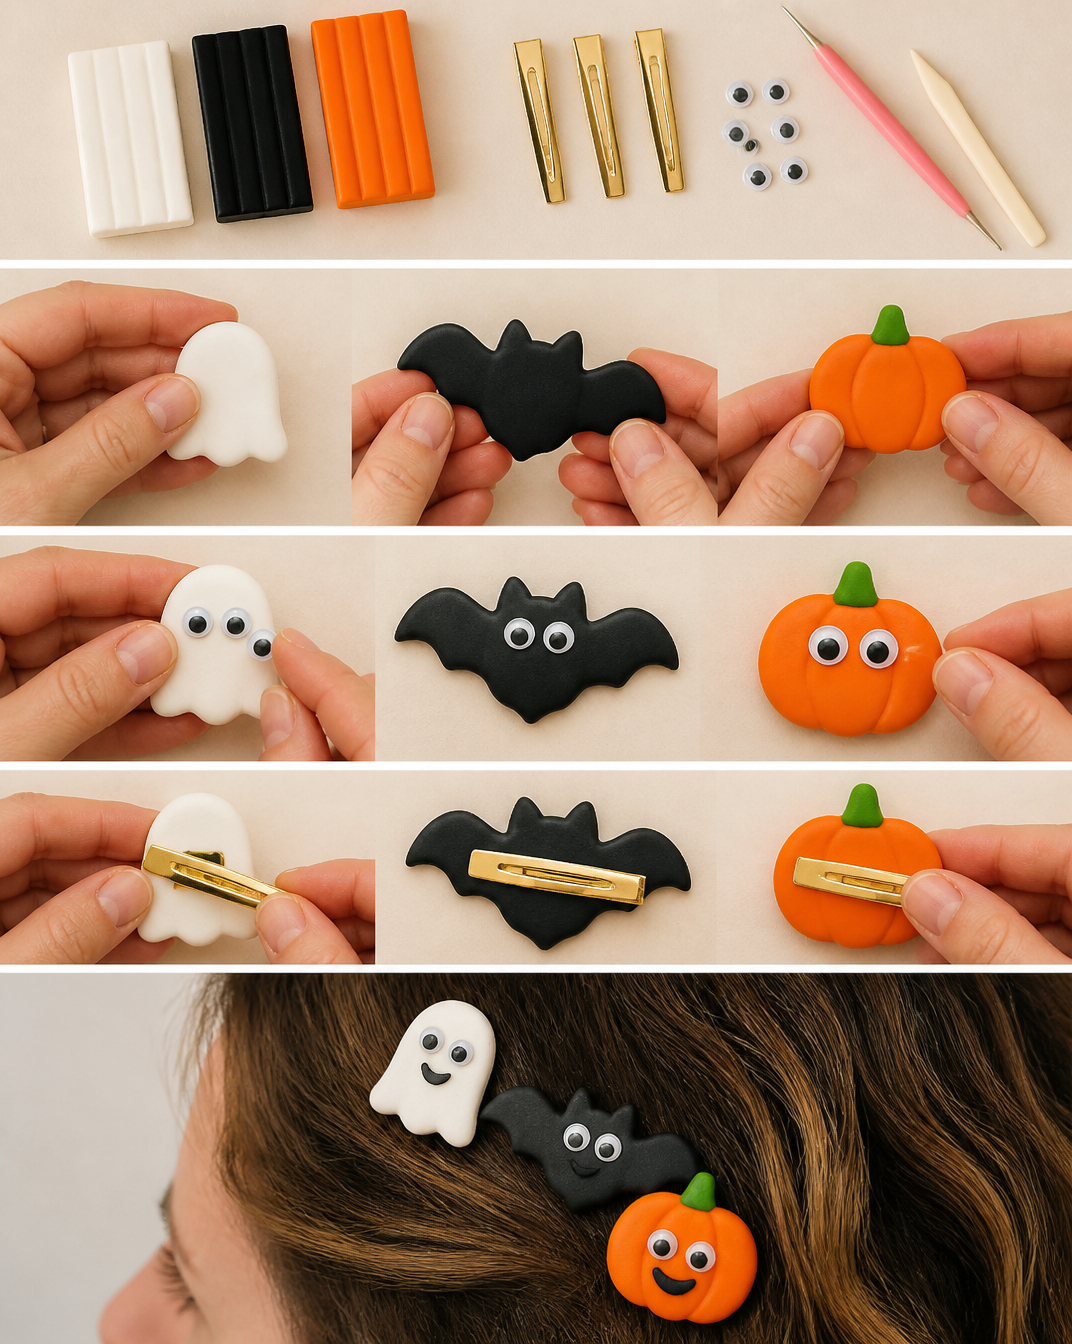
HOW TO MAKE Halloween Clay Shapes
Step 1: Warm the Clay
Start by warming the oven bake clay in your hands. Knead it until it feels soft and pliable. This step is crucial as it helps make the clay easier to work with.
Step 2: Roll the Clay
Using a smooth glass jar or rolling pin, roll the clay flat to about 1/4 inch thick. Make sure to keep an even thickness for uniform shapes.
Step 3: Cut Out Shapes
Take your small Halloween cookie cutters and press them into the rolled clay to cut out your desired shapes. Create various designs to add a fun variety to your decorations.
Step 4: Bake the Clay Shapes
Place your cut-out shapes on a baking sheet and bake them according to the instructions on the clay package. Typically, this will be around 250°F for 15-30 minutes, but always check your clay’s specific guidelines.
Step 5: Let Cool
Once baking is complete, remove the baking sheet from the oven and let the clay shapes cool completely. This step is important for safety before you start decorating.
Step 6: Add Googly Eyes
Using a hot glue gun, attach the mini googly eyes to each of the baked clay shapes. This part adds character and can be one of the most fun elements of your project!
Step 7: Attach Clips or Pins
Finally, hot glue hair clips or brooch pins to the backs of the shapes. This way, you can wear them or pin them onto clothing, bags, or hats as adorable Halloween accessories.
TIPS AND TRICKS
-
Choosing Materials: When selecting oven bake clay, consider colors that are vibrant and festive for Halloween. Look for bright oranges, blacks, whites, and greens to represent traditional Halloween themes.
-
Rolling Evenly: To ensure an even thickness, roll your clay out on a smooth surface, and consider using guides (like two small wooden dowels placed beside the clay) to help maintain an even height.
-
Avoiding Stickiness: If the clay is too sticky while working, lightly dust your surface and rolling tool with cornstarch to help reduce friction.
-
Detail Painting: If you want your shapes to be more decorative, once fully cooled, you can use non-toxic acrylic paints to add more details, such as designs or faces.
-
Cleaning the Hot Glue Gun: To avoid glue strings and excess mess, ensure to clean your hot glue gun tip slowly by letting the glue cool before removing any excess.
-
Storing Your Craft: Once your Halloween clay shapes are fully decorated and glued, store them in a cool, dry place. If you used any painted finishes, allow them to cure fully before storing.
VARIATIONS AND CUSTOMIZATION IDEAS
-
Different Colors: Change up the colors of the clay. Use black, purple, green, or even glow-in-the-dark options for a fun twist!
-
Larger or Smaller Shapes: Customize the size of the shapes by using larger or smaller cookie cutters to create variations.
-
Seasonal Versions: Adapt this project for other seasonal holidays like Christmas by using different cookie cutter shapes and colors.
-
Different Materials: Consider adding different embellishments such as glitter or small craft jewels after your pieces have cooled and dried.
-
Personalized Shapes: Create custom shapes that represent something unique to you or your friends, such as favorite symbols or initials!
Halloween Clay Shapes FAQ
1. Is this project difficult for beginners?
No, making Halloween clay shapes is an easy DIY project suitable for beginners. The instructions are straightforward, and the required materials are readily available.
2. What materials do I need for this craft?
The essential materials include oven bake clay, small Halloween cookie cutters, mini googly eyes, hair clips or brooch pins, and a hot glue gun.
3. How long does it take to complete this project?
The total time, from preparation to completion, usually ranges from 1 to 2 hours, depending on how long you bake your shapes and any added decoration time.
4. How should I store my finished clay shapes?
Store your crafted clay shapes in a cool, dry place. Ensure the pieces are fully cooled and cured to maintain their durability.
5. Can I customize the clay shapes further?
Absolutely! You can customize your clay shapes with different colors, sizes, or patterns. Paint them or add embellishments to make them unique.
CONCLUSION
Creating Halloween clay shapes is an easy and enjoyable project for anyone, especially beginners. Using basic materials and simple instructions, you can make charming decorations or unique gifts for friends. This budget-friendly craft offers endless opportunities for customization, making it perfect for the Halloween season. We encourage you to give this craft a try and share your finished project or your own customization ideas. Happy crafting, and enjoy the fun of Halloween!