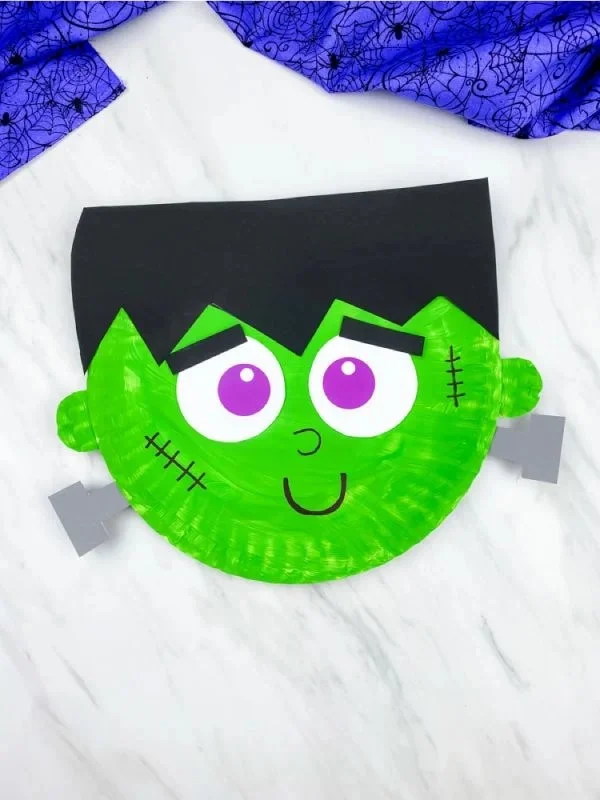
Crafting is a wonderful way to express creativity, and the Frankenstein Paper Plate Craft is an easy DIY project perfect for crafters of all ages. With a few simple materials, you can create a unique and fun decoration for Halloween or a quirky gift that shows off your handmade skills. This beginner-friendly craft is budget-friendly and uses items you may already have at home. So let’s dive into this creative DIY idea and bring Frankenstein to life!
WHY YOU WILL LOVE THIS Frankenstein Paper Plate Craft
The Frankenstein Paper Plate Craft is not only fun but also offers various benefits:
- Easy for beginners: This project is simple enough for crafters of any skill level, making it a great option for kids and adults alike.
- Uses simple materials: The materials needed are easy to find and often inexpensive, making it a budget-friendly craft.
- Quick to make: You can complete this creative DIY project in no time, making it perfect for a spontaneous crafting session.
- Great for home decor: Once finished, this playful Frankenstein can brighten up your home during Halloween.
- Easy to customize: You can easily adjust colors and features to make your Frankenstein unique.
PROJECT DETAILS
Skill Level
Beginner-friendly. This craft is ideal for novices due to its straightforward steps and minimal materials.
Estimated Time
Approximately 30 to 45 minutes. This includes prep and crafting time.
Approximate Cost
Low cost. Most materials can be found around the house or purchased at an affordable price.
Best For
Kids and adults who love seasonal crafts and want to create decorations for Halloween or handmade gifts.
Project Type
DIY home decor. This craft creates a fun piece you can display or give away, making it a versatile project.
TOOLS AND EQUIPMENT NEEDED
Scissors
Scissors are necessary for cutting paper and other materials into the desired shapes for the Frankenstein craft.
Glue
Glue is essential to attach the different parts of your paper plate Frankenstein together securely.
Pencil
A pencil is useful for drawing outlines before cutting, ensuring accuracy in your design.
Paintbrush (optional)
If you choose to paint features on your Frankenstein, a paintbrush is essential for applying the paint smoothly.
MATERIALS
Paper Plates
The main structure of your Frankenstein craft will be made from paper plates. They provide a sturdy base for decoration.
Green Paint or Marker
This will be used to color the face of your Frankenstein, giving it that classic creepy look.
Black Construction Paper
Black construction paper can be used to cut out hair, bolts, and other features to give your Frankenstein character depth.
White Construction Paper
White paper can be used for the eyes and teeth, providing contrast to the green face.
Googly Eyes (optional)
These fun little eyes can bring your Frankenstein to life, making him look even more engaging.
Tape (optional)
Use tape to secure any parts if glue is not solid enough for your project.
Brown or Gray Crayon (optional)
These colors can be used to add texture to the hair or create shadows on the face.
Template (Free Download)
A printable Frankenstein template makes creating your craft even easier, helping you trace the shapes you need.
![Frankenstein Paper Plate Craft [Free Template]](https://cdn.contai.io/public/fal-ai-generated/1787011114_6a83a02a13e8e.png)
HOW TO MAKE Frankenstein Paper Plate Craft
Creating your own Frankenstein using paper plates is a fun and easy DIY project. Follow these steps to make your own spooky creation!
Step 1: Prepare Your Materials
Gather all your materials and tools. This includes your paper plates, paints, markers, and any additional decorations like googly eyes.
Step 2: Paint the Plate
Use green paint or a green marker to color one side of the paper plate. Make sure to cover the plate completely for an even look. Allow the paint to dry before proceeding to the next step.
Step 3: Cut Out Features
Using black construction paper, cut out hair, bolts, or any additional features you want your Frankenstein to have. You might also want to cut out shapes from white paper for the eyes and teeth.
Step 4: Attach Features
Once everything is cut out, use glue to attach the black hair to the top of the green paper plate. Next, glue the googly eyes or drawn eyes and teeth in place to complete the face.
Step 5: Add Details
Use a brown or gray crayon to add texture to the hair. You can draw lines or shadows to make your Frankenstein more realistic.
Step 6: Display Your Craft
Once everything is dry, find a place to display your Frankenstein. You can hang it on a wall, place it on a table, or use it as part of your Halloween decor.
TIPS AND TRICKS
- Choosing Materials: Ensure your paper plates are sturdy enough to hold the paint and any additional decorations without warping.
- Cutting: Use sharp scissors for better accuracy. If you struggle with cutting, consider asking a friend or family member for help.
- Gluing: Use a glue stick or liquid glue for best adhesion. Be careful not to use too much glue, as it can make the paper soggy.
- Painting: If you’re using paint, consider doing multiple layers to achieve the vibrant green color you desire.
- Creating Depth: Adding layers to facial features by using additional paper can create a more three-dimensional effect.
- Budget-Friendly Tips: Use scraps of paper from previous projects to save money on supplies.
- Making It Last: Keep your finished craft in a dry place to prevent damage and fading from sunlight.
VARIATIONS AND CUSTOMIZATION IDEAS
- Different Colors: Try using different base colors for a unique twist. For example, make a Frankenstein with purple or yellow skin!
- Seasonal Versions: Adapt the project for different seasons by changing the colors or features. Make it a Christmas Frankenstein with holiday colors!
- Personalize: Add a name tag to your Frankenstein for a fun personalized touch or create a family of monsters.
- Different Materials: Use fabric scraps instead of paper for the hair or clothing components for a mixed-media version.
- Create a Family: Make a whole set of monsters using this template to create characters like the Bride of Frankenstein or other classic horror figures.
![Frankenstein Paper Plate Craft [Free Template]](https://cdn.contai.io/public/original_images/1787010948_6a839f8434585.jpg)
Frankenstein Paper Plate Craft FAQ
Is this craft suitable for beginners?
Yes, the Frankenstein Paper Plate Craft is designed to be beginner-friendly. It involves simple steps that are easy to follow, making it great for all ages.
What materials do I need to make this craft?
You will need paper plates, green paint or marker, black and white construction paper, glue, scissors, and optional decorations like googly eyes.
How long does it take to complete this craft?
The project typically takes about 30 to 45 minutes, depending on drying time for the paint and glue.
Can I store my Frankenstein craft for future use?
Yes! To make your craft last, store it in a dry, cool place to prevent any damage or fading from sunlight.
Are there any safety concerns I should be aware of?
When using scissors, always supervise children. Ensure that sharp edges are handled carefully and that they work in a safe environment.
CONCLUSION
The Frankenstein Paper Plate Craft is an exciting and easy DIY project that brings a touch of spooky fun to your home decor. This simple craft is not only budget-friendly, but it also sparks creativity and offers plenty of room for customization. Whether you’re making it for Halloween or as a unique handmade gift, it’s a great way to spend an afternoon crafting. We encourage you to try this project, share your experiences, and get creative with your own twist on this friendly monster. Happy crafting!