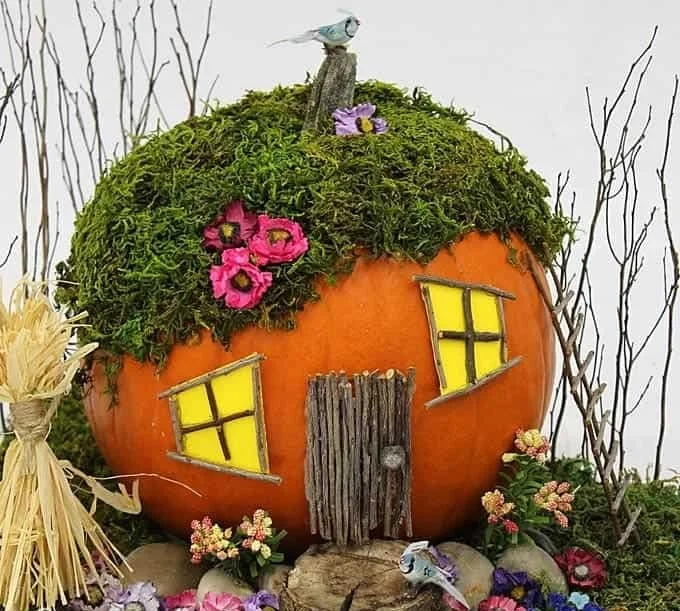
Creating a Pumpkin Fairy House is an engaging DIY craft project that is perfect for both beginners and seasoned crafters. This easy DIY project combines natural materials with whimsical design, making it a delightful addition to your home decor or a charming gift for friends and family. This article will guide you through crafting your own Pumpkin Fairy House using simple materials and techniques, offering creative DIY ideas for customization as you go along. Get ready to embark on a hands-on adventure in crafting with this seasonal and budget-friendly project!
WHY YOU WILL LOVE THIS Pumpkin Fairy House
Making a Pumpkin Fairy House is a wonderful way to celebrate the fall season while creating a unique piece of home decor. This beginner-friendly craft is perfect for those who have little experience in DIY projects. Here are a few reasons why readers will enjoy making this crafts project:
- Easy for beginners: The steps involved are straightforward, making this project simple for even the most inexperienced crafters.
- Uses simple materials: You will find that most of the materials can be found in your backyard or at your local craft store.
- Budget-friendly: It is an inexpensive project that requires minimal materials and tools.
- Quick to make: You can complete this craft in just a couple of hours, making it a perfect weekend project.
- Great for home decor: The finished product can be displayed at home, adding a touch of autumn charm to your decor.
- Great for gifts: It also serves as a unique and thoughtful handmade gift.
- Easy to customize: You can personalize your fairy house in numerous ways to match your style.
PROJECT DETAILS
Skill Level
Beginner-friendly: This project is designed for those with little to no experience in crafting.
Estimated Time
You can expect to spend about 2-3 hours on this project, including drying time.
Approximate Cost
Overall project cost will be low, typically around $20-$30 depending on the materials you use—especially if you opt for natural elements from your surroundings.
Best For
This craft is perfect for anyone who enjoys seasonal decorations, especially during the fall. It works well for family activities or crafting parties.
Project Type
This is a DIY home decor project that also makes for a creative handmade gift or seasonal decor.
TOOLS AND EQUIPMENT NEEDED
Wire Snips
Wire snips are used to cut twigs and other thin materials to create the door and other structural elements of the fairy house.
Scissors
You will need scissors for cutting card stock, twine, and other materials to the desired size.
Craft Tools
Basic craft tools such as a glue gun can assist with attaching various materials together, ensuring they stay in place.
Small Tray
A small tray serves as the base for your pumpkin fairy house, giving it stability and a clear foundation.
Foam Core Board
This can be used to create a sturdy base for the pumpkin house, enhancing durability.
MATERIALS
Pumpkin (faux or real)
You can use either a real pumpkin or a faux one. The pumpkin serves as the main structure of the fairy house where all the decorative elements will be added.
Sticks
Sticks can be used to create doors, windows, and other architectural details of the house.
Twigs
Similar to sticks, twigs are useful for building finer details and accents for your pumpkin house.
Pinecones
Pinecones can make lovely miniature trees or decorative elements around your fairy house.
Wood Slices
Wood slices are great for creating stairs or platforms that lead up to your pumpkin door.
Pebbles or Rocks
These small, natural elements can be used to create a pathway around the house.
Moss
Moss can be applied to the top of the pumpkin to mimic a natural roof, adding texture and greenery.
Faux Flowers
Using faux flowers will add a pop of color and whimsy to your fairy house.
Yellow Card Stock
Card stock can be cut into shapes for windows, giving your pumpkin a homey touch.
Miniature Birds
These little decorations can enhance the charm of your fairy house by being placed around it.
Small Clay Pot
A clay pot can serve as a cute birdbath or decorative base that complements the entire design.
Small Tray
A small tray acts as a base for your pumpkin fairy house, providing stability.
Miniature Scarecrow
Adding a miniature scarecrow can enhance the fall theme of your pumpkin fairy house.
Styrofoam Balls
These can be painted and used as decorative toadstools around your fairy house.
Red Paint
Red paint can be used to add color to various decorative elements like toadstools.
White Paint
This can be used as an accent on toadstools or other parts of your fairy house.
Raffia
Raffia can be utilized to create corn stalks or other natural decorations.
Twine
Twine is great for wrapping around elements or tying parts together.
Mod Podge
This will help seal your project and give it a polished finish.
White Craft Glue
This standard craft glue is essential for attaching various parts together securely.
Foam Core Board
Foam core boards work well for creating a structured base to hold your pumpkin.
Craft Tools
Basic craft tools such as glue guns, tape, or additional adhesives may be needed.
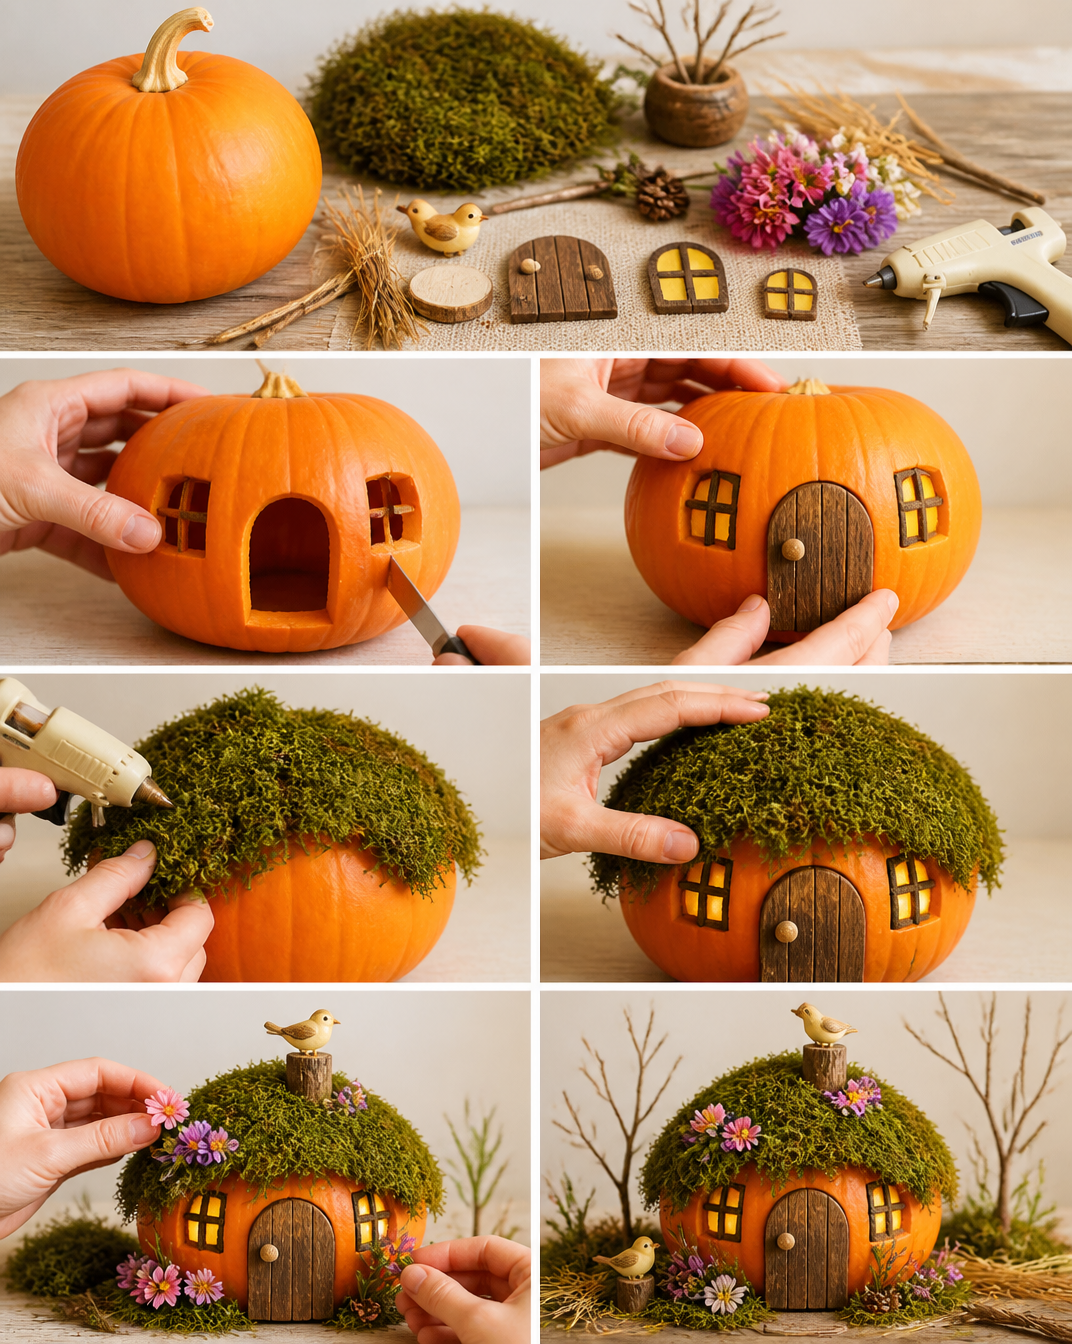
HOW TO MAKE Pumpkin Fairy House
Step 1: Wash and Dry the Pumpkin
Start by washing your pumpkin thoroughly to remove any dirt or debris. Once clean, dry it carefully to prepare for crafting.
Step 2: Create the Door
Use wire snips to cut twigs to the desired lengths. Once they are ready, glue them together to form a door on the front of the pumpkin.
Step 3: Build Stairs
Select wood slices and glue them in a stair formation leading up to your door. This will give access to your fairy house.
Step 4: Add Windows
Cut shapes from yellow card stock to create windows. You can frame them with extra twigs and glue them onto the pumpkin.
Step 5: Make a Roof with Moss
Cover the top of the pumpkin with moss to mimic a natural roof. Secure it down with glue if necessary.
Step 6: Prepare the Base
Cut a piece of foam core board to serve as the base for your fairy house. Make sure the pumpkin sits securely on it.
Step 7: Create a Pebble Path
Using glue, lay pebbles in a random pattern to create a pathway leading up to the entrance of your fairy house.
Step 8: Cover with Moss
Cover the rest of the base (excluding where the pumpkin sits) with moss for a lush look.
Step 9: Seal the Pebbles
Once the pebble path is complete, use Mod Podge to coat it. Allow it to dry overnight for a secure finish.
Step 10: Add Decorative Details
Use pinecones for trees around your fairy house. Create corn stalks from raffia and twine, place painted toadstools made from Styrofoam balls, and toothpicks nearby.
Step 11: Finish with Miniature Birds
Glue miniature birds to your clay pot birdbath or strategically around the pumpkin to add charm.
TIPS AND TRICKS
- Choosing materials: Collect natural elements like twigs and moss from your backyard or local park to keep costs low.
- Cutting and gluing: Ensure that your twigs are even for a neat appearance. Use enough glue, but avoid excess, which can create messes.
- Common mistakes: Be careful not to rush; letting the glue dry properly is vital for a sturdy craft.
- Finishing touches: Layer different materials for texture and visual interest.
- Safety tips: Always be cautious with wire snips and scissors. Keep tools out of reach of children.
- Durability: If using a real pumpkin, consider sealing it with a spray to enhance its durability in displays.
VARIATIONS AND CUSTOMIZATION IDEAS
- Different colors: Paint your pumpkin, use different colors for the flower accents, or alter the mushroom colors.
- Different sizes: Create a larger pumpkin house for a bigger display or multiple small ones for a fairy village.
- Seasonal versions: Decorate according to different seasons—add snowflakes for winter or flowers for spring.
- Personalized versions: Create mini signs or decorations to represent specific themes or names.
- Patterned embellishments: Use printed card stock or decorative papers for a variety of textures and prints.
Pumpkin Fairy House FAQ
Is this Pumpkin Fairy House difficult to make?
No, it is a beginner-friendly craft, with straightforward steps. There is no prior experience needed.
What materials do I need for this project?
You’ll need a pumpkin (real or faux), twigs, moss, twine, pebbles, and other decorative items such as miniature birds and flowers. A full materials list is included above.
How long does it take to make the Pumpkin Fairy House?
The project can typically be completed in 2-3 hours, depending on the drying time for glue and paints.
Can I display this project outside?
If you use a real pumpkin, it might last a few days outside, depending on the weather. For longevity, display indoors or use a faux pumpkin.
How do I clean or store my Pumpkin Fairy House?
If you used a real pumpkin, any remnants may need removal after a couple of weeks. For faux materials, simply dust off any dirt and store them in a cool, dry place for future use.
CONCLUSION
Creating a Pumpkin Fairy House is an enjoyable and engaging DIY craft that combines creativity with the charm of autumn. This project is not only easy to make but also perfect for adding a unique touch to your home decor while being highly customizable. It can serve as a beautiful seasonal decoration or a delightful handmade gift. I encourage you to try this simple craft and share your experience, any customizations you made, or pictures of your finished Pumpkin Fairy House. Happy crafting!