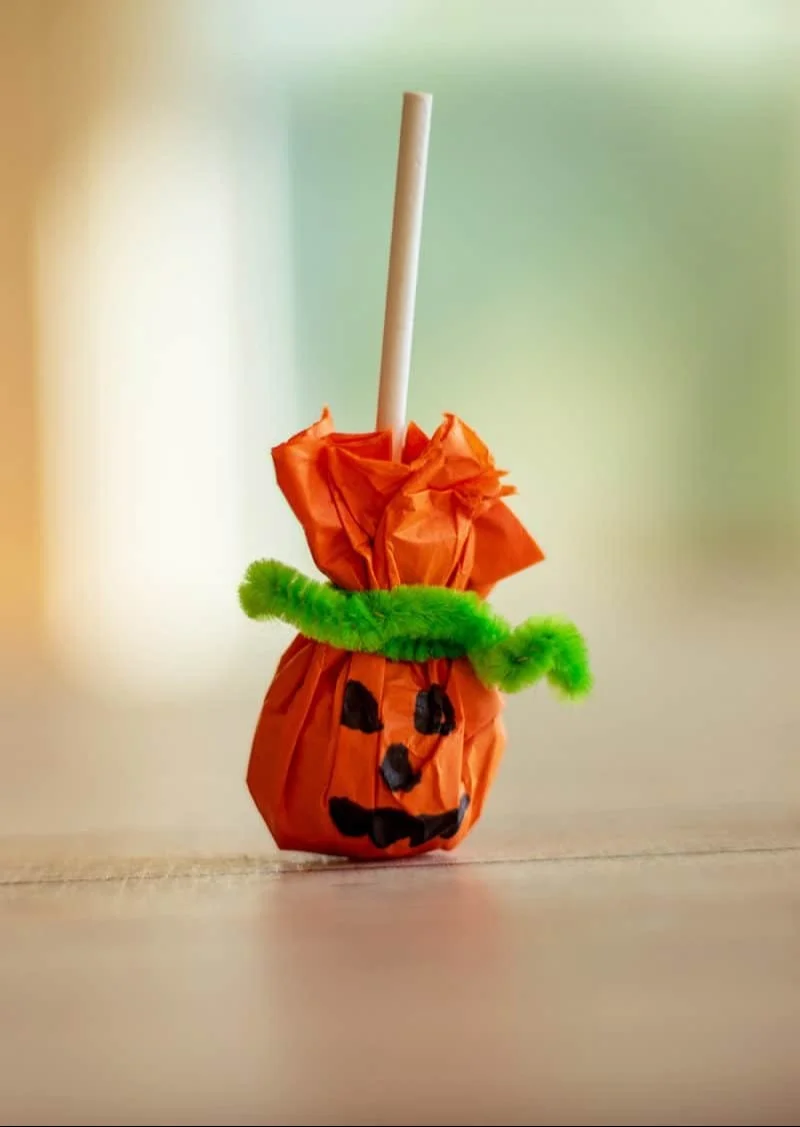
Lollipop Pumpkins are a delightful and simple DIY craft that adds a dash of festivity to any space. Perfect for the fall season, these cheerful little treats can serve as fun decorations or as unique gifts. With just a few easy-to-find materials and a little bit of time, you can create these colorful pumpkins. This beginner-friendly craft project is ideal for all ages and perfect for anyone looking for creative DIY ideas or easy crafts for adults. Whether you’re preparing for Halloween or simply want to spruce up your home decor, Lollipop Pumpkins are a great choice!
WHY YOU WILL LOVE THIS Lollipop Pumpkins
Making Lollipop Pumpkins is an enjoyable, hassle-free experience that anyone can tackle. Here are a few reasons why this project stands out:
- Easy for Beginners: This is an excellent beginner-friendly craft that requires no complex techniques.
- Uses Simple Materials: The materials needed are common and inexpensive, making it easy for anyone to start.
- Budget-Friendly: You can create several Lollipop Pumpkins without breaking the bank, making it a perfect option for budget-conscious crafters.
- Quick to Make: This project can be completed in a short amount of time, making it a great weekend or evening activity.
- Great for Home Decor: These pumpkins can brighten up your living space, adding a festive touch to your home.
- Creative and Customizable: Personalization options abound, allowing you to create unique variations to suit your style or occasion.
PROJECT DETAILS
Skill Level
This DIY project is ideal for beginners and those without prior crafting experience. The steps are straightforward, making it accessible to crafters of all ages.
Estimated Time
You can expect to spend around 30 minutes to 1 hour creating a batch of Lollipop Pumpkins, depending on how many you make.
Approximate Cost
The cost for this budget-friendly DIY craft is typically around $10 to $15, largely depending on the size of your batch and the materials you choose.
Best For
Lollipop Pumpkins are best for holiday decorations, Halloween parties, and as unique handmade gifts for friends and family.
Project Type
This project falls under the category of seasonal crafts and homemade decor, making it a versatile addition to any craft list.
TOOLS AND EQUIPMENT NEEDED
Scissors
Scissors are essential for cutting the tissue paper into squares to wrap around the lollipops.
Black Sharpie
A black Sharpie is used to draw faces on the pumpkins, allowing room for creativity and personalization.
MATERIALS
Round Lollipops
Lollipops are the base of the Lollipop Pumpkins and can be any color or flavor you like. Choose ones that have a sturdy stick.
Orange Tissue Paper
Orange tissue paper is used to create the pumpkin’s body. It provides a vibrant look and is lightweight, making it easy to work with.
Green Pipe Cleaners
Green pipe cleaners serve as the pumpkin’s vines and leaves, adding a playful touch to the finished piece.
Black Sharpie
The black Sharpie is used for drawing facial features on the pumpkins, making each one unique and fun.
Scissors
Scissors help cut the tissue paper and pipe cleaners to the necessary sizes, ensuring easy assembly without excessive waste.
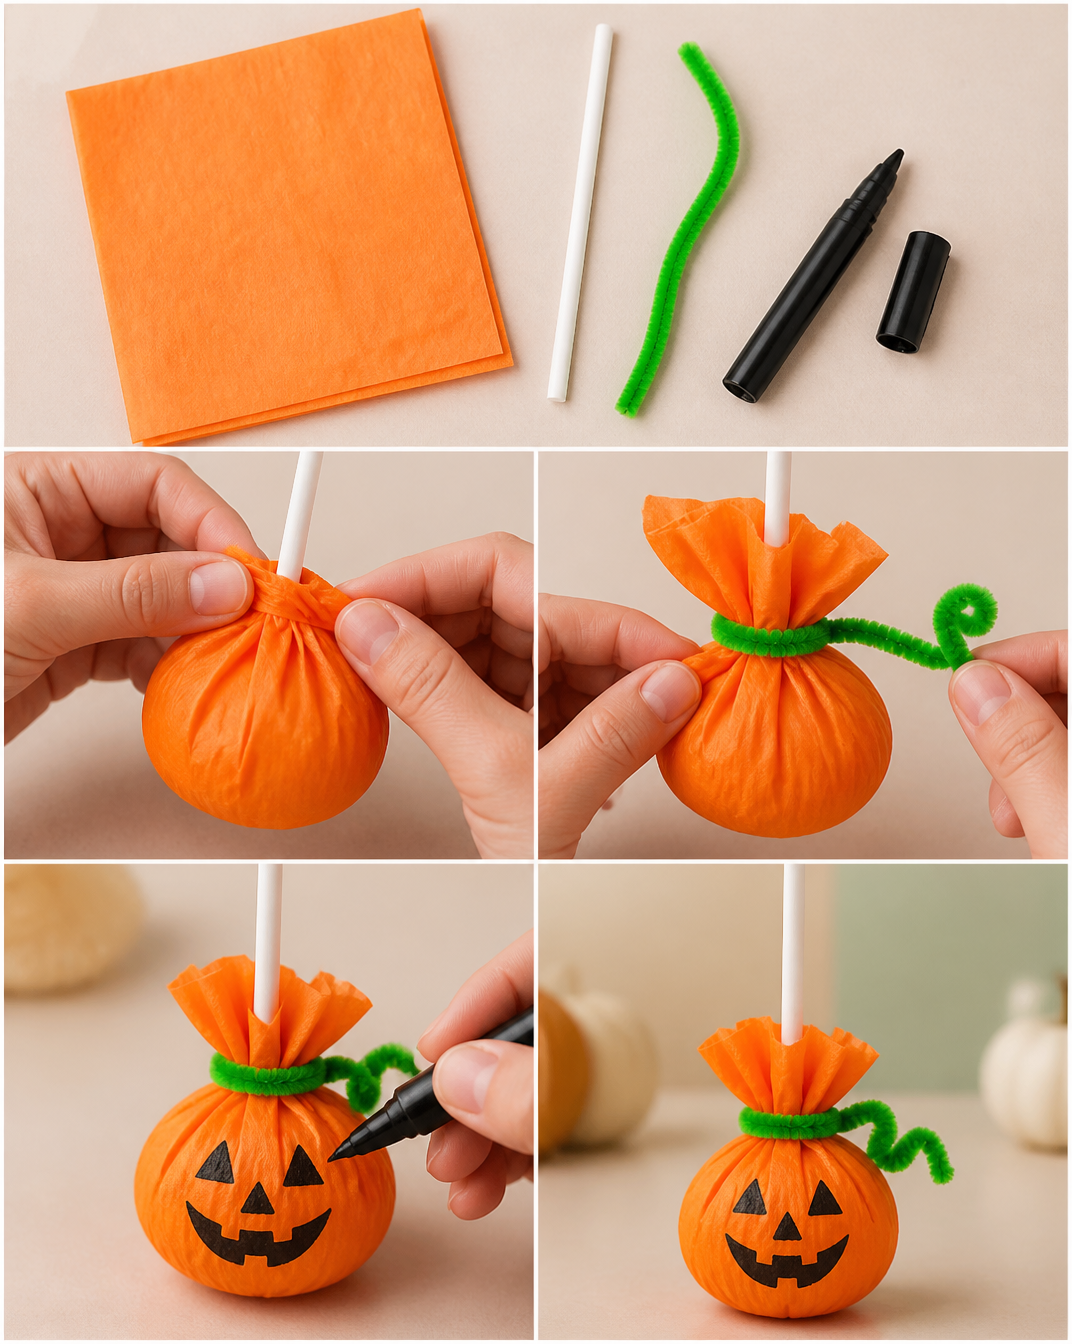
HOW TO MAKE Lollipop Pumpkins
Step 1: Cut the Tissue Paper
Begin by cutting an approximately 4-inch square of orange tissue paper. This square will wrap around the lollipop, so ensure it is large enough to cover the candy.
Step 2: Wrap the Lollipop
Take the cut tissue paper and wrap it around the top of the lollipop. Ensure that the wrapper is neat and secure it in place using a green pipe cleaner. A tight wrap will help create the pumpkin shape.
Step 3: Layering the Tissue Paper
Depending on the thickness of your tissue paper, you may need to layer a few additional squares to completely cover the lollipop wrapper. This will add depth and ensure that the orange color shines through.
Step 4: Curling the Pipe Cleaner
Once the tissue paper is secured with the pipe cleaner, cut off the excess ends, but leave a little extra to curl. The curls will represent the pumpkin’s leaves, adding to the overall look.
Step 5: Shape the Leaves
Twist the ends of the pipe cleaner to shape the leaves. You can bend them in any direction to create a natural look.
Step 6: Add Faces
Using your black Sharpie, draw eyes, a nose, and a mouth on the pumpkin. This step allows you to be creative—each face can be a reflection of your style! Repeat this process as many times as you’d like to create a vibrant collection of Lollipop Pumpkins.
TIPS AND TRICKS
- Choosing Materials: Opt for sturdy lollipops to ensure they hold up during crafting and display. If you have lollipops with colorful wrappers, consider using transparent or other colored tissue paper for a unique look.
- Cutting Tissue Paper: Use a sharp pair of scissors for clean cuts. If you are making multiple pumpkins, cut several pieces at once to save time.
- Secure Wrapping: Make sure the tissue paper wraps tightly around the lollipop to hold its shape. If it flares out, it might not resemble a pumpkin.
- Creative Designs: Encourage creativity by designing different faces on each pumpkin—some can be spooky, while others can be cute!
- Storing: Keep any unfinished Lollipop Pumpkins in a cool, dry place to prevent the candy from melting or getting damaged.
- Cleaning: As these pumpkins are made from paper and candy, avoid getting them wet. Keep them in a dry environment for best results.
VARIATIONS AND CUSTOMIZATION IDEAS
- Different Colors: While orange is traditional for pumpkins, you can also use green, yellow, or even purple tissue paper for a fun twist.
- Different Sizes: Experiment with larger or smaller lollipops if you want to create varying sizes of pumpkins.
- Seasonal Versions: Along with traditional Halloween themes, consider creating Thanksgiving versions with harvest colors.
- Different Patterns: Use patterned tissue paper (such as polka dots or stripes) to create a unique look that stands out.
- Personalized Versions: Add the names of friends or family members on the pumpkins for a personalized party favor or gift.
Lollipop Pumpkins FAQ
What materials do I need to make Lollipop Pumpkins?
You will need round lollipops, orange tissue paper, green pipe cleaners, a black Sharpie, and scissors.
How long does it take to make one Lollipop Pumpkin?
Creating a single Lollipop Pumpkin typically takes about 5 to 10 minutes, but you can make multiple pumpkins in about 30 minutes to an hour.
Are Lollipop Pumpkins suitable for children?
Yes! This is a beginner-friendly craft that can be enjoyed by children when supervised. The materials are safe and easy to handle.
How should I store my Lollipop Pumpkins?
Keep your Lollipop Pumpkins in a cool, dry place to prevent the candy from melting. It’s best not to expose them to moisture.
Can I customize my Lollipop Pumpkins?
Absolutely! You can change the tissue paper colors, draw different faces, or modify the shapes of the leaves for a more personalized look.
CONCLUSION
Lollipop Pumpkins are a simple and delightful way to get into the fall spirit. This easy DIY project requires minimal materials and time, making it perfect for beginners and seasoned crafters alike. Plus, they add a fun touch to your seasonal home decor. Whether you decide to use them for holiday gifts or as part of your festive decorations, they’re sure to bring a smile to anyone who sees them.
Give this creative DIY project a try, and don’t forget to share your experience and customization ideas. Happy crafting!