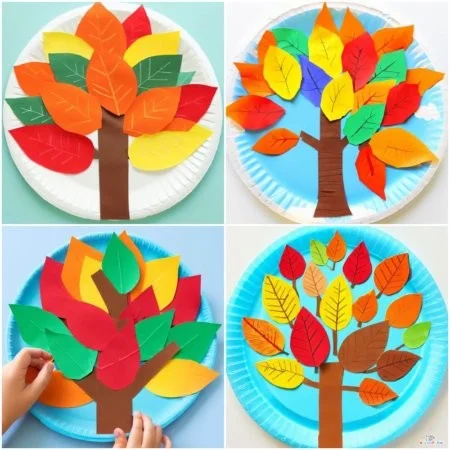
Autumn is a wonderful season to celebrate change, color, and creativity. One delightful DIY project that perfectly captures the essence of fall is the Paper Plate Autumn Tree. This easy DIY project is a fantastic way to create a vibrant piece of art that can adorn your home while also serving as a lovely gift. Suitable for both beginners and experienced crafters alike, this autumn-themed craft idea lets you engage with the beauty of the season using only simple materials you likely already have at home. Whether you’re looking for a budget-friendly craft or searching for easy crafts for adults that also double as homemade decor, this project is a great fit!
WHY YOU WILL LOVE THIS Paper Plate Autumn Tree
Creating a Paper Plate Autumn Tree is an enjoyable experience that offers multiple benefits:
- Easy for Beginners: This simple craft requires no special skills or advanced techniques, making it perfect for newcomers.
- Uses Simple Materials: The materials are easy to find and often inexpensive, making it a low-cost project.
- Budget-Friendly: You can complete this DIY project with supplies you might already have, keeping costs down.
- Quick to Make: The steps are straightforward, and you can easily complete this in under an hour.
- Great for Home Decor: Once finished, your autumn tree can beautify any room in your home.
- Perfect for Gifts: This handmade creation can make a heartfelt gift for friends or family.
- Seasonal Decorating: It’s an ideal piece for fall-themed decorations, celebrating the vibrant colors that the season brings.
- Easy to Customize: You can change the colors and sizes to fit your style preferences or seasonal needs.
PROJECT DETAILS
Skill Level
Beginner-friendly. This craft is great for those who may be new to DIY projects or want a stress-free experience.
Estimated Time
Approximately 30 to 60 minutes, depending on your speed and how detailed you want to be with your design.
Approximate Cost
$5 to $10, depending on whether you need to purchase any materials. Most items are budget-friendly and can be found at local stores or craft shops.
Best For
This project is suitable for family activities, school projects, holiday decorating, or as a thoughtful, handmade gift.
Project Type
A one-of-a-kind handmade art piece that can be enjoyed year-round but is particularly suited for the autumn season.
TOOLS AND EQUIPMENT NEEDED
Scissors
A basic tool required for cutting out the tree trunk, leaves, and any decorative elements from paper.
Glue or Glue Stick
Essential for adhering different parts of your craft together, ensuring the leaves stay attached to the branches.
Pencil
Used for marking out shapes on paper, allowing you to plan your design before cutting.
Colored Markers or Crayons
These are useful for adding finishing touches or detailing to your leaves and tree trunk, enhancing the overall aesthetic of your finished project.
MATERIALS
Paper Plate
The main component of your craft serves as the base for your autumn tree and will be painted to represent the sky.
Blue Paint
Used to create a bright and cheerful backdrop on the paper plate, representing the fall sky.
Brown Construction Paper or Cardstock
This will be cut into strips for the tree trunk and branches, offering a realistic texture that mimics a real tree.
Yellow Construction Paper
Utilized for creating bright, sunny leaves that bring a touch of cheer to your autumn tree.
Orange Construction Paper
A staple in fall themes, this paper will add a warm hue, complementing the other colors used in the project.
Red Construction Paper
Adds an exciting splash of color for vibrant foliage.
Green Construction Paper
While less traditional for autumn leaves, it can add variation and freshness to your design.
Colored Markers or Crayons
These will be used to add details such as veins in the leaves or additional design elements on your trunk.
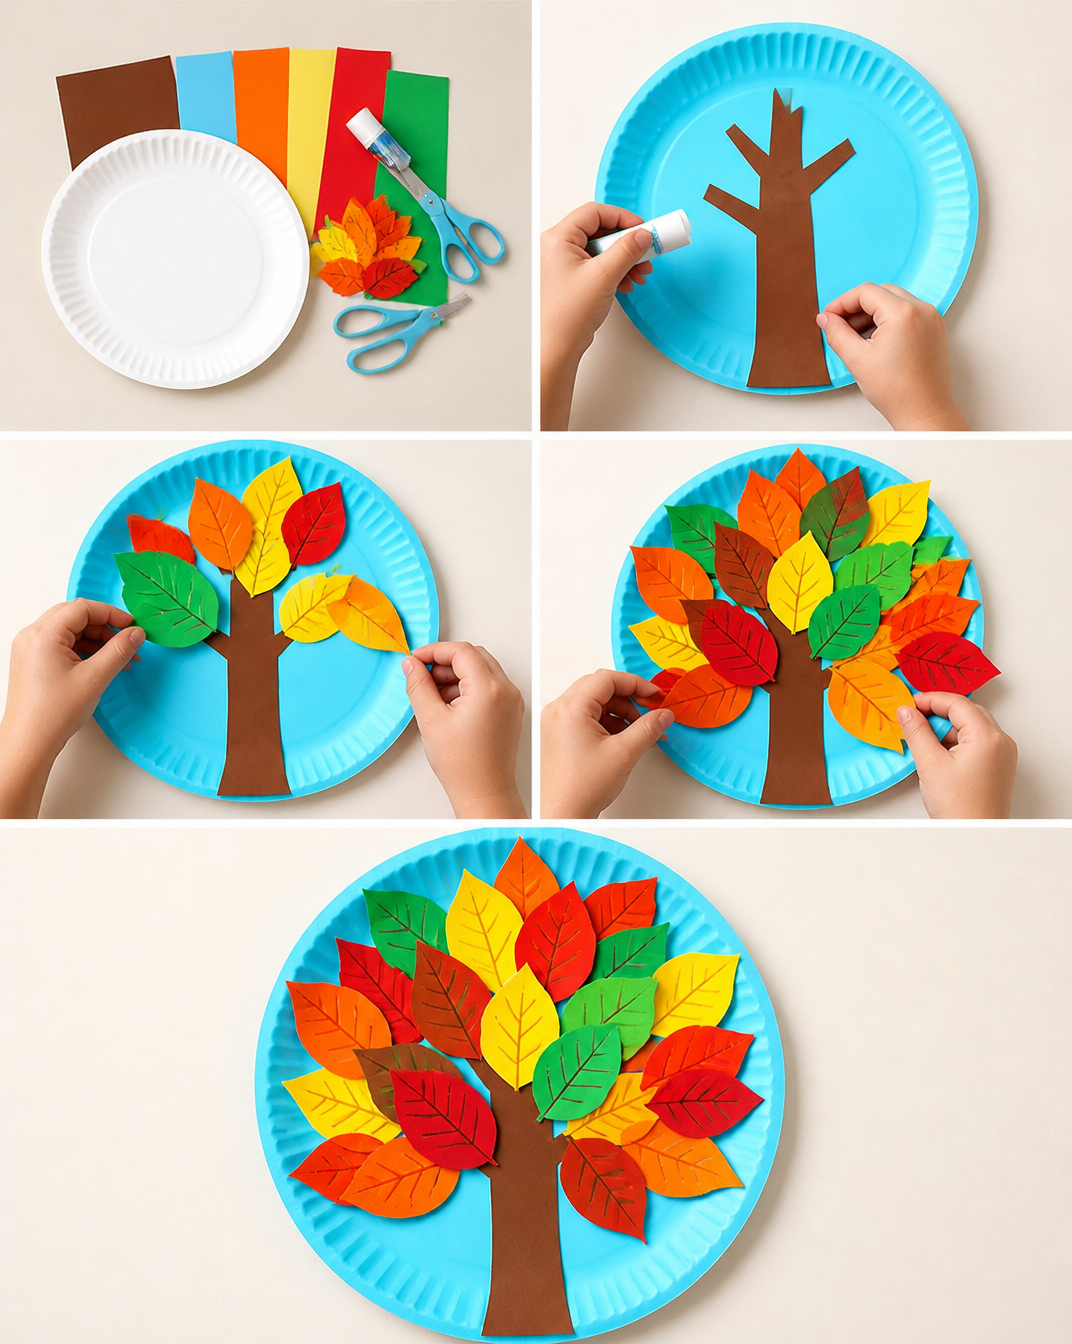
HOW TO MAKE Paper Plate Autumn Tree
Step 1: Prepare Materials
Start by gathering all your materials on a clean, flat workspace. This helps ensure that everything is easy to access and organized before you begin crafting.
Step 2: Paint the Paper Plate Blue
Take your blue paint and apply it evenly across the surface of the paper plate. This will serve as the sky of your autumn scene. You may additionally use green for grass at the plate’s base or create clouds using white if you wish. Let the paint dry completely before moving on to the next step.
Step 3: Create the Tree Trunk and Branches
Using the brown construction paper, cut several strips that will function as your tree trunk and branches. The trunk should be thicker and taller, while the branches can vary in size. Arrange these strips vertically on the painted plate, aligning them to create a cohesive look for your tree. Once-you’re satisfied with the arrangement, secure them in place with glue.
Step 4: Make the Paper Leaves
On your yellow, orange, red, and green construction paper, draw different leaf shapes with a pencil. Be creative with the sizes and forms! Once you finish drawing, cut them out carefully. If you want to personalize them, use colored markers or crayons to add details such as leaf veins or outlines.
Step 5: Arrange and Glue Leaves
Lay out your leaves around the branches you created in Step 3. Experiment with the placement until you find a configuration you love. Then, glue each leaf down securely. This will create a layered and colorful look, bursting with the beauty of autumn.
Step 6: Display or Share
Once your Paper Plate Autumn Tree is complete, allow any remaining glue to dry. Now it’s time to decide where to display your creation. You can hang it on your wall, place it on a shelf, or even give it as a thoughtful gift.
TIPS AND TRICKS
- Choosing Materials: Use what you have at home to save money. Old newspapers, magazines, or even fabric scraps can be used to substitute the colored papers.
- Cutting Techniques: Take your time while cutting out leaves and strips to avoid mistakes. Use child-safe scissors for kids, ensuring they are comfortable while crafting.
- Gluing Tips: A glue stick can reduce the mess. If you’re using liquid glue, apply it sparingly to avoid dripping.
- Painting Technique: If painting the plate, you might want to do so outside or on a covered surface to avoid getting paint on your workspace.
- Avoiding Mistakes: Plan your layout before gluing. This way, you can adjust your design without making permanent mistakes.
- Saving Money: Repurpose items from around your house. This craft can take on new life with leftover craft supplies.
- Durability: The colors can fade over time if displayed in direct sunlight. Consider placing your tree in a less sunlit area to preserve vibrancy.
- Working Safely: Always supervise children, especially when using scissors or glue.
VARIATIONS AND CUSTOMIZATION IDEAS
- Different Colors: Feel free to use different autumn colors or even add more shades to represent various stages of leaves throughout the season.
- Different Sizes: Experiment with larger plates or smaller paper circles to create mini trees. They can be grouped together for a stunning display.
- Different Materials: Add embellishments using wire, fabric, or other recyclables to create a mixed-media tree if you want a unique twist.
- Seasonal Versions: Try creating a winter tree with snowflakes, or a spring tree with blossoms for year-round crafting fun.
- Holiday Versions: Decorate the tree for Thanksgiving by adding pumpkins or for Halloween by incorporating spooky elements.
- Patterns and Finishes: Use printed paper or textured surfaces for leaves and trunks for a more dynamic look.
- Personalized Versions: Add family names or important dates to the trunk to make it a personalized gift or decor piece.
Paper Plate Autumn Tree FAQ
How difficult is it to make a Paper Plate Autumn Tree?
This project is beginner-friendly and can be completed by people of all ages. It involves simple steps such as cutting and gluing, which are easy to grasp.
What materials do I need for this craft?
You will need a paper plate, colored construction paper, scissors, glue, and markers or crayons. Most of these materials can be found at home or easily purchased.
How long does this project take to complete?
The project can typically be finished in 30 to 60 minutes, including drying time for the paint and glue.
Can I store my Paper Plate Autumn Tree?
Yes, you can store this craft in a dry and flat place. It should be kept away from direct sunlight over long periods to maintain its color.
Are there any safety precautions I should consider?
For children, ensure that scissors are age-appropriate and that they are supervised during this craft, especially while handling glue and paint.
CONCLUSION
The Paper Plate Autumn Tree is a simple yet creative DIY project that brings the spirit of autumn into your home. Because it uses easy-to-find materials and has straightforward steps, it is perfect for beginners and offers a wonderful opportunity for families to engage in crafty fun together. Not only is this a budget-friendly craft, but it also makes for fantastic seasonal decor or a thoughtful handmade gift. So gather your supplies and unleash your creativity—use this easy craft idea to bring the beauty of fall indoors. Don’t forget to share your experience or customization ideas once you’re finished with your unique autumn tree!