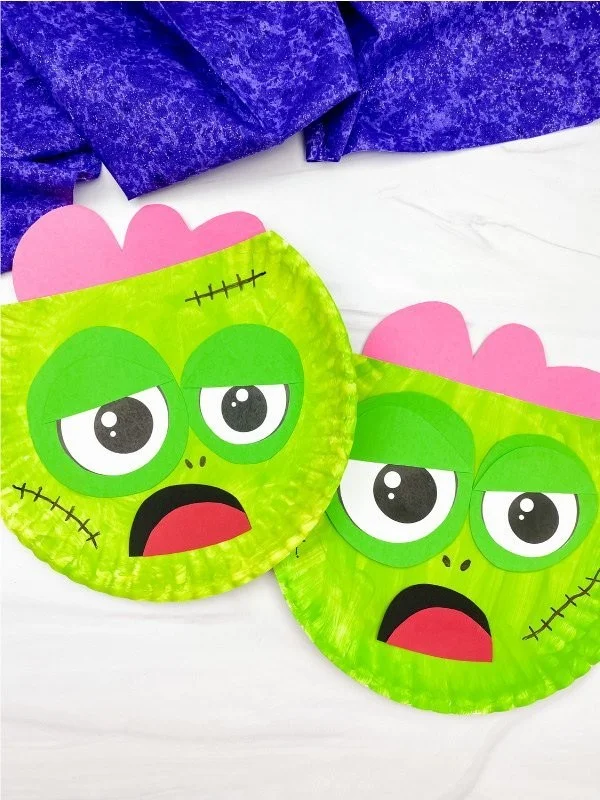
Zombie Paper Plate Craft For Kids [Free Template] is an easy and fun DIY project that kids will love. This seasonal craft is perfect for Halloween or other spooky celebrations. It uses simple materials that are usually found around the house, making it a budget-friendly, creative DIY project. With this easy craft, children can express their creativity while making unique decorations for home decor or parties. This beginner-friendly craft is designed to keep kids engaged and entertained during arts and crafts time.
WHY YOU WILL LOVE THIS Zombie Paper Plate Craft
The Zombie Paper Plate Craft is a fantastic project for many reasons:
- Easy for beginners: Even kids with no prior crafting experience can successfully create their own zombie masterpieces.
- Uses simple materials: Most materials are common household items, making it accessible for everyone.
- Budget-friendly: This craft won’t break the bank. It’s a cost-effective way to spark creativity.
- Quick to make: This easy DIY project can be completed in about an hour, making it perfect for short craft sessions.
- Great for home decor: Finished zombies can be used as decorations for Halloween parties or as fun accents in kids’ rooms.
- Easy to customize: Kids can personalize their zombies to make each one unique, enhancing their creative expression.
PROJECT DETAILS
Skill Level
This project is beginner-friendly. Kids can complete it with minimal adult supervision.
Estimated Time
Approximately 30 minutes to 1 hour, depending on how detailed the zombies are.
Approximate Cost
The cost is very low, typically around $5–$10, depending on materials already on hand.
Best For
This project is perfect for kids aged 5 and up and is ideal for group activities, home crafting sessions, or during Halloween crafting parties.
Project Type
This is a fun and creative DIY project that falls under the category of easy crafts and seasonal crafts.
TOOLS AND EQUIPMENT NEEDED
Scissors
Scissors are needed to cut the paper plates into the desired zombie shapes.
Glue
Regular white glue or a glue stick is required to adhere various features of the zombies.
Paintbrush (optional)
If you decide to use paint for details, a paintbrush can help apply paint smoothly.
Markers or Crayons
These are essential for adding details and features to the zombie like eyes and mouths.
MATERIALS
Paper Plates
These serve as the base for the zombie’s head. Their round shape is perfect for creating faces.
Green Paint
Green paint is used to give the zombies their signature undead hue.
Black Paint
Black paint is used to create various facial features like eyes and stitches.
White Paint
White paint can be used for details like teeth and eyeballs.
Googly Eyes
These add a fun and playful element to the zombie faces, making them look more comical and creative.
Construction Paper
Colored construction paper can be used for additional elements like hands or accessories.
Optional Decorations
Sequins, glitter, or stickers can be used for customizing the zombies further.
HOW TO MAKE Zombie Paper Plate Craft
Step 1: Prepare Your Plates
Start by gathering your materials. Take a paper plate and decide how you want to design your zombie.
Step 2: Paint the Base Color
Using green paint, fill in the entirety of the paper plate to give it the base color. Allow it to dry completely.
Step 3: Create Facial Features
Once dry, use black paint to create eyes, a mouth, and stitches. You can also attach googly eyes for added fun. For the mouth, make it wide to exaggerate the zombie’s expression.
![Zombie Paper Plate Craft For Kids [Free Template]](https://cdn.contai.io/public/fal-ai-generated/1787011146_6a83a04adbe68.png)
Step 4: Add Details
Use white paint for teeth and any additional details. Let everything dry.
Step 5: Attach Additional Elements
If you want to enhance your zombie, you can cut out shapes from construction paper and glue them onto the plate for accessories or hair.
Step 6: Display Your Zombie
Once everything is dry and ready, display your creations! You can hang them or use them as table decor.
TIPS AND TRICKS
- Choosing Materials: Pick non-toxic paints and materials if younger children are involved. Ensure safety by supervising closely.
- Cutting: If kids are using scissors, ensure they are child-friendly and supervised during cutting.
- Painting: Allow layers of paint to dry completely before applying another color to avoid muddy colors.
- Details: Encourage kids to get creative with features—everyone’s zombie can look different!
- Display: Consider using a string to hang them or paper clips to make a fun display.
- Storage: Keep the finished crafts in a dry place to maintain their durability throughout the season.
- Safety: Always supervise young children while crafting, especially with scissors and paints.
VARIATIONS AND CUSTOMIZATION IDEAS
- Different Colors: Use various colors for zombies—pink or purple could be silly, while blue might be spooky.
- Seasonal Versions: Change designs to fit Halloween or other celebrations by adding elements like hats or different props.
- Different Sizes: Use larger or smaller paper plates to create mini or giant zombies.
- Personalized Versions: Kids can write their names or fun phrases on the zombies for a more personal touch.
- Accessories: Explore using fabric scraps for clothing or hats for a mixed medium effect.
![Zombie Paper Plate Craft For Kids [Free Template]](https://cdn.contai.io/public/original_images/1787010952_6a839f886695e.jpg)
Zombie Paper Plate Craft FAQ
Q1: How difficult is this craft for kids?
This craft is quite easy and is perfect for beginners. Supervision is suggested for very young children, but most kids can follow the steps independently.
Q2: What materials do I need for this project?
You will need paper plates, paints (green, black, and white), googly eyes, markers or crayons, and optional construction paper for additional features.
Q3: How long does it take to make the Zombie Paper Plate Craft?
The estimated time for completing this craft is between 30 minutes to 1 hour, depending on drying time and detailing.
Q4: How do I store the finished zombies?
To store them, keep them in a dry location away from moisture. They can be placed flat in a box or hung up as decorations.
Q5: Can I make this craft for other holidays or occasions?
Absolutely! While it’s great for Halloween, kids can adapt it for any themed party or celebration by changing colors and details to suit the occasion.
CONCLUSION
The Zombie Paper Plate Craft is an enjoyable and easy DIY project for kids, combining creativity with learning. With simple materials and straightforward steps, this craft is both budget-friendly and beginner-friendly. It’s perfect for seasonal decoration, encouraging kids to unleash their imaginations. Try out this easy craft at your next family gathering or craft day—don’t forget to share your finished zombies or personalizations with others! Happy crafting!