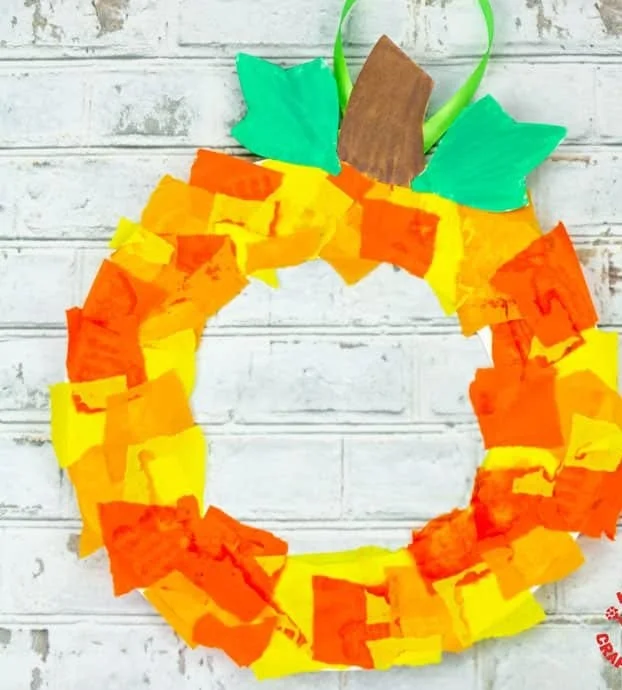
If you’re looking for an easy and fun DIY craft that brightens up your home this autumn, the Pumpkin Wreath Craft is the perfect project for you! This seasonal craft is not only budget-friendly but also a beginner-friendly craft that requires simple materials and steps. It makes for a charming piece of DIY home decor that can be displayed on doors, walls, or windows. Plus, it can be a delightful gift for friends and family during the fall season. Let’s explore how to create this easy craft idea that captures the essence of autumn!
WHY YOU WILL LOVE THIS Pumpkin Wreath Craft
You will enjoy making this Pumpkin Wreath Craft for several reasons:
- Easy for Beginners: This project features straightforward instructions, making it suitable for crafters of all skill levels. Even if you’re new to crafting, you’ll find it easy to create your very own pumpkin wreath.
- Uses Simple Materials: The materials needed are easily accessible and inexpensive, ensuring that you won’t break the bank while enjoying this creative endeavor.
- Budget-Friendly: This budget-friendly DIY project requires supplies you likely already have at home, making it great for those on a tight budget.
- Quick to Make: With an estimated crafting time of about an hour, you can create a lovely piece of DIY decor in no time.
- Great for Home Decor: This beautiful pumpkin wreath can be used as decor for your home during the fall or Halloween season, adding a festive touch to your space.
- Easy to Customize: You can personalize your wreath by using different colors of tissue paper or by adding unique elements to reflect your style.
PROJECT DETAILS
Skill Level
This project is beginner-friendly, making it easy for anyone to tackle.
Estimated Time
The project takes about 1 hour to complete, allowing you to enjoy the creative process without spending too much time.
Approximate Cost
With materials costing around $10 or less, this craft is both affordable and accessible.
Best For
This project is perfect for individuals looking to add some homemade decor to their space or for those wanting to create a thoughtful gift for friends or family.
Project Type
This is a seasonal craft ideal for autumn and Halloween.
TOOLS AND EQUIPMENT NEEDED
Scissors
You will need a good pair of scissors to cut out the middle of the paper plate and to create the leaves and stem for your pumpkin wreath.
Sticky Tape
Sticky tape will be used to secure the hanger for your wreath, ensuring it stays in place when displayed.
MATERIALS
Paper Plates
Paper plates provide the base for your wreath. The round shape is ideal for creating a pumpkin-like appearance when covered in tissue paper.
Tissue Paper (In a Range of Yellows and Oranges)
The colorful tissue paper gives the pumpkin its vibrant look. Using a variety of yellow and orange shades will make your wreath visually appealing.
White Glue
White glue acts as the adhesive for securing the tissue paper onto the paper plate, creating the pumpkin texture.
Green and Brown Marker Pens
These markers allow you to color in the leaves and the pumpkin’s stalk, adding more detail to your wreath.
Green Ribbon
The green ribbon serves as a functional and decorative hanging loop for your wreath, allowing you to easily hang it up for display.
Scissors
In addition to cutting the paper plate, you’ll also use scissors to cut out the stalk and leaves from the center of the plate.
Sticky Tape
Sticky tape helps secure the ribbon hanger at the back of the wreath.
HOW TO MAKE Pumpkin Wreath
Step 1: Cut Out the Center
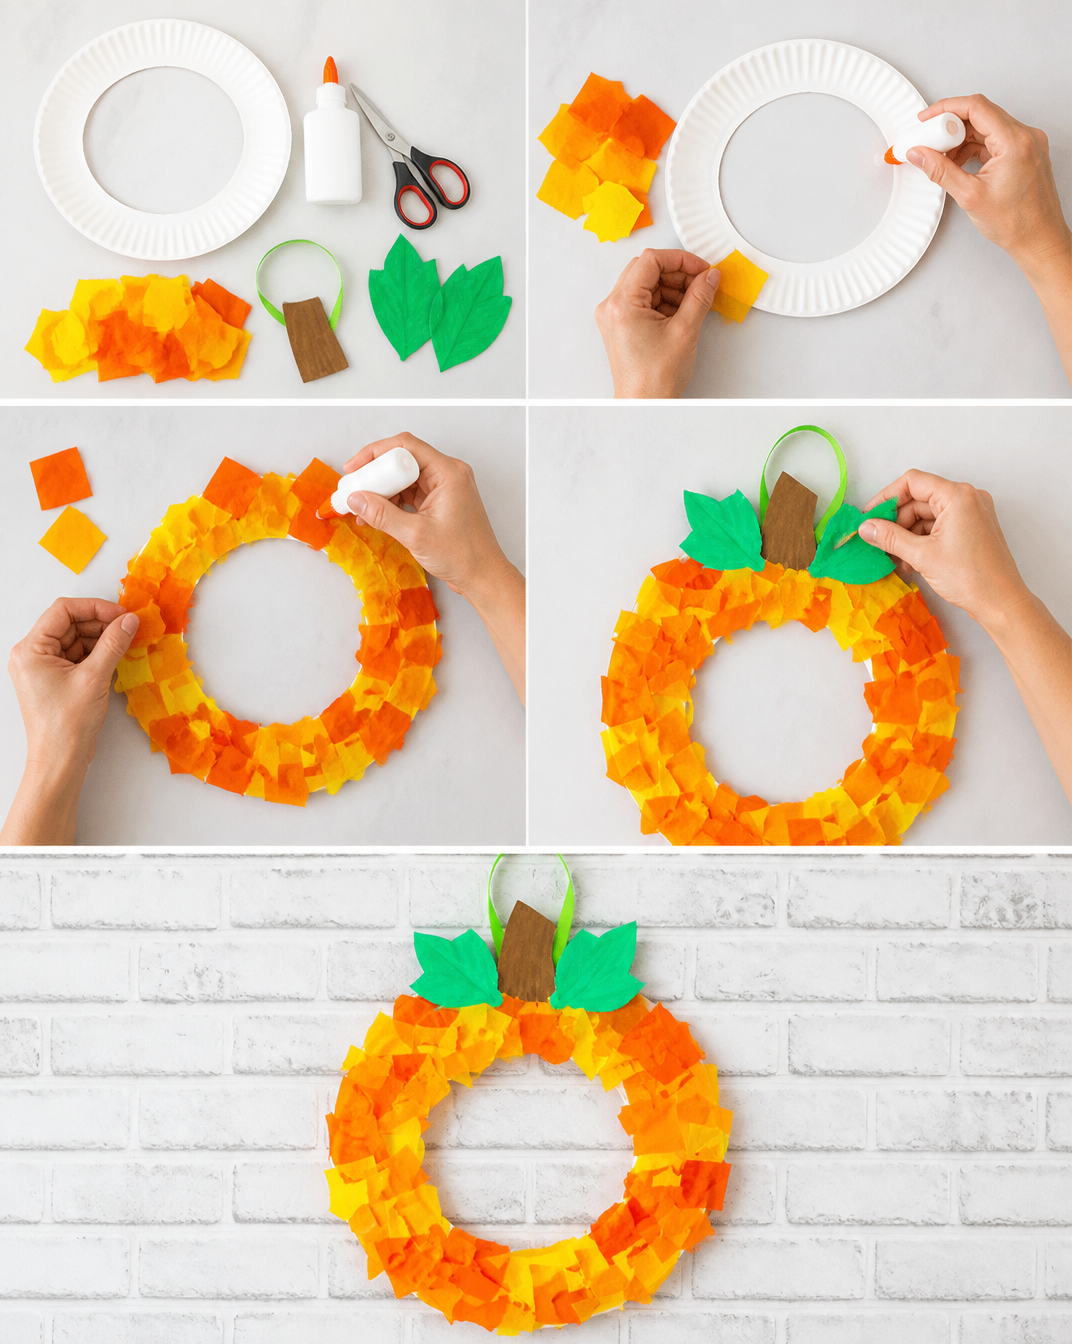
Using scissors, carefully cut the middle out of a paper plate. Be sure to keep the center piece, as you’ll use it to create the leaves and stalk later on.
Step 2: Tear Tissue Paper
Take your range of yellow and orange tissue paper and tear it into rough squares. You’ll need plenty of these for covering the plate.
Step 3: Apply Glue
Using a paintbrush or your fingers, apply a thin layer of white glue to the rim of the paper plate.
Step 4: Add Tissue Paper
Once the glue is applied, begin placing your torn tissue paper squares onto the glued areas. Press down gently to ensure they stick. Keep layering until the entire plate is covered in vibrant colors.
Step 5: Create Leaves and Stalk
Next, take the middle part of the paper plate that was cut out and cut out a couple of leaf shapes and the pumpkin stalk from it. Use your green and brown marker pens to color these pieces in.
Step 6: Attach Leaves and Stalk
Use white glue to stick the leaves and stalk at the top of your pumpkin wreath, positioning them so they look nice and balanced.
Step 7: Add Hanging Loop
Cut a short length of green ribbon and attach it to the back of the wreath using sticky tape. Make sure the ribbon is secured well so that your wreath hangs properly.
Step 8: Display Your Pumpkin Wreath
Now that you’ve completed your wreath, find a door, window, or wall to display your lovely autumn decoration!
TIPS AND TRICKS
- Choosing Materials: Opt for tissue paper that is quality and won’t rip easily. Experiment with various colors to create a unique pumpkin look.
- Cutting and Gluing: Be careful when cutting with scissors to avoid injuries. If you’re crafting with children, supervise them closely.
- Avoiding Common Mistakes: Applying too much glue may cause the tissue paper to become soggy. Stick to a thin layer for best results.
- Making the Project Easier: If you’re short on time, consider pre-cutting the tissue paper squares ahead of time.
- Getting a Better Finish: For a more polished look, try wrapping the ends of the ribbon to avoid fraying.
- Making the Craft Last Longer: Seal your wreath with a clear spray sealant to help in preserving the tissue paper and keeping it vibrant.
- Working Safely: Use safety scissors for kids, and ensure that all crafting tools are kept out of reach when not in use.
VARIATIONS AND CUSTOMIZATION IDEAS
- Different Colors: Experiment with different shades of colors like purples and reds to give your pumpkin a unique twist.
- Different Sizes: Create smaller versions of the wreath to use as table centerpieces, or go larger for a dramatic door display.
- Seasonal Versions: Consider changing the theme for other seasons! Use pastel colors for spring or festive colors for Christmas.
- Different Materials: If you have burlap, fabric, or felt, consider incorporating them for a mixed-media wreath.
- Different Patterns: Use patterned tissue paper or even paint the plate instead for a different texture.
- Personalized Versions: Add your family name or a holiday greeting onto the wreath for a customized touch.
Pumpkin Wreath Craft FAQ
Q1: How difficult is the pumpkin wreath craft?
A1: This craft is very easy and suitable for beginners. The steps are simple and quick to follow.
Q2: What materials do I need to complete this project?
A2: You will need paper plates, tissue paper in yellow and orange, white glue, green and brown marker pens, green ribbon, scissors, and sticky tape.
Q3: How long will it take to make this pumpkin wreath?
A3: The total crafting time is approximately 1 hour, making it a quick and fulfilling project.
Q4: Can I save the pumpkin wreath for next year?
A4: Yes! To prolong the life of your pumpkin wreath, store it in a cool, dry place away from bright sunlight to prevent fading.
Q5: Is this project suitable for children?
A5: Yes, this is a fun project for kids. Just be sure to supervise them while they use scissors and glue.
CONCLUSION
The Pumpkin Wreath Craft is a fantastic way to dive into seasonal crafting that is both budget-friendly and easy to accomplish. With simple materials and straightforward instructions, this creative DIY project is perfect for beginners of all ages. Not only will you create a beautiful piece of homemade decor for your home, but you can also gift it to loved ones or use it in school projects.
We encourage you to try this easy craft idea. Don’t forget to share your experience and any customization ideas you come up with! Happy crafting!