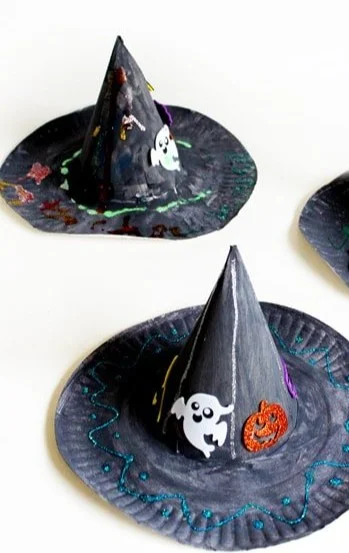
Creating a cute Paper Plate Witch Hat is an easy DIY craft that is perfect for Halloween fun! This seasonal craft for kids not only allows for creativity but also promotes fine motor skills in a playful manner. Best of all, it requires minimal materials and is budget-friendly, making it an excellent choice for beginners and families looking for simple crafts that fit well within any budget. Get ready to make this delightful witch hat with your little ones and celebrate the spooky season with some homemade decor!
WHY YOU WILL LOVE THIS Paper Plate Witch Hat
Making a Paper Plate Witch Hat is an enjoyable experience for both kids and parents. Here are some reasons why you will appreciate this craft:
- Easy for Beginners: This craft involves simple steps and requires no special skills, making it a suitable activity for kids and first-time crafters alike.
- Uses Simple Materials: You probably have most of the supplies at home, which makes this project even more accessible.
- Budget-Friendly: The cost of materials is low, meaning you can create several hats without breaking the bank.
- Quick to Make: Set aside just a bit of time, and you can have a finished hat in under an hour, perfect for those last-minute Halloween decorations.
- Great for Holidays: These whimsical hats are fantastic for Halloween parties, school events, or as part of your seasonal decorating.
- Easy to Customize: Kids can personalize their witch hats in many ways, allowing for unique creations.
PROJECT DETAILS
Skill Level
Beginner-Friendly: This craft is designed for kids and beginners, ensuring that anyone can join in the fun!
Estimated Time
30-45 minutes: It typically takes around half an hour to complete the craft, depending on how creative you and your little ones get with decorations.
Approximate Cost
$5-$10: The materials needed are inexpensive and can often be found around the home, making this a budget-friendly DIY project.
Best For
Kids and Family: This craft is perfect for children’s craft time, family gatherings, or classroom activities.
Project Type
Seasonal Craft: This project is specifically designed for Halloween, but can easily be adapted for other occasions.
TOOLS AND EQUIPMENT NEEDED
Scissors
Scissors are essential for cutting the paper plates. Ensure they are kid-friendly or supervise children when using them.
Glue
Glue is used for attaching the decorations and assembling parts of the witch hat. You can use liquid glue, glue sticks, or craft glue based on what works best for your project.
Pencil
A pencil will help you mark where to cut and guide your crafting process neatly.
Ruler
Using a ruler can help you measure and create straight lines, ensuring a neat finish.
MATERIALS
Paper Plates
These are the main material for the hat. One plate will be the base of the brim, while another will come in half for the cone part of the hat.
Black Paint or Marker
This will give your witch hat its classic color. You can also use construction paper if you prefer.
Decorations (Glitter, Stickers, Ribbons)
These materials can be used to personalize and decorate the witch hat. Let your child’s imagination run wild!
Ribbon or String
This can be used to create a strap for the hat or to add decorative elements, giving it a unique touch.
Optional Items (Foam Shapes, Eyes, Felt)
These items can add extra flair to your witch hat, making it more fun and distinctive.
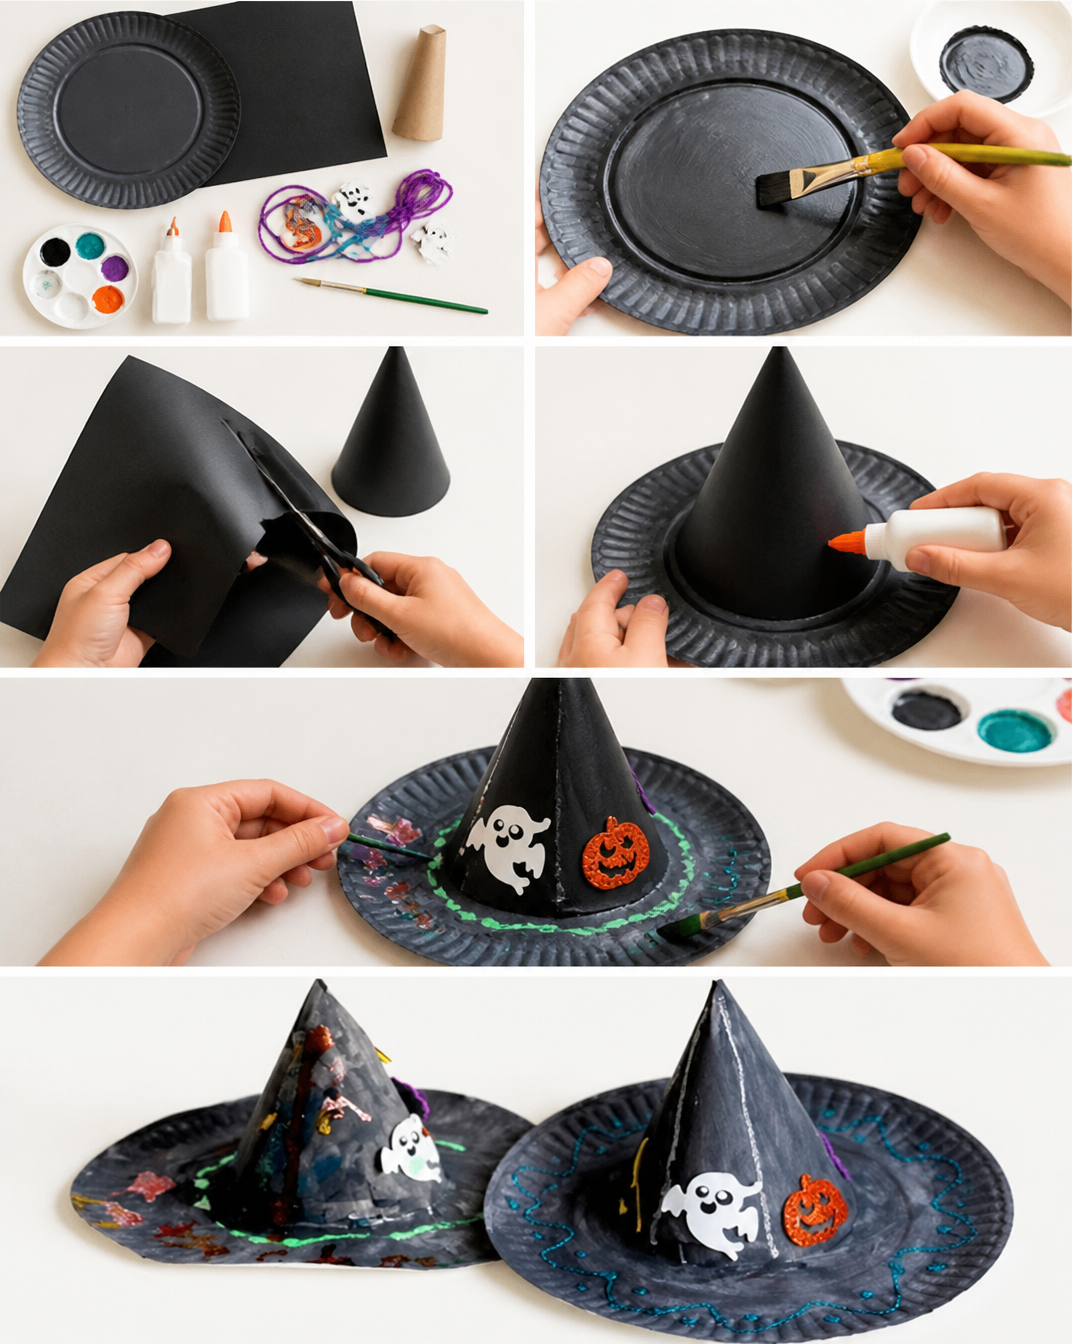
HOW TO MAKE Paper Plate Witch Hat
Follow these simple steps to create a magical Paper Plate Witch Hat:
Step 1: Prepare Your Materials
Gather all the materials and tools you will need. This will make the crafting process easier and more organized.
Step 2: Cut the Paper Plates
Take one paper plate and cut it in half. This will be used for the cone part of the hat. Then, take the second plate to be the brim. You can leave this plate whole.
Step 3: Make the Hat Cone
Form the half paper plate into a cone shape by bringing the rounded edge together and overlapping some of the flat edge. Secure it with glue or tape to hold it in place.
Step 4: Paint the Cone
Use black paint or a black marker to color the outside of your cone hat. Make sure to get an even coat for a smooth finish. Allow it to dry completely.
Step 5: Decorate the Brim
While the cone is drying, take the whole paper plate (the brim) and color it black as well. You can also leave this part unpainted and just add decorations if you prefer.
Step 6: Attach the Cone to the Brim
Once both pieces are dry, use glue to attach the point of the cone to the center of the brim. Ensure it is secure for stability.
Step 7: Add Decorations
Have fun decorating your witch hat! Use glitter, stickers, or ribbons to create spooky designs or fun patterns. Let the kids get creative!
Step 8: Add a String or Strap (Optional)
If you want the hat to be wearable, attach a string or a ribbon to the brim. Make sure it’s secure so that it won’t fall off during wear.
Step 9: Enjoy Your Witch Hat
Your Paper Plate Witch Hat is now complete! Use it for Halloween parties, school events, or just wear it around the house for some festive fun.
TIPS AND TRICKS
- Choosing Materials: Look for materials you already have at home, like old scrap paper or leftover craft supplies, to keep costs down.
- Careful Cutting: When cutting the paper plates, take your time and cut carefully to avoid uneven edges.
- Make it Last: If you plan to store the craft for future occasions, keep it in a sturdy container to prevent bending or breaking.
- Decorate with Care: Use non-toxic glue and decorations to ensure it’s kid-friendly, especially for younger children.
- Experiment: Don’t hesitate to try different color combinations or add more decorations. Each witch hat can tell a different story!
VARIATIONS AND CUSTOMIZATION IDEAS
- Different Colors: While black is traditional, try using purple, green, or orange for a fun twist.
- Add Faces: Create fun or spooky faces on your hat using craft foam or markers.
- Seasonal Versions: Adapt this craft for different holidays by changing the colors and decorations.
- Size Adjustments: Use smaller plates for mini witch hats or different sizes for various hat styles.
- Personalized Versions: Let children write their names on the hats or add custom stickers to make them unique.
Paper Plate Witch Hat FAQ
1. Is this Paper Plate Witch Hat difficult to make?
No! This project is perfect for beginners and children. The steps are straightforward, requiring no special skills.
2. What materials do I need for this project?
You’ll need paper plates, scissors, glue, black paint or markers, and any decorative items like ribbons or stickers that you wish to use.
3. How long does it take to make the witch hat?
You can complete this craft in about 30 to 45 minutes, making it a quick and satisfying DIY project.
4. Can I store this craft for the future?
Yes! If stored in a protective container, your witch hat can be reused for multiple Halloweens without losing its charm.
5. What if I don’t want to use paint?
That’s perfectly fine! You can skip the paint and use colored construction paper or even decorative scrapbook paper to make your witch hat.
CONCLUSION
Making a Paper Plate Witch Hat is a fun, easy, and budget-friendly DIY project that children of all ages can enjoy. This simple craft promotes creativity while providing an opportunity for kids to express themselves during the Halloween season. From the gathering of materials to the final brush of decoration, every step encourages imaginative play. We hope you try this project and share your experiences or unique customization ideas with others. Happy crafting!