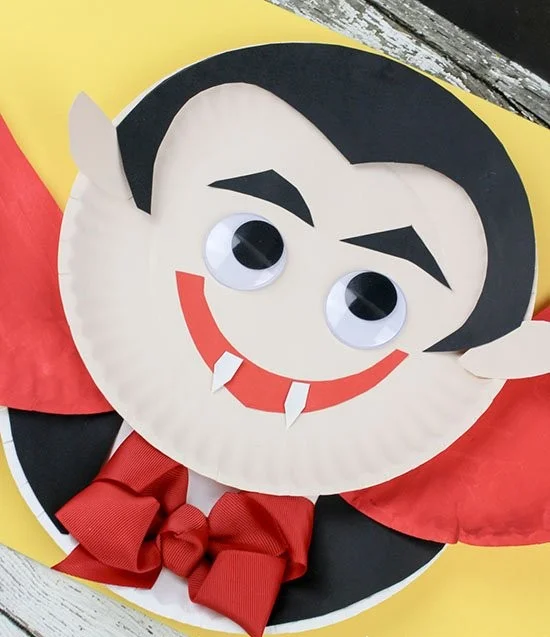
Are you looking for a fun and creative DIY craft that’s perfect for Halloween? The Darling Paper Plate Vampire Craft is an easy DIY project that both kids and adults can enjoy. With simple materials and beginner-friendly steps, this craft is the ideal way to create festive decorations for your home or a spooky-themed party. Let’s dive into how you can make your very own paper plate vampire!
WHY YOU WILL LOVE THIS Darling Paper Plate Vampire Craft
Making the Darling Paper Plate Vampire Craft is a delightful experience for several reasons.
- Easy for beginners: This craft involves straightforward steps, making it great for people who may not have much crafting experience.
- Uses simple materials: You probably have most of the required materials at home already, making this a convenient project.
- Budget-friendly: Crafting with paper plates and basic supplies is often light on the wallet, allowing you to create impressive decorations without breaking the bank.
- Quick to make: In under an hour, you can complete this vampire craft, perfect for those who want a fast DIY project.
- Great for home decor: This vampire can add a charmingly spooky touch to your Halloween decorations.
- Easy to customize: Personalize your vampire however you’d like with different colors or features for a unique touch.
PROJECT DETAILS
Skill Level
Beginner-friendly. This project is designed for all skill levels, making it accessible for everyone.
Estimated Time
Approximately 45 minutes. This includes drying time for the paint, so you can adjust your schedule accordingly.
Approximate Cost
Low-cost. Most materials come at a minimal expense, often around $10 total, depending on what you already have at home.
Best For
Families, classrooms, or individuals looking to create seasonal crafts. This project is fantastic for community events, school Halloween parties, or simple home gatherings.
Project Type
DIY home decor. This craft can serve as a fun addition to your Halloween decorations or themed parties.
TOOLS AND EQUIPMENT NEEDED
Scissors
Used for cutting the paper plates and construction paper. Make sure to use child-safe scissors if children are involved in this craft.
Paintbrush
Used to apply paint smoothly on the paper plates. If you don’t have one, you can use your fingers, although a paintbrush will help you achieve a neater finish.
Glue stick/pen
Essential for adhering the various parts of your vampire together. A glue stick is recommended for easy application without making a mess.
MATERIALS
3 Paper Plates
You’ll need three paper plates to create the vampire’s face and cape. They’re easy to work with and provide a solid base for your craft.
Black Construction Paper
This is used for the vampire’s hair and shirt details. The dark color will help to give your vampire a bold, spooky look.
White Construction Paper
Used for the eyes and fangs. It provides a nice contrast against the darker elements.
Red Construction Paper
Used for creating the mouth and cape. The vivid color will add a fun pop to your vampire.
Flesh-Colored Paint
This is used to paint the vampire’s face. It provides a neutral base that you can then embellish further.
Red Paint
Used to paint part of the vampire’s cape, adding depth and detail.
Red Bow
This little accessory can be added to make your vampire look more fun and stylish.
2 Large Googly Eyes
These eyes give your vampire a playful, cartoonish appearance. They are perfect for adding character!
Paintbrush
For applying paint to the plates and ensuring smooth coats.
Scissors
To cut the paper plates and construction paper into the necessary shapes.
Glue Stick/Pen
To attach each piece together, ensuring a secure hold for your finished vampire.
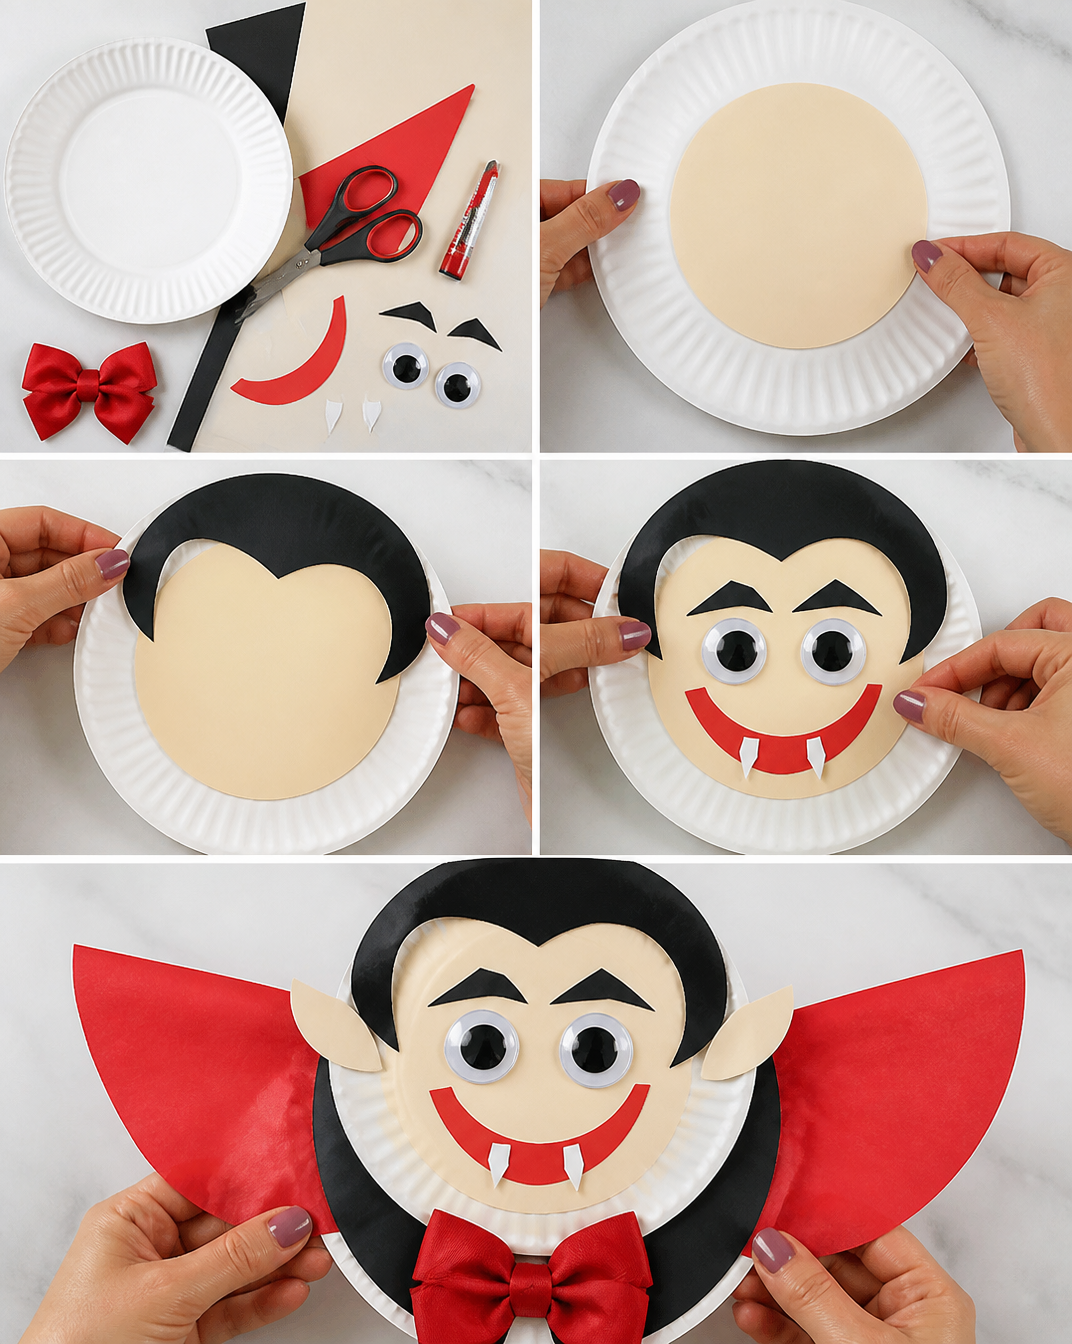
HOW TO MAKE Darling Paper Plate Vampire Craft
Now let’s get into the steps for creating your own Darling Paper Plate Vampire. Follow along for this simple craft!
Step 1: Paint the Vampire’s Face
Begin by taking one of the paper plates and painting it with the flesh-colored paint. Once painted, set it aside to dry fully.
Step 2: Create the Cape
Next, cut the second paper plate in half. Paint both halves with red paint and set them aside to dry. These will act as the vampire’s cape.
Step 3: Make the Shirt and Ears
Take the third paper plate and cut it in half. Set one half aside to create the vampire’s shirt. From the remaining half, cut out two pointy ears. Use the flesh-colored paint to paint the ears and set them aside for later.
Step 4: Cut Out the Hair
Using the black construction paper, cut out a shape for the vampire’s hair. You can trace along the diameter of a paper plate to ensure the perfect fit. Make sure it’s wide enough to cover the top of the face.
Step 5: Assemble the Face
Once the flesh-colored plate is dry, glue the black hair piece onto the top of the plate.
Step 6: Add Eyes
Apply glue to the back of the large googly eyes and adhere them to the front of the painted face. Position them where you want the eyes to go for maximum effect.
Step 7: Create Eyebrows
Cut out two long, skinny eyebrows from the black construction paper. Glue them above the googly eyes to give your vampire some expression.
Step 8: Make the Mouth
From the red construction paper, cut out a large mouth. Glue this onto the face, positioning it below the eyes.
Step 9: Craft the Fangs
From the half paper plate where the ears were cut, cut out two triangular shapes to create fangs. Glue these onto the red mouth, positioning them so they pop out.
Step 10: Attach the Ears
Carefully glue one ear on each side of the face. Position them about halfway down the plate so they look just right.
Step 11: Create the Shirt
Cut two half circles from the black paper for the vampire’s shirt. Glue one on each end of the half plate set aside for the shirt.
Step 12: Attach the Cape
Apply glue to the top ends of the shirt plate. Place the painted red cape pieces on top and press firmly for 15 seconds.
Step 13: Combine the Head and Body
Generously apply glue to the top of the shirt plate and position the vampire head at the top. Press down firmly for 15 seconds to ensure it sticks.
Step 14: Add the Bow
Finally, apply glue to the back of the red bow and place it in the middle of the shirt plate. Allow it all to dry for about 15 minutes before moving it.
TIPS AND TRICKS
- Choosing Materials: Use sturdy paper plates. They will hold up better than flimsy ones.
- Cutting and Gluing: Take your time when cutting. If you’re not confident, practice on scrap paper.
- Painting: Use a light hand when applying paint for a smooth finish. If you want extra color depth, wait for the first coat to dry before adding another.
- Avoiding Mistakes: Use a fine-tip glue pen to avoid excess glue. It will help make everything neat.
- Make It Last Longer: If you want your craft to last, consider spraying it with a clear acrylic finish for a protective coat.
- Getting a Better Finish: Test different shades of paint on scrap paper first to see what you like best.
- Safety: If children are participating, supervise them closely when handling scissors and glue.
VARIATIONS AND CUSTOMIZATION IDEAS
- Different Colors: Feel free to change the colors of the cape or the vampire’s face to unique shades.
- Seasonal Versions: Create a festive vampire with an orange cape for a fall theme.
- Different Sizes: Make mini vampires using smaller paper plates for a cute décor option.
- Patterns: Use patterned paper for the cape or shirt to add an extra layer of fun and creativity.
- Personalized Versions: Have each family member create their own vampire style, adding unique features and colors.
Darling Paper Plate Vampire Craft FAQ
Is this craft suitable for all age groups?
Yes! The Darling Paper Plate Vampire Craft is beginner-friendly and can be enjoyed by all ages, making it great for family or classroom activities.
How long does it take to complete this craft?
It typically takes about 45 minutes, including drying time. You can adjust this time if you need to wait for paint to dry.
What materials do I need to make this craft?
You will need paper plates, construction paper in various colors, paint, googly eyes, scissors, and glue. Most materials are inexpensive or can be found around the house.
How do I store the finished vampire craft?
Store your vampire in a dry place to keep it safe. If you want to ensure it lasts, avoid areas with high humidity.
Can I customize my vampire?
Absolutely! You can change the colors, add patterns, or even give your vampire unique accessories to create a one-of-a-kind piece.
CONCLUSION
The Darling Paper Plate Vampire Craft is an easy, budget-friendly, and fun DIY project perfect for Halloween. With simple materials that are often found at home, this craft is ideal for beginners and provides a delightful way to decorate for the spooky season. It’s not only a great addition to your home decor but also a fun activity for kids and adults alike. Try making it, and don’t hesitate to share your own creations or any customization ideas you come up with! Happy crafting!