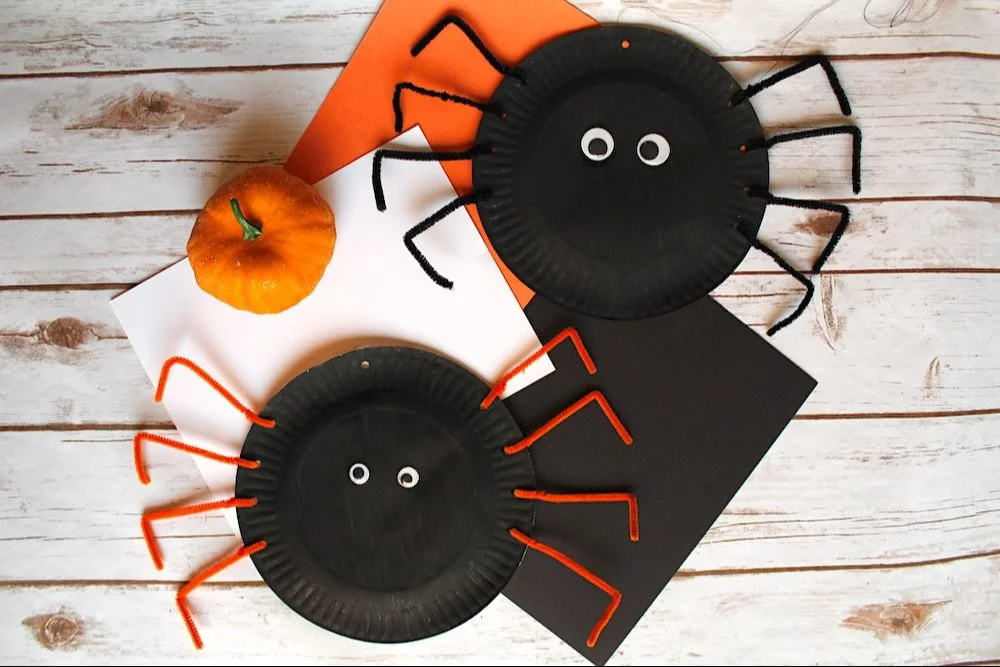
The Paper Plate Spider Craft is a fun and easy DIY project that is perfect for decorators looking to add a touch of creativity to their home or parties. This beginner-friendly craft uses simple materials that you likely already have at home. Perfect for holidays like Halloween or even just for fun, this spider craft brings a bit of whimsy to any space. Plus, it’s budget-friendly and quick to make, making it an ideal choice for a wide range of DIY enthusiasts.
WHY YOU WILL LOVE THIS Paper Plate Spider Craft
Making a Paper Plate Spider Craft is an enjoyable experience, especially for those new to the crafting world. Here’s why you’ll love this simple craft:
- Easy for Beginners: This craft is straightforward, requiring minimal skills and steps, making it a great choice if you’re just starting out.
- Uses Simple Materials: Most of the items needed are everyday household supplies, so you won’t need to make a special trip to the store.
- Budget-Friendly: All the materials are inexpensive, ensuring that you can create cute decorations without breaking the bank.
- Quick to Make: You can complete this craft in a short amount of time, making it perfect for a quick decorating session.
- Great for Home Decor: Once you finish, these paper plate spiders can hang around your home, bringing a spooky vibe, especially during the Halloween season.
- Easy to Customize: You can modify the colors, sizes, and even add extra embellishments to make your spider unique.
PROJECT DETAILS
Skill Level
Beginner – This craft is suitable for anyone, regardless of age or experience.
Estimated Time
Approximately 30-45 minutes – This includes all preparation, crafting, and drying time.
Approximate Cost
Less than $10 – The materials are inexpensive and often found around the house.
Best For
All ages – This project is family-friendly and can be enjoyed by kids and adults alike.
Project Type
DIY craft – Specifically a holiday craft, but can also serve as year-round indoor decor.
TOOLS AND EQUIPMENT NEEDED
Hole Punch
A hole punch is necessary for creating holes on the paper plates, making it easier to attach the legs.
Scissors
You will use scissors to cut the pipe cleaners to the desired length for the spider legs.
Paintbrush
A paintbrush helps in painting the underside of the paper plates, providing a smooth finish.
Newspaper
Lay down newspaper to protect your workspace from paint, ensuring easy cleanup.
MATERIALS
Paper Plates
The base of your spider, these plates will form the body and shape of your spider.
Black Paint
Used to cover the underside of the plates to give the spider a spooky look.
Paintbrushes
Essential for applying black paint evenly on the plates.
Pipe Cleaners
They will serve as the spider’s legs. Each spider requires eight legs, so choose your colors wisely!
Googly Eyes
These fun embellishments will give your spider personality and make it come to life.
Hole Punch
You’ll use this tool to create holes in the plates for attaching the legs.
Scissors
Scissors will be used to cut the pipe cleaners to length.
White School Glue
This glue will secure the googly eyes onto the spider’s body.
Black Thread or Yarn
Used to create a loop for hanging your spider.
Newspaper
First, lay down some newspaper to prevent paint from splattering on surfaces while working.
HOW TO MAKE Paper Plate Spider Craft
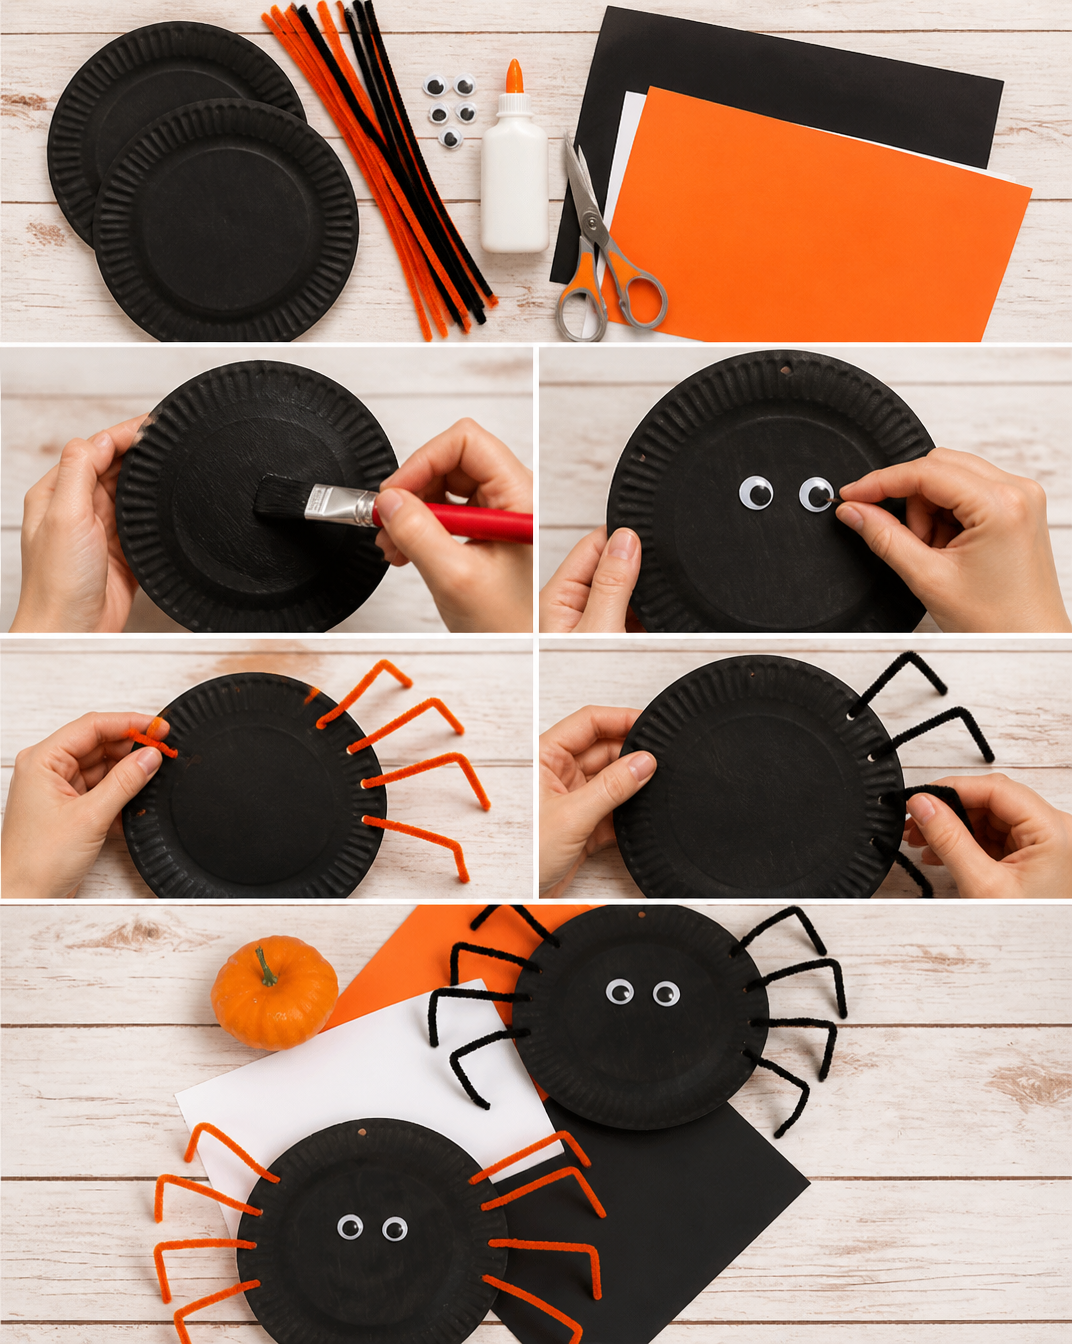
Step 1: Prepare the Holes for the Legs
Begin by using a hole punch to create four holes on each side of the paper plate. Additionally, punch one hole at the top of the plate, which will later be used for hanging your spider.
Step 2: Paint the Plates
Take the black paint and paint the underside of the paper plate. Make sure to cover it evenly. Set the painted plates aside to dry completely.
Step 3: Prepare the Spider Legs
While the plates are drying, take the pipe cleaners and cut eight equal lengths to serve as the spider legs. You can fold the pipe cleaners to make them thicker or keep them thin, depending on your style preference.
Step 4: Attach the Spider Legs
Once the paint is dry, insert the pipe cleaners into the holes you made earlier. The legs can be bent and twisted to secure them firmly and shaped to give the spider a natural appearance.
Step 5: Add the Googly Eyes
Apply a small amount of white school glue to the googly eyes and attach them to the front of your spider. Allow time for the glue to dry.
Step 6: Create a Hanging Loop
Thread a piece of black yarn through the top hole. Tie it securely to create a loop for hanging.
Step 7: Display Your Paper Plate Spider
Finally, let all the glue dry completely. Once finished, find a suitable spot to display your spooky creation!
TIPS AND TRICKS
- Choosing Materials: Look for sturdy paper plates that can withstand a bit of paint without tearing.
- Cutting and Assembling: Use sharp scissors when cutting pipe cleaners to ensure clean edges.
- Avoiding Common Mistakes: Be sure to let the paint dry completely before attaching any legs to avoid smudging.
- Getting a Better Finish: For a glossy look, consider using a coat of clear spray sealant after everything is dry.
- Making the Craft Last Longer: Store your spider in a cool, dry place to prevent deterioration, especially if it’s made in humid conditions.
- Safety Tips: Always supervise younger children when using scissors and hole punches to avoid accidents.
VARIATIONS AND CUSTOMIZATION IDEAS
- Different Colors: Instead of black, use various colors to make a vibrant spider for different seasons or events.
- Different Sizes: Create larger or smaller spiders by choosing larger or smaller paper plates.
- Seasonal Versions: Add seasonal themes, like using orange and black for Halloween or bright colors for spring.
- Different Materials: Incorporate fabric scraps or glitter to enhance the spider’s appearance.
- Personalized Versions: Add names or messages to the spiders using stickers or paint for a personalized touch.
Paper Plate Spider Craft FAQ
Q1: How difficult is this project?
This project is quite easy and is ideal for beginners or anyone looking for a simple craft.
Q2: What materials do I need for this craft?
You’ll need paper plates, black paint, paintbrushes, pipe cleaners, googly eyes, a hole punch, scissors, white school glue, black thread or yarn, and newspaper.
Q3: How long does it take to complete?
The project takes approximately 30-45 minutes, depending on drying time and your crafting speed.
Q4: How can I store my finished spiders?
Store your finished spiders in a dry, cool place, preferably in a bin or container to prevent them from gathering dust.
Q5: Is it safe for children to make this craft?
Yes, this craft is safe for children. However, adult supervision is recommended when using scissors.
CONCLUSION
The Paper Plate Spider Craft is an incredibly easy and fun DIY project that is perfect for anyone from kids to adults. With its simple materials and steps, this craft allows you to create delightful handmade decorations or gifts. Not only is it budget-friendly, but it also offers a fantastic way to express creativity, especially during the Halloween season.
So gather your supplies and give this easy craft a try! We’d love to hear about your experience, see your finished spiders, or hear any unique customization ideas you come up with. Happy crafting!