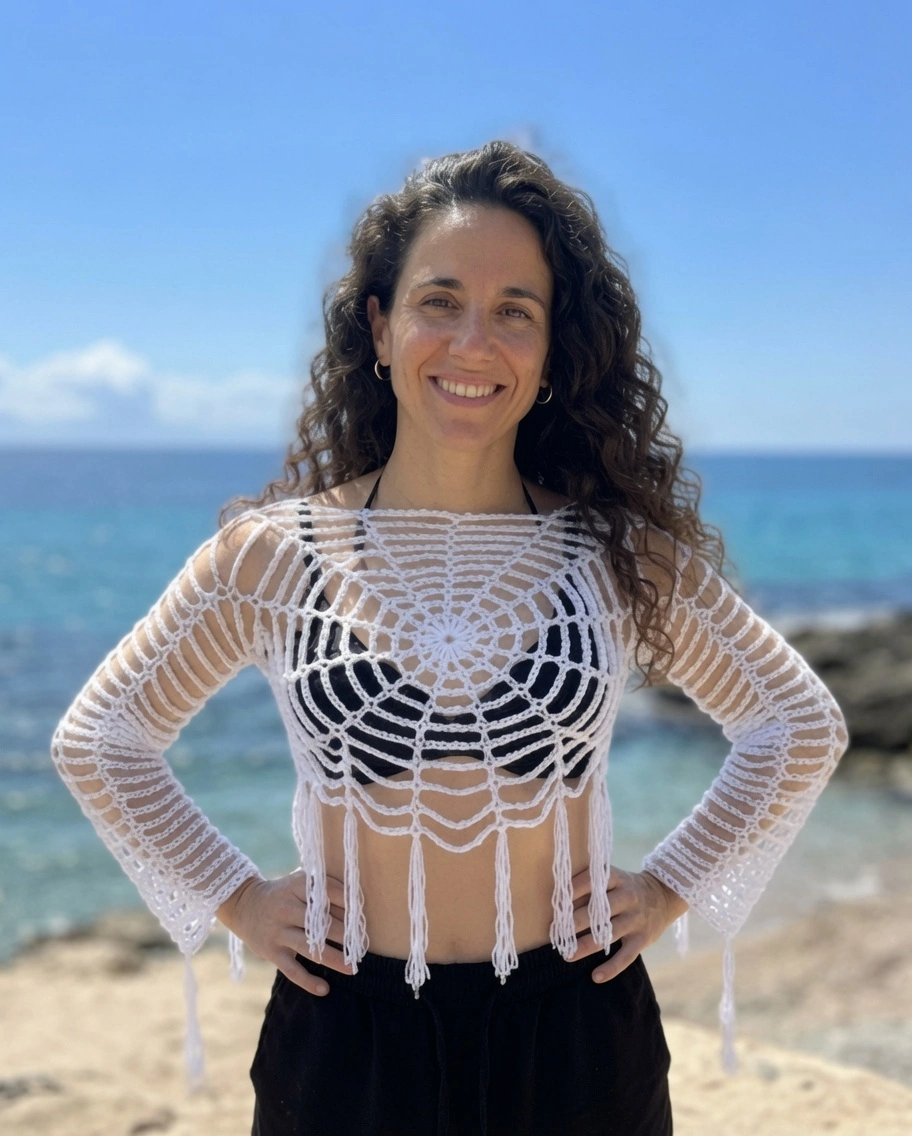
Style yourself this Halloween with a bold and breathable design that brings a touch of spooky elegance to your wardrobe. The free crochet spider web top pattern lets you create a beautiful garment that looks like a delicate spider web made from yarn. This top feels light and comfortable, making it the perfect piece for wearing on warm autumn days or dressing up for festive Halloween parties.
The beauty of this top comes from its open, lacy design that mimics real spider webs. Using simple stitches to create loops and lines, the pattern yields a delicate and stylish look. You can choose any color you like—classic black for a traditional spooky feel, bright orange for a festive touch, or soft pastels for a more gentle appearance. Because it is constructed from two simple motifs, it is a fantastic introduction to wearable crochet.
Materials Needed
- Yarn: 2 balls (50g each) of cotton yarn (or any yarn with good structure; about 100g total), color of choice
- Hook: 3.5 mm crochet hook
- Stitch Markers: At least 4
- Scissors
Abbreviations Used
- ch = chain
- sl st = slip stitch
- dc = double crochet (UK: treble crochet)
- st(s) = stitch(es)
This pattern uses USA crochet terminology
Pattern Instructions
Spiderweb Motif (Make 2)
Round 1: Start with a magic circle. Ch 3 (counts as first dc). Work a total of 16 dc into the ring (counting initial ch3 as one dc). (Tip: If circle expands, pull yarn tail tight only after all 16 dc are made.) Join to the third ch of starting ch3 with a sl st.
Round 2: Ch 3 (counts as first dc), mark third ch with stitch marker. Ch 1 (first separation chain). (Dc in next dc, ch 1) repeat around. You will have 16 dc each separated by ch 1. Join with sl st to marked third ch.
Round 3: Ch 3, mark third ch. Ch 2 (increase the separation: now ch2 between dc). (Dc in next dc, ch 2) repeat around. Join with sl st to marked ch.
Rounds 4 and Onward: Each new round begins with Ch 3, mark third ch, then ch N where N increases by 1 in every round (i.e., ch 3 then ch 3, then ch 4, and so on). (Dc in next dc, ch N) repeat around; continue increasing separation chains by 1 each round. Continue until the web reaches your desired diameter (for Viviana: up to 14 separation chains between dcs).
Last Round: Finish round as usual, join with sl st to starting marked ch-3. Do not cut yarn on the second motif; you’ll use it for joining the front and back panels.
Assembly: Joining Web Panels
Step 1: Arrange Panels Place both spiderwebs with “right sides” together (Viviana suggests the center dc posts face out as “right side”). Align edges; pair final/dc posts of each web at the same place.
Step 2: Mark Shoulders (Neck Opening) Decide on the width to leave for the opening (suggested: 4 “spaces” or arches for the neck). Use stitch markers to hold panels together at the shoulders and at sides, as guides for armhole and body seams.
Step 3: Join Tops With yarn attached to one web at the join-point, insert hook through marked dc on both webs. Sl st to join; ch 3 for height. Mark the third ch; proceed to create the first sleeve.
Sleeves
Set-Up With body assembled and sleeves openings marked, begin working in the round at armhole.
Sleeve Rounds Ch 3 (counts as first dc), mark third ch. Ch S (S equals number of chains used in the last round of your web, e.g., ch 14 for a roomy sleeve). (Dc in each dc “spoke” from edges of the joined webs, ch S) repeat around the armhole. At the base of the sleeve (underarm), alternate joining through corresponding dc of each panel. Continue the pattern as on the last round of the web: dc “spoke”, separated by ch S (keep this number constant for straight sleeves or increase for bell sleeves). Join each round with sl st to third ch. Work as many rounds as desired for sleeve length (Viviana worked 30 rounds). Repeat the whole process for the second sleeve on the other side.
Assembly & Finished Size
Fasten off all yarn, weave in all ends securely. Block gently for a tidy, open appearance. The finished t-shirt features two “spiderweb” panels joined at shoulders/sides, with sleeves grown directly onto the armholes. Fit & size: Custom—try on as you go; adapt number of rounds and sleeve length for your preferred fit.
Tips
One of the best things about this pattern is that very little precise measurement is needed before you start. You can easily try the work on as you go for a completely custom fit. Simply take a quick shoulder-to-shoulder measurement to estimate your starting web diameter, then lay the work on your chest while crocheting to adjust for width. When you reach the sleeves, keep the number of separation chains constant for straight sleeves, or continue increasing them if you prefer a dramatic, bell-sleeve look!

FAQ
Do I need to check my gauge? No, gauge is not critical for this pattern. You can easily adjust the round count to achieve your desired diameter and fit.
Can beginners make this top? This pattern is rated for confident beginners to intermediate crocheters. It requires familiarity with working in the round, increasing, and seaming, but serves as a great introduction to filet and motif construction for garments.
How do I size this top? The top is highly adaptable. Continue crocheting the circular web motifs until they reach at least your shoulder width before assembling the panels and starting the sleeves.
More Crochet Patterns to Try
- Free Crochet Witch Hat Pattern
- Mini Potion Bottle Crochet Pattern
- Easy Summer Scallop Crochet Tank Top
- Chunky Crochet Tie Top
Conclusion
Congratulations on finishing your crochet spider web top! This bold, lacy design makes a perfect statement piece for Halloween festivities. Share your finished top in the comments below!